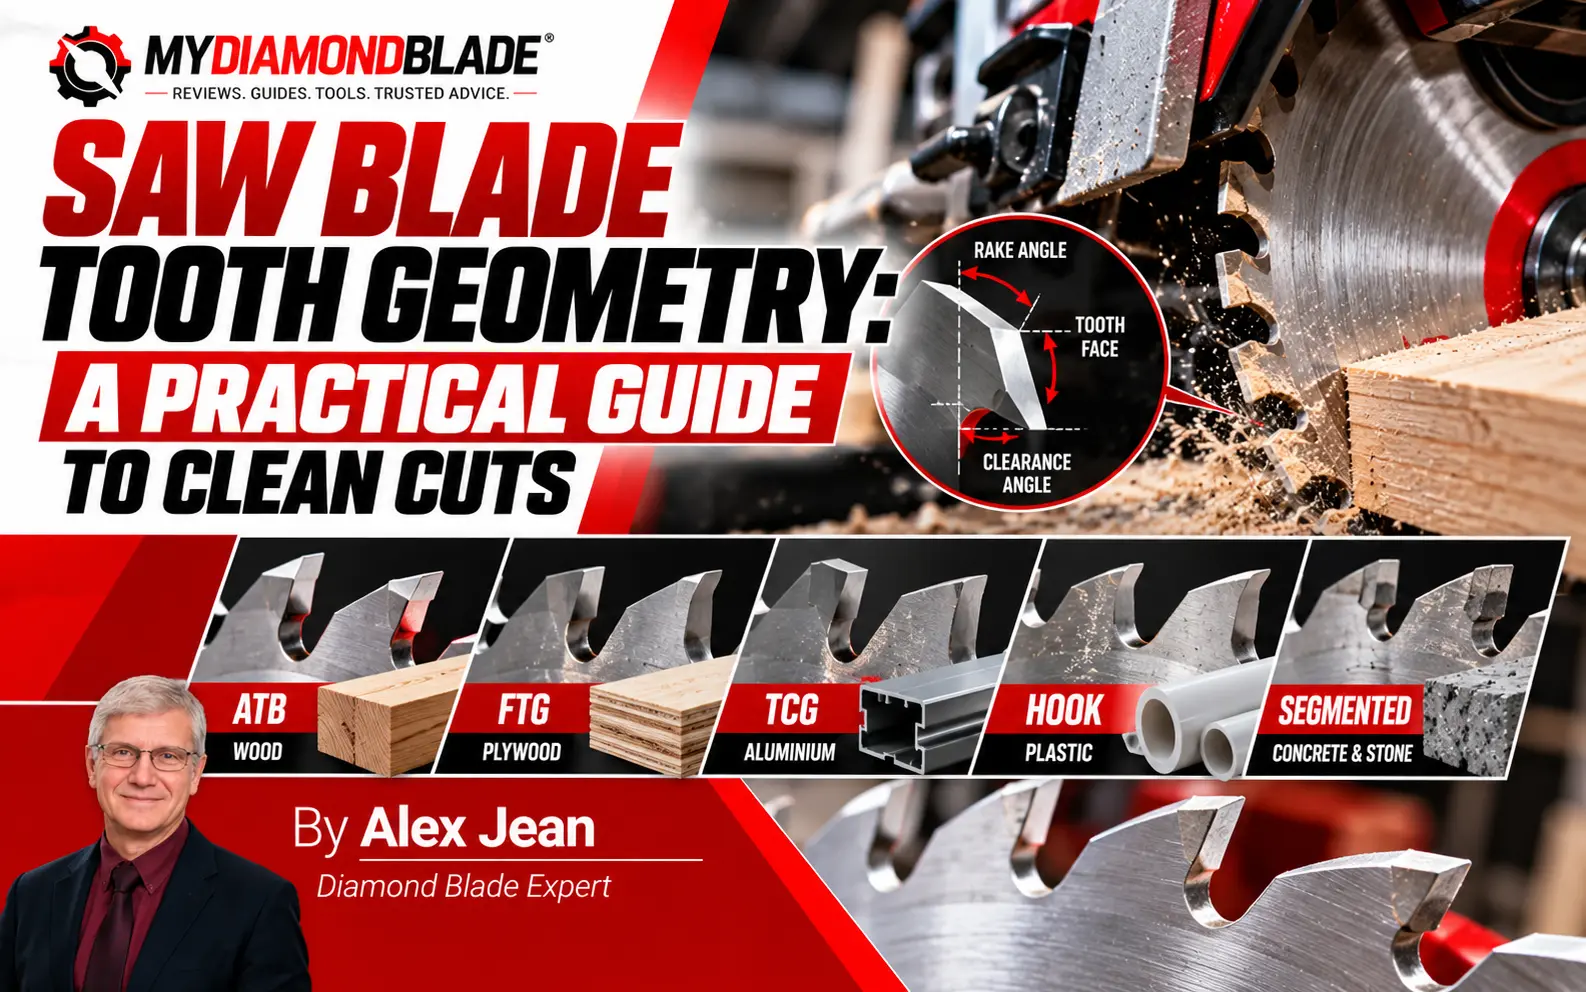
The maple panel was already scorched by the time I realized the blade’s tooth geometry was all wrong. I’d been using hand-saw tooth rules from an old woodworking book, rules that work for a backsaw but turn a table saw blade into a burnisher. Tear-out, burning and wandering cuts aren’t technique flaws; they’re symptoms of mismatched tooth geometry. Most woodworkers own a stack of blades and still guess which one to use. This saw blade selection guide ends the guesswork.
Key Takeaways
- Tear-out, burning, and wandering cuts are almost always tooth geometry problems, not technique flaws.
- Match the grind (ATB, FTG, TCG, Combination) to the material and cut type: there is no universal blade.
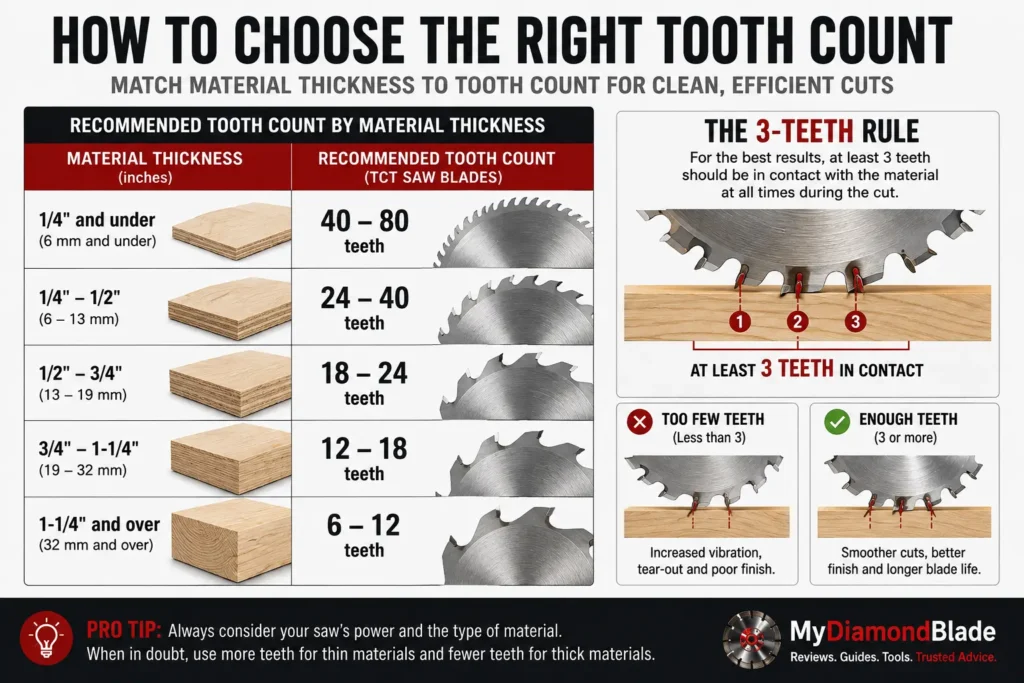
- The 3-teeth-in-the-material rule is your baseline for safety and cut quality when choosing tooth count.
- Hook angle controls aggressiveness; negative hook is mandatory for sliding miter saws and brittle materials.
- A clean, sharp blade solves most cutting problems before you need to buy a new one.
Understanding the four core tooth grinds, ATB, FTG, TCG and Combination is the fastest path to clean, accurate cuts. We’ll match specific blade recommendations to your material and saw type, based on 2026 field testing. Let’s start with the foundation the four tooth grinds that determine every cut you make.
Tooth Geometry Types Explained: ATB, FTG, TCG and Combination Grinds
Before you can fix a bad cut, you need to know what your blade’s teeth are actually doing.
What Is Tooth Geometry and Why It’s the Foundation of Every Cut
Tooth geometry, the grind, hook angle and gullet, dictates cut quality more than tooth count or brand. The grind shapes how the tooth attacks the material shearing fibers, chiseling chips or scoring a brittle surface. Hook angle controls feed rate and tear-out risk. Gullet size determines chip clearance.
Four grinds dominate the market: ATB, FTG, TCG and combination. Each solves a different problem and using the wrong one is the root of most cutting frustration.
Alternate Top Bevel (ATB)
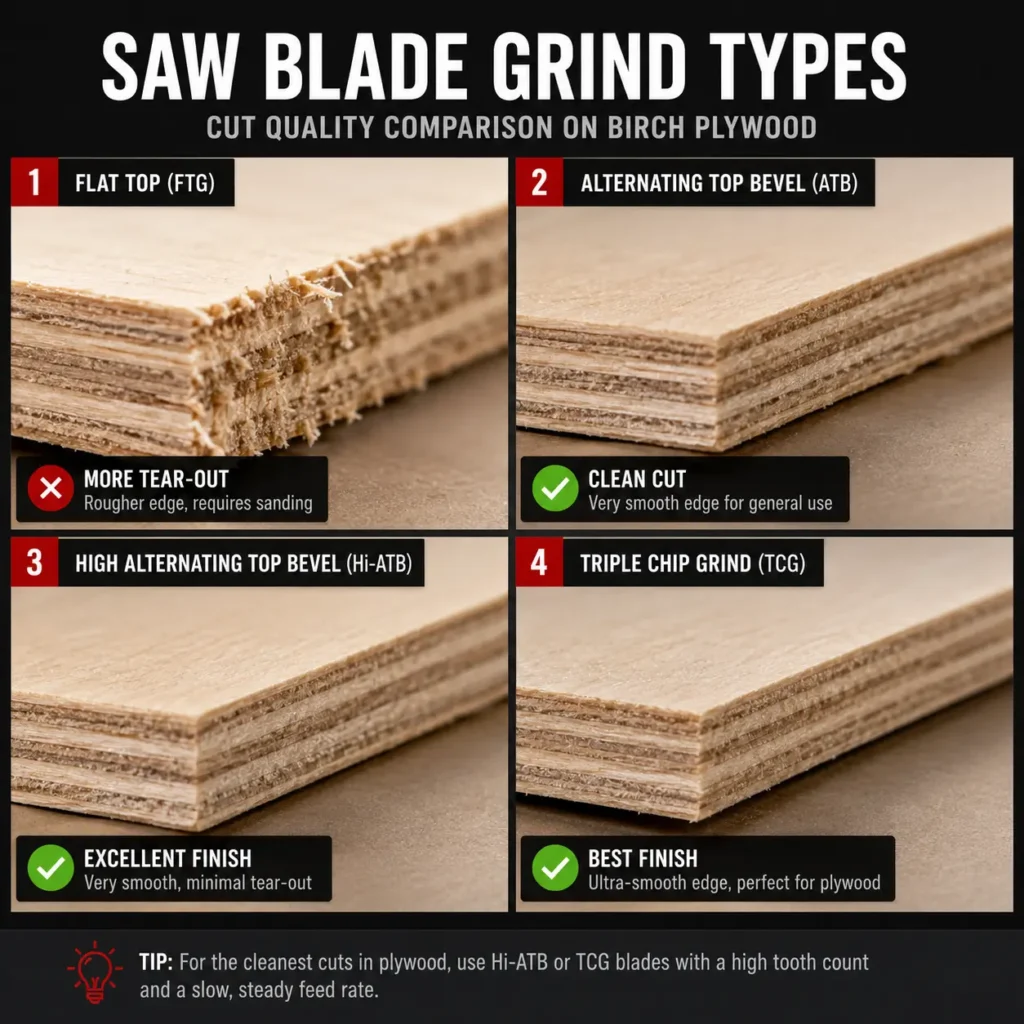
ATB teeth are beveled alternately left and right, typically 10°–20°, shearing wood fibers like a chisel for clean crosscuts and plywood cuts. The bevel slices the top veneer before the tooth body can lift it, minimizing tear-out. Hi-ATB blades push the bevel to 30°-40°, essential for fragile veneers. The trade-off ATB edges dull faster in abrasive materials and can’t clear chips efficiently in deep rips.
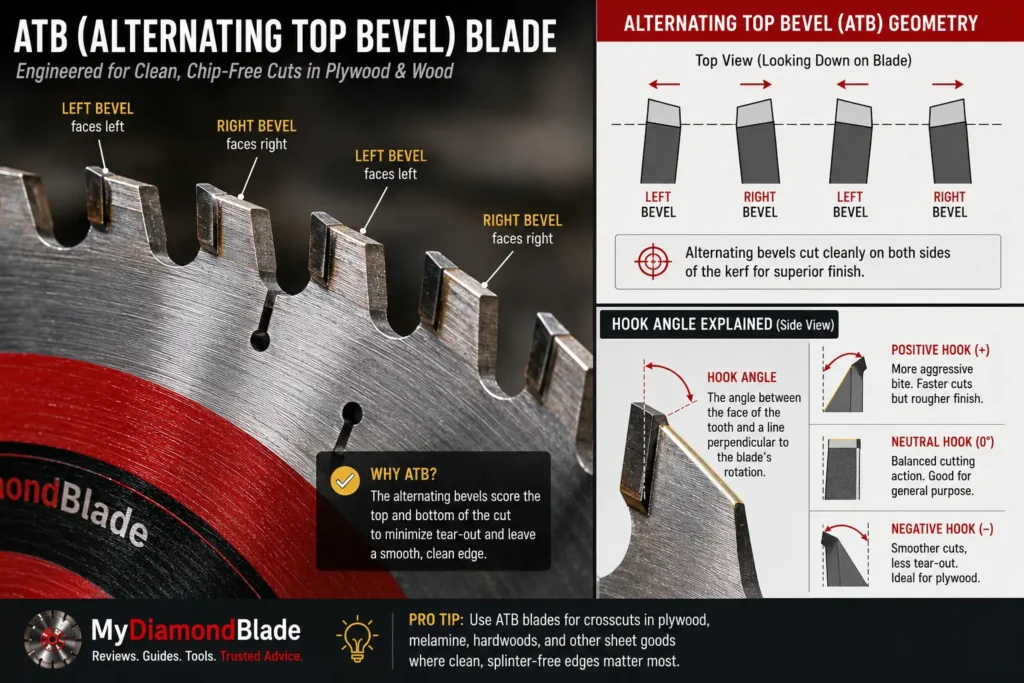
Expert Tip: For tear-out-prone plywood, a Hi-ATB blade with 80 teeth and a zero-clearance insert slices the top veneer before the tooth body can lift it.
Flat Top Grind (FTG)
FTG teeth have a flat top edge with no bevel. They cut by chiseling, not shearing, which makes them aggressive and fast in rip cuts. High positive hook angles (20°-30°) pull the workpiece into the blade, ideal for ripping thick hardwood.
But that same aggression leaves rough, splintered edges on crosscuts. Never use an FTG blade for finish work it’s a material hog, not a surgeon.
Expert Tip: If your table saw bogs down during rips, switch to a thin-kerf FTG blade: the reduced material removal and aggressive hook let an underpowered saw cut faster without stalling.
Triple Chip Grind (TCG)
TCG alternates a flat-top tooth with a chamfered tooth that has 45° bevels on its corners. The chamfered tooth scores the material first then the flat tooth clears the chip. This two-step action prevents chipping on brittle surfaces like melamine, laminate and non-ferrous metals.
TCG blades typically use a negative hook angle (0° to -5°) to slow the feed and reduce self-feeding, which is critical for safety with plastics and aluminum. The downside slower cut speed and a slightly rougher edge than a sharp ATB in wood.
Expert Tip: When cutting melamine, score the cut line with a utility knife first, then use a TCG blade with a negative hook angle to virtually eliminate chipping.
Combination Grind (ATB+R)
Combination blades group four ATB teeth followed by one flat-top raker. The ATB teeth shear the sides of the kerf, while the raker flattens the bottom, producing a flat-bottomed cut suitable for glue-line rips. It’s the best single-blade solution for mixed shop work, if you can tolerate a compromise.
We’ve never met a combination blade that truly excelled at both ripping and crosscutting. Last winter, building a cherry bookcase, we left a 40-tooth ATB+R in the saw to avoid swapping. The crosscuts in plywood were acceptable but the rip cuts in solid cherry showed faint scoring marks from the raker tooth and required more sanding than a dedicated FTG rip blade would have needed. The blade’s marketing promised “glue-line rips,” but the reality was a step above rough, not a finished edge. That’s the trade-off convenience over perfection.
The raker tooth also limits how fast you can feed, since it’s essentially a flat-top tooth that needs more power.
Now that you know the grinds, let’s see them side by side in a quick-reference table.
Tooth Geometry Comparison Table
Here’s how the grinds stack up in one place.
A mentor once pointed out that the negative hook angle on the good blade was the real secret. The steep bevel shears the veneer but the hook keeps the tooth from grabbing and lifting it. Marketing talks about the grind but the hook angle is what makes it work. That pairing is what the table below makes explicit.
| Grind Type | Hook Angle Range | Best For (Materials) | Cut Quality | Typical Applications |
|---|---|---|---|---|
| ATB (Alternate Top Bevel) | 5°–20° positive | Crosscuts in solid wood, plywood, veneered panels | Smooth crosscuts, minimal top-side tear-out; bottom side may chip without zero-clearance support | General crosscutting, miter saws, table saws for hardwood and plywood |
| Hi-ATB (High Alternate Top Bevel) | -5° to +5° | Veneered plywood, melamine, laminates | Extremely clean, virtually no tear-out on either face, even on fragile veneers | Finish carpentry, cabinet making, pre-finished panel cutting |
| FTG (Flat Top Grind) | 20°–30° positive | Ripping solid wood along the grain | Fast, rough cuts; leaves significant tear-out on crosscuts | Rip cuts in table saws, resawing, construction framing |
| TCG (Triple Chip Grind) | 0° to -10° | MDF, particle board, non-ferrous metals, plastics | Good, reduces chipping on brittle materials; not as smooth as ATB on wood | Sheet goods with abrasive content, metal cutting, solid surface |
| Combination (ATB+R) | 10°–20° positive | General purpose: ripping and crosscutting in solid wood and plywood | Good crosscuts, acceptable rips; raker tooth flattens kerf bottom for glue-ready edges | All-in-one blade for table saws, jobsite saws where blade changes are inconvenient |
Grind type is only half the equation tooth count determines how those teeth engage the material.
Tooth Count vs. Cut Speed and Finish
Fewer teeth mean bigger gullets and faster chip ejection. A 24-tooth ripping blade rips through 8/4 oak like a freight train but the edge will show saw marks. More teeth like an 80-tooth crosscut blade, leave a glass-smooth surface but demand a slower feed rate.
Push too fast and the small gullets pack with sawdust. The blade heats up and you get burn marks. That’s the tradeoff speed versus finish. The sweet spot depends on your material and what you’re willing to sand later.
Recommended Tooth Count by Material and Thickness
- 3/4″ plywood or hardwood crosscuts: 60-tooth ATB blade keeps at least three teeth engaged and delivers a clean cut.
- 3/4″ hardwood ripping: 24-tooth FTG blade clears chips fast and avoids friction burns.
- 1/2″ stock: 40-tooth combination blade balances speed and finish.
- 1/4″ plywood or veneer: 80-tooth Hi-ATB blade prevents tearout and keeps multiple teeth in the cut.
Expert Tip: Burn marks on hardwood often mean too many teeth for your feed rate: the small gullets pack with sawdust, creating friction; switch to a blade with fewer teeth or increase your feed rate.
With grind and count dialed in, let’s match blades to specific materials.
Material-Specific Blade Selection Guide
Now let’s get specific: here’s exactly which blade to grab for the material sitting on your bench.
Wood: Softwood, Hardwood, Plywood, MDF, Melamine
Softwood ripping is fast and forgiving. Use a 24-tooth FTG blade. Crosscutting, though, demands an ATB grind. A 40-tooth ATB combination blade splits the difference clean crosscuts and acceptable rips without a blade swap.
For plywood and veneered sheet goods, step up to a 60-tooth Hi-ATB blade. The steep bevel shears fragile face veneers cleanly and prevents tear-out. MDF and particleboard are abrasive. A high-tooth-count ATB or TCG blade with a wear-resistant carbide grade pays for itself in edge life.
Hardwood is where blade choice gets real. Dense species like oak and maple punish underpowered saws and thin plates.
I expected a 24-tooth FTG blade to rip oak just fine. It’s what came on the saw. The burn marks and wandering told a different story. Swapping to a 40-tooth ATB combination blade like the Forrest Woodworker II gave me glue-line rips without burning, right off the saw.
A full-kerf blade stays truer in the cut, resisting deflection that causes burning and drift.
Melamine and laminates are unforgiving. Any positive hook angle will grab the brittle surface and chip it. Use a Hi-ATB or TCG blade with a negative hook (0° to -5°) and a zero-clearance insert to support the fibers right at the cut line.
Product Recommendation: For all-around wood cutting, the Diablo D0760A 60-tooth ATB thin-kerf blade handles crosscuts and light rips; for premium glue-line rips and crosscuts, the Forrest WW10407125 Woodworker II is the top choice.
Metal: Steel, Aluminum and Other Non-Ferrous Metals
Never put a wood blade on metal. Steel demands a dedicated carbide-tipped blade with a TCG grind and a negative hook angle. The Milwaukee 48-40-4515, a 5-3/8″ 30-tooth TCG blade, cuts steel studs and conduit cleanly and lasts far longer than an abrasive wheel. Clamp the work securely and feed slowly. The blade does the work.
For aluminum, use a TCG or modified ATB blade with a negative hook. Apply stick wax or light cutting fluid to prevent chips from welding to the teeth. Thin-kerf blades reduce the load on smaller saws, but a full-kerf blade runs cooler in thick stock.
Expert Tip: Never use a positive-hook blade on a sliding miter saw for metal or plastic. The aggressive feed can grab and shatter the material. Always use a negative-hook blade.
Product Recommendation: For occasional metal cutting, the Milwaukee 48-40-4515 TCG blade is a safer, longer-lasting alternative to abrasive wheels; for fiber cement, the Oldham VCTC140B PCD blade is purpose-built and affordable.
Plastic and Fiber Cement
Plastic melts if heat builds up. A TCG or modified ATB blade with a negative hook and low tooth count (24–30 teeth) clears chips fast and resists self-feeding. Slow your feed rate and use a blade with expansion slots to dissipate heat. Acrylic and polycarbonate demand a zero or negative hook to prevent grabbing.
Fiber cement is brutally abrasive. A standard carbide blade dulls in a few cuts. The Oldham VCTC140B uses a 4-tooth PCD-tipped FTG grind that withstands the material and cuts with minimal dust when paired with a good vac. Always wear a respirator. Silica dust is no joke.
Even the right blade can misbehave. Next, we’ll diagnose the five most common cutting problems and fix them fast.
Common Cutting Problems and Solutions
You’ve matched the blade to the material, but the cut still isn’t right. Let’s troubleshoot.
Problem: Burn Marks on Wood
Burn marks? Too many teeth for your feed rate, or a dirty blade. On a cherry bookcase last winter, I swapped to a lower tooth count and cleaned the pitch burn gone. Reduce tooth count, increase feed or clean the blade.
Expert Tip: If burn marks appear only on one side, your fence is likely toeing into the blade; realign it so the back of the blade is a few thousandths of an inch farther from the fence than the front.
Problem: Tear-Out on Plywood or Veneer
Tear-out demands a Hi-ATB grind and a zero-clearance insert. Keep the good face up and consider a scoring cut.
Problem: Rough, Wavy Edges on Rips
Rough, wavy rips? Blade deflection. Add a stiffener, switch to a full-kerf or combination blade and ease up on the feed.
Problem: Blade Wandering Off the Cut Line
Blade wandering? Check arbor runout and blade flatness first. Then square the fence and add a stiffener for thin-kerf blades.
Problem: Excessive Blade Dulling
Excessive dulling? You’re probably using the wrong blade for the material. Match the blade to the stock, clean it regularly, don’t force the cut and replace when carbide chips.
Two specs that quietly cause most of these problems hook angle and kerf. Let’s pull them into the light.
Hook Angle and Kerf: The Overlooked Specs
Hook angle and kerf are the specs most woodworkers ignore, until they cause a kickback or a ruined glue line. These two numbers on the blade’s label dictate how the saw behaves in your hands and whether the cut comes out straight.
Hook Angle: Aggressiveness vs. Control
Hook angle is the forward or backward lean of the tooth face. A positive hook (5°–30°) pulls the blade into the cut aggressively, great for ripping on a table saw, but it can grab and climb on a sliding miter saw. Negative hook (0° to -5°) resists self-feeding, so you control the feed rate.
That’s non-negotiable for sliding miter saws. A positive-hook blade will ride up the material and throw it back at you.
Expert Tip: If your circular saw tries to climb the workpiece, switch to a blade with a negative hook angle (0° to -5°) to resist self-feeding and maintain control.
Zero hook sits in the middle, but for most handheld and sliding saws, negative is the safer default.
Kerf: Thin vs. Full Kerf
Kerf is the width of the cut. Thin-kerf blades measure about 3/32″ (0.090″–0.100″) and reduce motor load by roughly 25%, which keeps underpowered saws from bogging down. The tradeoff: they deflect more easily in dense hardwoods, leading to wander and burn.
Full-kerf blades (~1/8″ or 0.125″) stay true in thick stock and produce glue-line rips but they demand more horsepower and a riving knife that’s thinner than the kerf, otherwise the wood pinches and binds.
The saw bogs down halfway through a 2-inch-thick white oak rip and we know instantly: that thin-kerf blade is eating 25% less power but deflecting under the load. That’s when we reach for a full-kerf blade.
Product Recommendation: For underpowered saws, the CMT 250.024.10 thin-kerf blade reduces motor load; for cabinet-grade rips, the Forrest Woodworker II full-kerf blade delivers glue-line cuts.
Even the best blade won’t cut clean if it’s dirty or dull. Here’s how to keep yours performing like new.
Blade Maintenance and Sharpening Tips
A $10 bottle of pitch remover can do more for your cut quality than a $100 blade, if you use it. Most woodworkers chase sharpness when the real culprit is baked-on resin. A clean blade cuts cooler, tracks truer and lasts longer. Here’s how to keep yours in fighting shape.
Cleaning: The Simplest Performance Boost
I’ve seen more burn marks from dirty blades than dull ones. A Forrest WWII started leaving scorch lines on maple after a long run of cabinet parts. I assumed the carbide was shot but a 20-minute soak in pitch remover brought it back to glass-smooth cuts. That $10 bottle saved me a $30 sharpening and a week of downtime. The rule is simple clean every 8–10 hours of use. A dedicated pitch remover dissolves resin without attacking the carbide or brazing. Soak the blade, scrub with a soft brush, rinse and dry immediately. Never use oven cleaner or steel wool. They can etch the carbide and ruin the plate.
Expert Tip: A dirty blade mimics a dull one. Clean it first before assuming it needs sharpening, and you’ll often restore cut quality instantly.
Storage: Prevent Warping and Damage
Blades are precision tools, not frisbees. Hang them by the center hole or lay them flat in a drawer with dividers. Stacking blades on top of each other invites warped plates and chipped teeth. A simple blade cover or a dedicated storage case costs almost nothing and keeps edges sharp. If you toss a blade into a toolbox loose, expect it to cut like it’s been in a toolbox.
Sharpening vs. Replacement
Sharpening makes sense for premium blades, like Forrest, Freud Industrial, CMT, where the carbide is thick and the plate is flat. You can typically get three to five sharpenings before the tooth geometry degrades. Budget blades, on the other hand, are disposable.
If the carbide is chipped, the blade vibrates, or you’re forcing the cut, replace it. A sharpening service charges $20–$35 (as of publication); a new budget blade costs less. Do the math.
Now that you know how to maintain them, let’s look at the best blades you can buy in 2026.
| Blade | Best For | Teeth | Grind | Kerf | Price |
|---|---|---|---|---|---|
| Diablo D0724A | Framing | 24 | ATB | Thin | $12–$15 |
| Freud LU79R010 | Plywood & veneer | 80 | Hi-ATB | Thin | |
| Diablo D0760A | General purpose | 60 | ATB | Thin | $20–$25 |
| Milwaukee 48-40-4515 | Metal | 30 | TCG | Thin | $25–$35 |
| Oldham VCTC140B | Fiber cement | 4 | FTG (PCD) | Thin | $30–$40 |
| CMT 250.024.10 | Ripping | 24 | FTG | Thin (0.098″) | $35–$45 |
| Forrest WW10407125 | Premium combo | 40 | ATB+R | Full | $130–$150 |
Product Comparison Table
All seven blades, one view. The 0.098″ kerf on the CMT ripper saved my underpowered jobsite saw from bogging down. For ripping, kerf width mattered more than tooth count. The table below distills the critical specs so you can match blade to material and saw at a glance. Prices are approximate 2026 street prices; check current listings for deals.
| Model | Diameter | Tooth Count | Grind Type | Kerf | Best For | Approx. Price |
|---|---|---|---|---|---|---|
| Diablo D0724A | 7-1/4″ | 24 | ATB | Thin kerf | Fast framing cuts in softwood and OSB | $18 |
| Freud LU83R010 | 10″ | 50 | ATB+R | Thin kerf | General-purpose ripping and crosscutting in hardwood and plywood | $55 |
| Diablo D0760A | 7-1/4″ | 60 | ATB | Thin kerf | Fine crosscuts and light rips in wood and plywood | $28 |
| Milwaukee 48-40-4515 | 5-3/8″ | 30 | TCG | Thin kerf | Cutting steel studs, pipe, and conduit | $22 |
| Oldham VCTC140B | 7-1/4″ | 4 | FTG (PCD-tipped) | Thin kerf | Fiber cement siding and backer board | $45 |
| CMT 250.024.10 | 10″ | 24 | FTG | Thin kerf (0.098″) | Ripping hardwood and softwood on underpowered saws | $35 |
| Forrest WW10407125 | 10″ | 40 | ATB+R | Full kerf | Glue-line rips and glass-smooth crosscuts in fine woodworking | $140 |
Before you click ‘buy,’ run through this checklist to make sure the blade fits your saw and project.
Buyer’s Guide Checklist
A blade that doesn’t fit your saw or your project is money wasted. Use this checklist every time.
- Material & saw type: match the blade to what you’re cutting and the saw you’re using (table, miter, circular).
- Arbor & diameter: verify your saw’s arbor size and maximum blade diameter.
- Tooth grind & count: select the grind (ATB, FTG, TCG, etc.) and tooth count for the cut quality you need.
- Hook angle: positive for table saws, negative for miter saws. After a frustrating afternoon of burning and slow cuts, I pulled the blade expecting dull teeth. They were sharp. The hook angle was negative, fine for a miter saw, but on a table saw it was fighting every inch of feed. That’s when I learned to check hook angle first.
- Budget & brand: balance cost with reputation and expected blade life.
Still have questions? Here are the answers woodworkers ask most.
Conclusion: Your Next Cut Starts Here
From ATB to TCG from burn marks to glass-smooth plywood you now have a complete problem-solving system for saw blade teeth. I watched a guy burn through three sheets of $80 plywood before he’d listen. The right $40 blade would’ve paid for itself on the first cut. That’s the real math. Bookmark this guide, pull up the Tooth Selector next time you’re staring at a stack of material and pass the system along. Clean cuts aren’t luck. They’re geometry.