I was halfway through a 4-inch slab when the blade started skating. That’s when I finally ditched the cheap continuous rim for a segmented blade. You know the feeling. You grab a blade off the truck, fire up the saw and ten seconds later the cut is wandering or the rim is glazed over. That mistake cost you a blade, a chunk of material and half an hour of cleanup, if you’re lucky. If you’re not, you’re breathing silica dust because the shroud didn’t fit.
Key Takeaways
- Learn to match blade bond to material so you cut fast and avoid glazing.
- Know exactly which cup wheel to grab for hogging off material vs. a smooth finish.
- See why dry grinding without a HEPA shroud is a costly gamble and how to stay compliant.
- Get a field-tested method to dress a glazed blade and keep working.
This guide cuts through the marketing noise. It’s built from years of hands-on work not catalog specs. You’ll learn a simple system to match diamond blade type to material and task. You’ll also get straight advice on cup wheels, dust control and blade dressing. Now let’s break down every diamond blade type so you never grab the wrong one again.
Diamond Blade Types and Their Applications
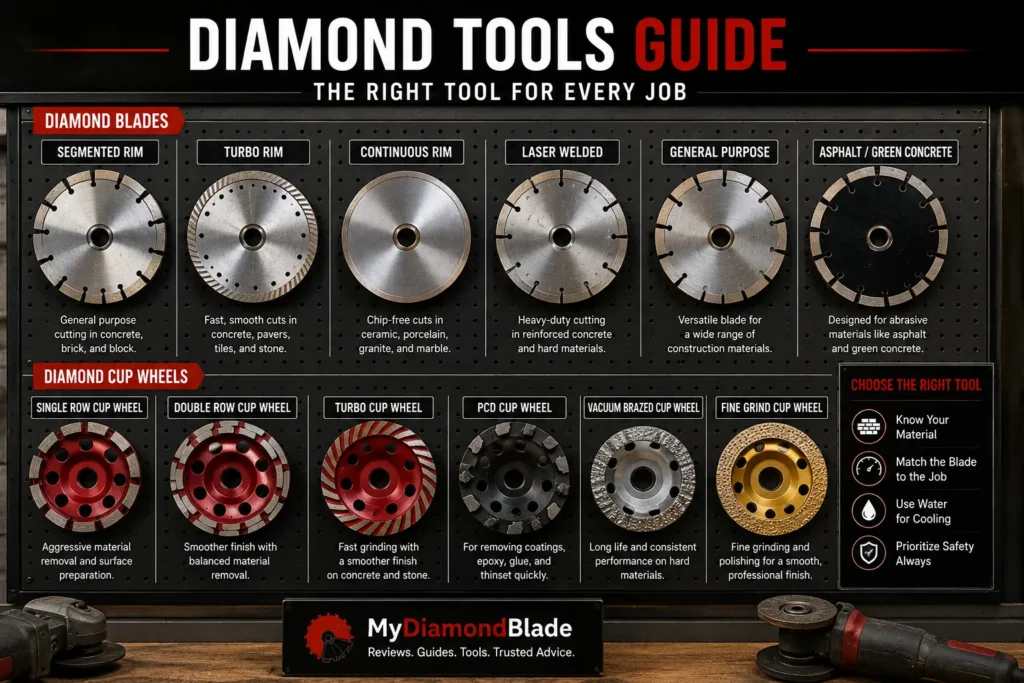
You’ve seen the big picture. Now let’s get into the specifics of diamond blades, starting with the workhorse segmented blade. The four main categories segmented, turbo, continuous rim and specialty. Each solves a different problem on the job and our full selection guide walks you through matching them to the material. Match the blade to the material and the task and you’ll cut faster, cleaner and with fewer ruined blades.
Segmented Diamond Blades: The Workhorse for Rough Cuts
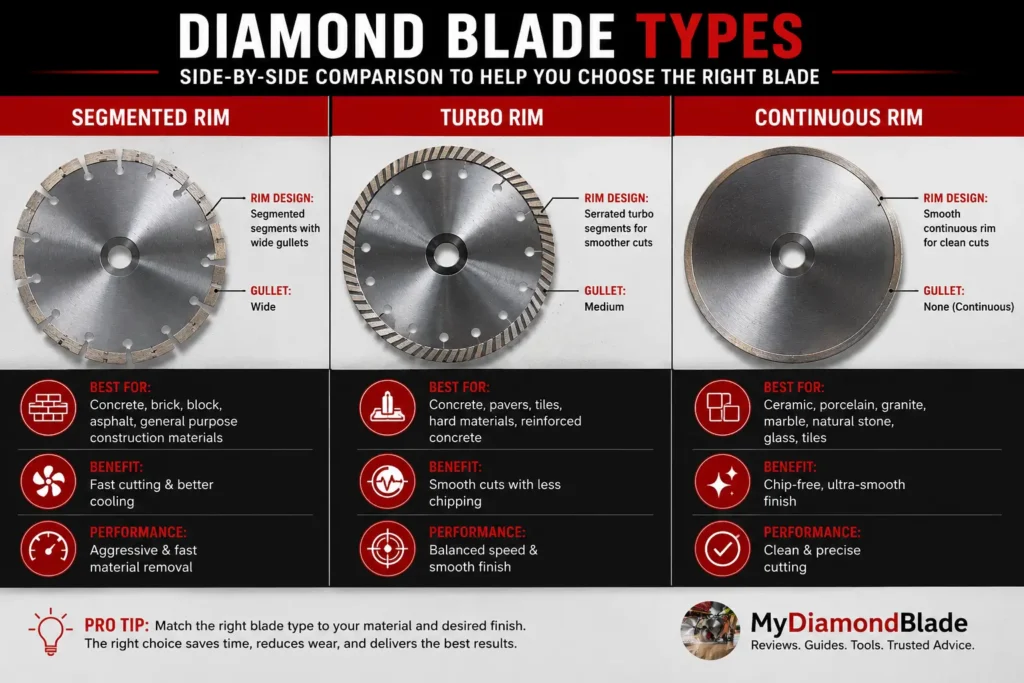
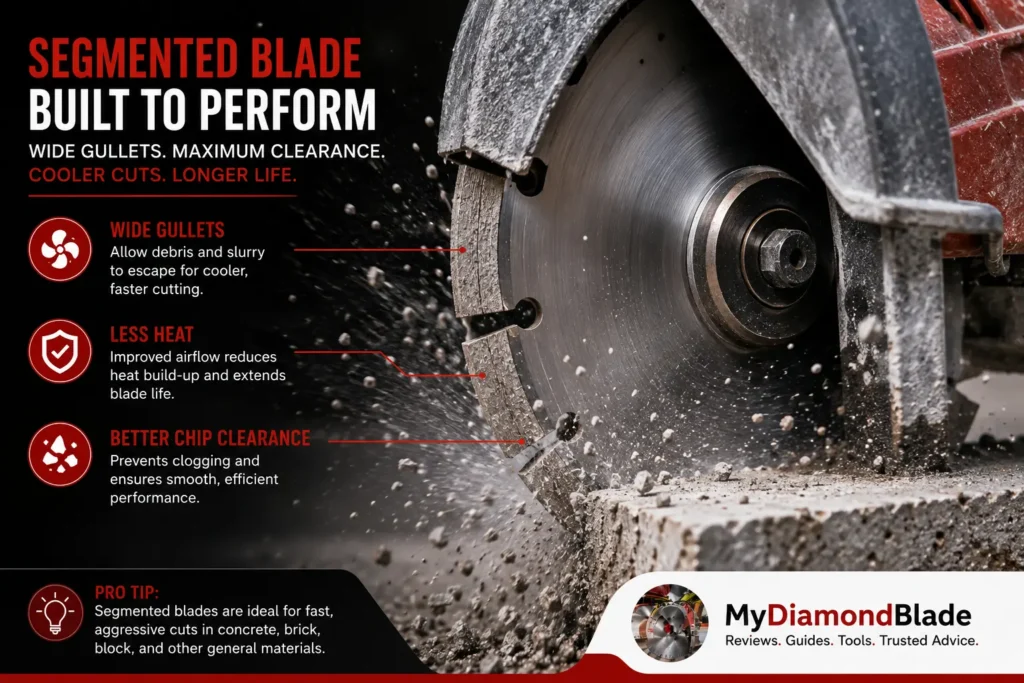
Segmented blades have deep gullets between the segments that eject dust and cool the rim. That makes them the go-to for fast, rough cuts in concrete, asphalt and masonry. The gullets prevent the blade from loading up and overheating, so you can push hard without glazing.
Product Recommendation: For general concrete demolition, grab a segmented diamond blade with gullets to clear dust and keep the blade cool.
We’ve learned to ignore the “universal” bond claim on the package. A hard-bond segmented blade on dense granite glazes over in minutes. The rim polishes instead of cutting. The manufacturer’s spec sheet never mentions that. A soft bond sheds grit constantly, exposing fresh diamond. That’s the difference between a blade that cuts and one that just makes noise. The bond rule is simple hard, dense material needs a soft bond abrasive material needs a hard bond. Get this wrong and you’ll waste time and money.
Expert Tip: When cutting asphalt, use a blade with a soft bond so the diamond grit sheds and exposes fresh cutting edges instead of glazing over.
Turbo Diamond Blades: Faster, Smoother Cuts in Hard Materials
Turbo blades have a continuous serrated rim that balances speed and smoothness. The small notches act like mini-gullets, clearing debris while keeping more diamond in contact with the material. They cut faster than a continuous rim and leave a smoother finish than a segmented blade. This makes them ideal for hard, dense materials like cured concrete or granite.
Product Recommendation: A turbo diamond blade with a serrated rim gives you faster cuts than a continuous rim and a smoother finish than a segmented blade.
Continuous Rim Diamond Blades: Chip-Free Cutting for Tile and Stone
For chip-free cuts in porcelain tile, granite or marble, you need a continuous rim blade. The smooth, uninterrupted rim eliminates the vibration that causes chipping. The trade-off: these blades require a steady water feed to stay cool. Without water, the rim overheats and the diamonds pull out.
Product Recommendation: For chip-free cuts in porcelain tile or granite, use a continuous rim diamond blade with a steady water feed.
Expert Tip: If you must dry-cut with a continuous rim blade, make shallow scoring passes and let the blade spin freely between cuts to dissipate heat.
Specialty Blades: When Standard Won’t Cut It
Some jobs demand a blade built for a single purpose and when you need clean holes, the same bond rules apply to diamond core drilling. Green concrete is soft and abrasive. It needs a hard bond to resist wear.
Ductile iron is tough and gummy; a standard blade will load up, so you need a blade with a softer bond and a more open segment design, similar to how blades for cutting metal handle tough steel. Tuckpointing blades are thin and designed to remove mortar without damaging the surrounding brick.
Don’t force a general-purpose blade into these jobs; you’ll burn it up or get a lousy result.
Blades are for cutting; now let’s look at the other side of the coin cup wheels for grinding.
Diamond Cup Wheel Types and Segment Patterns
Now that you know which blade to cut with let’s talk about the tools that grind, cup wheels and how to pick the right segment pattern. Which one do you grab when you need to hog off a high spot fast?
I bought a single-row cup wheel with five segments for a slab that had heaved after a freeze-thaw cycle. It chewed through the high spots in minutes but left swirl marks deep enough to catch a fingernail. That’s the trade-off speed now, finish later.
That experience taught me to keep more than one pattern on the truck.
Single-Row Diamond Cup Wheels: Aggressive Stock Removal
Single-row wheels are the heavy hitters. With fewer, wider segments and a more open rim, they concentrate pressure and cut deep. You run them flat, use overlapping passes and let the weight of the grinder do the work. They’re the right call when you need to level a rough pour or knock down form lines fast.
Product Recommendation: A single-row diamond cup wheel with 5-6 segments is your go-to for aggressive stock removal.
Expert Tip: Single-row cup wheels hog off material fast, but you’ll need a double-row or polishing pad to get a smooth finish.
Double-Row Diamond Cup Wheels: General-Purpose Grinding and Smoother Finish
Double-row wheels pack more segments, usually offset, which spreads the load and leaves a finer surface. They’re the everyday choice for surface prep before epoxy or a thin mil coating. You’ll still remove material, but with less gouging and a more consistent scratch pattern. Keep the grinder moving and use lighter pressure than you would with a single-row.
Product Recommendation: A double-row diamond cup wheel with offset segments delivers a smoother finish and better dust clearance.
Turbo Cup Wheels: Fast Grinding with Less Chatter
Turbo cup wheels use a continuous, spiral-wrapped rim that bridges the gap between aggressive and smooth. The spiral pattern reduces vibration and chatter, so you get a faster grind with less fatigue and better control. They’re a solid pick when you want to remove material quickly but still need a surface that won’t telegraph through a thin coating.
Product Recommendation: A turbo cup wheel with a spiral segment pattern grinds fast with less chatter and vibration.
PCD (Polycrystalline Diamond) Cup Wheels: Coating Removal Specialists
PCD wheels don’t grind concrete they strip what’s on top of it. The blocky polycrystalline diamond segments scrape off thick mastic, carpet glue, epoxy and paint without loading up. Run them at low speed (under 4,000 RPM) and keep the wheel flat. They’ll peel coatings in sheets but the moment you hit bare concrete, stop.
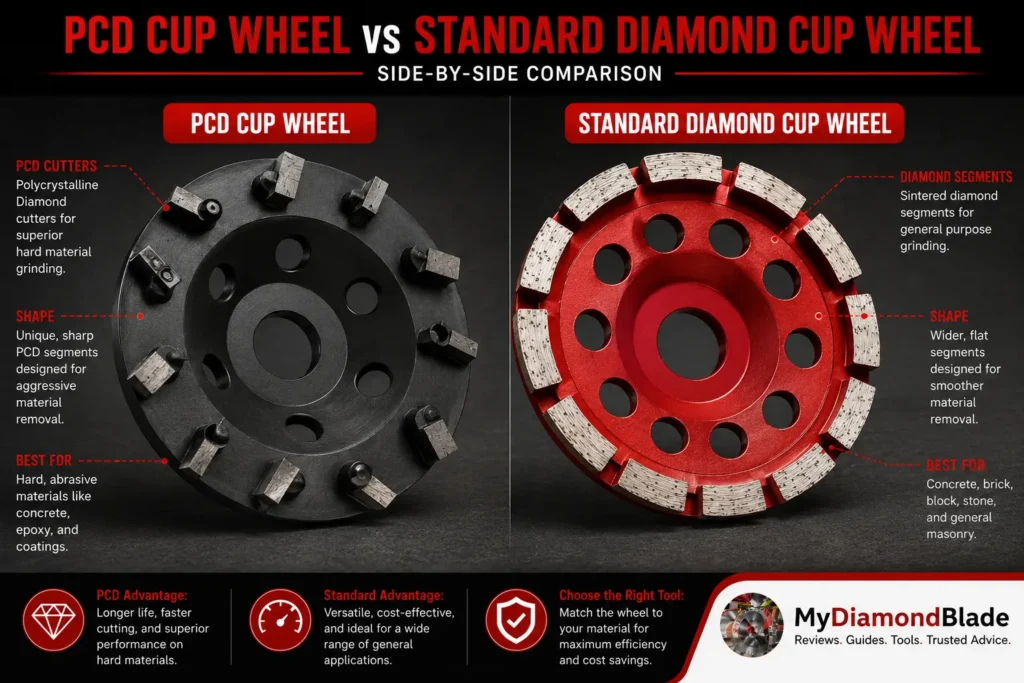
Product Recommendation: A PCD cup wheel with blocky polycrystalline diamond segments strips coatings without loading up.
Expert Tip: PCD wheels eat through thick mastic and adhesives but never use them on bare concrete they’ll wear out instantly.
With blade and cup wheel types clear the next step is a decision table that maps your exact task to the right tool.
How to Choose the Right Tool: A Decision Table
You’ve got the theory, now here’s the cheat sheet. This table matches your task to the right tool, no guesswork.
| Task / Application | Recommended Tool Type | Key Features | Notes / Tips |
|---|---|---|---|
| Cutting a concrete slab (expansion joint) | Segmented diamond blade | Fast, aggressive cut; wide gullets clear debris | Use wet cutting to control dust and extend blade life. |
| Cutting granite countertop (rough cut) | Turbo diamond blade | Serrated rim balances speed and smoothness | Granite is hard, so match with a soft bond blade. |
| Cutting porcelain tile (clean edge) | Continuous rim diamond blade | Smooth, chip-free cut; no segments | Run wet for the cleanest edge and to prevent overheating. |
| Removing thick epoxy coating from floor | PCD cup wheel | Polycrystalline diamond segments scrape coatings without loading | Keep the grinder moving; PCD generates less heat than diamond. |
| Leveling a high spot in concrete (aggressive) | Single-row cup wheel | Large gaps between segments for maximum stock removal | Hog off material fast; follow with a double-row for finish. |
| Surface prep for epoxy (smooth profile) | Double-row cup wheel | More segments produce a finer, more uniform scratch pattern | Aim for CSP 2–3; use a dust shroud and HEPA vacuum. |
| Grinding hard, dense concrete (fast, smooth) | Turbo cup wheel with soft bond | Serrated rim grinds fast but leaves a smooth finish; soft bond wears to expose fresh diamond | Hard concrete demands a soft bond; otherwise the blade glazes. |
| Removing carpet glue from concrete | PCD cup wheel | Scrapes soft, sticky residues without gumming up | PCD is the go-to for adhesives and mastics; avoid standard diamond cups. |
| Cutting asphalt (driveway patch) | Segmented diamond blade with hard bond | Hard bond resists the abrasive asphalt; wide gullets prevent clogging | Asphalt is soft and abrasive, so a hard bond lasts longer. |
| Tuckpointing (removing mortar) | Tuckpointing diamond blade | Thin kerf (4–6 mm) fits into mortar joints; segmented rim | Use a dust shroud and vacuum; OSHA Table 1 applies. |
I saved a ton of time on a hard concrete floor by matching a soft bond cup wheel to the material, a trick no packaging mentions. With the right tool selected, let’s walk through how to use a diamond blade safely and effectively.
Step-by-Step: How to Use a Diamond Blade Safely and Effectively
You’ve picked the right blade. Now make sure you use it without ruining the tool or the work.
Pre-Cut Setup and Safety Checks
I expected a fresh blade to be ready to hang and go. The ring test told a different story. Tapping the blade with a screwdriver handle produced a flat, dead thud instead of a clear metallic ring, a hairline crack I’d missed. That’s the moment ANSI B7.1 stopped being a code number and became a habit. Inspect every blade before mounting. Look for cracks, warping or missing segments. Spin it by hand and listen for a clean ring. A dull thud means damage.
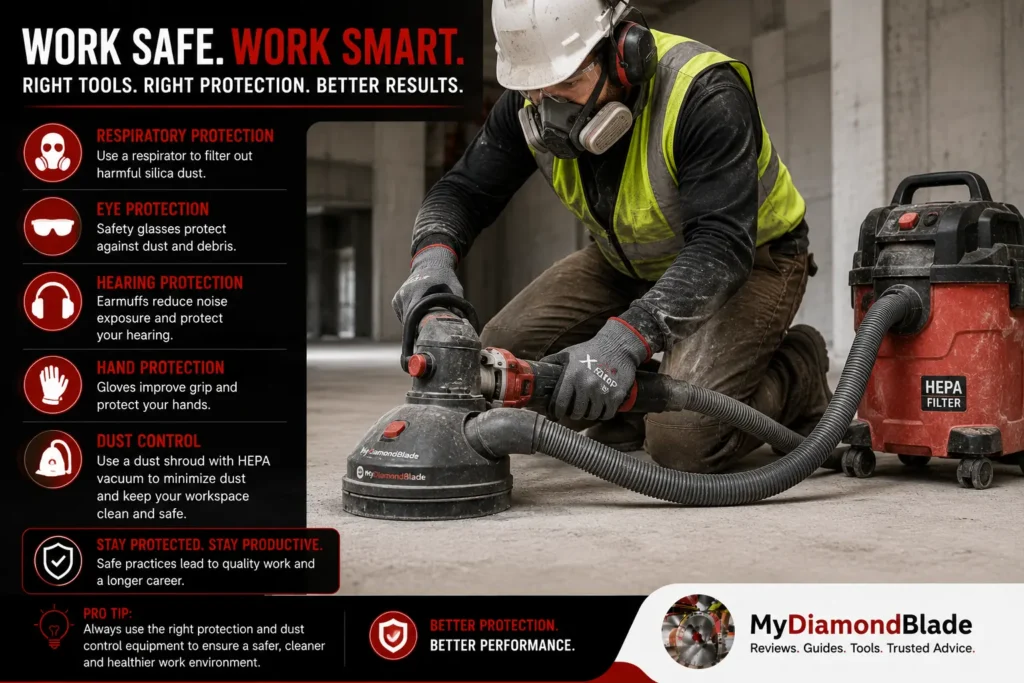
Verify the arbor matches the saw and that the blade is rated for the tool’s RPM. Mount it with the directional arrow facing forward and tighten the nut firmly. Never overtighten. Full PPE is non-negotiable: safety glasses, hearing protection, gloves and a respirator for dry cutting.
Cutting Techniques: Wet vs. Dry
Wet cutting is the default for a reason and the right wet or dry cutting setup can double your blade life and improve your finish. Water suppresses dust, cools the blade, and can double its life. Keep a steady flow aimed at the cut entry point. If you must cut dry, use shallow passes, no more than an inch deep and let the blade spin free every 30 seconds to cool. Push a blade too hard and it glazes over you’ll smell it before you see it.
Expert Tip: If you see blue discoloration or smell burning during dry cutting, stop immediately. The blade is glazing; let it cool and dress the blade before continuing.
The Cut: Depth Control and Technique
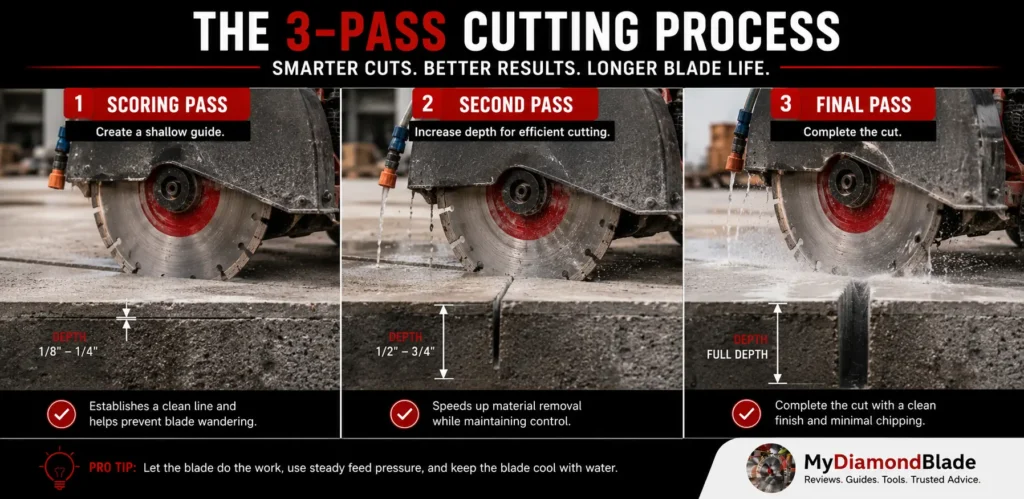
Start every cut with a scoring pass. Run the blade along the line at about a quarter of the full depth to create a clean track. That single pass prevents exit-side chipping and keeps the blade from wandering. Follow with two or three shallow passes increasing depth each time.
For straight cuts, let the saw’s weight do the work for plunge cuts, tip the blade in slowly and keep the guard in contact with the surface. Rushing a deep cut in one go is the fastest way to bind the blade and invite kickback.
Avoiding Common Cutting Mistakes
Binding happens when the material pinches the blade usually from twisting the saw or letting the cut close. If the blade starts to stall, ease up and let it clear the kerf. Never force it. Chipping on the exit side is almost always a depth problem a shallow scoring pass and a sacrificial backer board eliminate it.
Overheating is the silent blade killer. A glazed blade stops cutting and starts burning and the fix is to dress it immediately, not push harder.
Cutting is one skill grinding is another. Next, we’ll cover how to grind concrete with a cup wheel.
Step-by-Step: How to Grind Concrete with a Cup Wheel
Cutting is straightforward; grinding takes finesse. Here’s how to get a flat, smooth floor without gouges.
Surface Preparation and Setup
Clear the area, choose the right cup wheel bond and grit, attach a dust shroud and HEPA vacuum and put on your PPE.
Grinding Technique: Angle, Motion, and Pressure
Hold the grinder at 15–30°, overlap your passes, let the tool’s weight do the work and cross-hatch.
On the warehouse grind last month, chattering meant the angle was too steep. Backed off to 20°, and the scratch pattern evened out.
Expert Tip: Aim for CSP 2–3 for thin coatings, CSP 3–4 for thicker overlays.
Dust Control During Grinding
Keep the shroud flush and run a HEPA vacuum. Wet grinding creates slurry, so plan for containment.
Product Recommendation: Use a dust shroud with a HEPA vacuum meeting OSHA Table 1.
Achieving a Smooth, Professional Finish
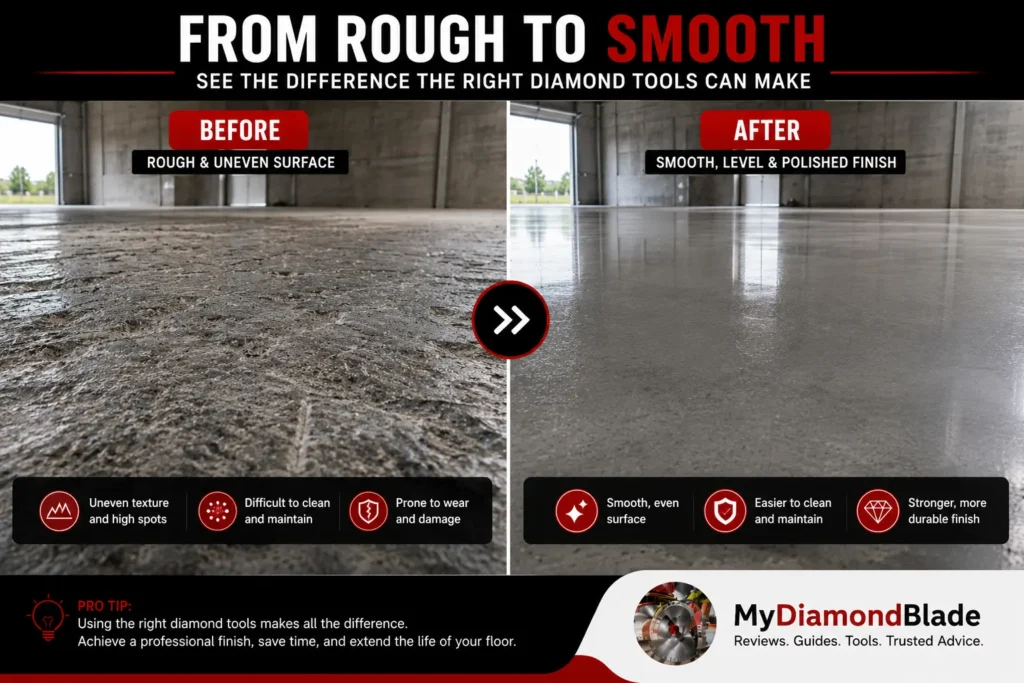
Start with a coarse grit then step down to a finer one. Check flatness with a straightedge and compare the CSP to your target. The surface should be uniform.
Even with perfect technique, problems happen. The next section is your troubleshooting field manual.
Common Problems and Troubleshooting Guide
Even after you’ve dialed in your grinding technique, things can still go wrong. Here’s how to diagnose and fix the most common diamond tool headaches before they cost you.
Blade or Cup Wheel Glazing (Shiny, Smooth Segments)
The segments look polished and the tool stops cutting. That’s glazing. It happens when the bond is too hard for the material, so the diamond never gets exposed or when you run with too little pressure and just buff the segments.
The fix is to dress the blade. Grind into a dressing stick, a soft concrete block or even a brick to wear back the bond and expose fresh diamond. If glazing returns fast, switch to a softer bond. On a parking garage rehab last fall, we burned through three blades in a week before someone showed us a dressing stick that’s a $200 lesson in bond hardness.
Expert Tip: Keep a dressing stick in your tool bag: a few seconds of grinding into it can revive a glazed blade and save you from buying a new one.
Chipping or Edge Breakout When Cutting
Chipping along the cut edge usually means you’re using a segmented blade on brittle material like tile or thin stone. The segments hammer the surface instead of shearing it cleanly. Uneven feed pressure makes it worse. Switch to a continuous rim blade for a smooth, chip-free cut. On concrete, a turbo blade often reduces breakout while still cutting fast. Feed steady and let the tool do the work.
Slow Cutting or Grinding
If the tool is crawling, check for glazing first. A glazed blade can’t cut. Next, verify your RPM against the manufacturer’s spec; low speed kills performance.
The bond may be too hard for the material; a softer bond wears faster and keeps diamond exposed. For cup wheels, a single-row wheel is more aggressive than a double-row. If you’re grinding hard, dense concrete, a soft bond single-row will hog off material much faster.
Uneven Grinding or Gouging
Gouges and wavy surfaces come from an inconsistent grinding angle or using the wrong cup wheel. A double-row wheel is for finishing not heavy stock removal; it will skip and gouge if you push it. Hold the cup wheel at a steady, shallow angle, around 15 to 20 degrees and keep the surface free of debris. For aggressive leveling, grab a single-row or turbo cup wheel.
Excessive Vibration or Chatter
Vibration that rattles your hands is a red flag. It’s often a loose mounting nut, a bent arbor or a damaged blade. Check that the blade is seated flat and the arbor is straight. RPM mismatch is another culprit; a blade rated for a lower max RPM than your grinder will wobble dangerously. Replace any blade with missing segments or cracks immediately.
Premature Wear or Segment Loss
Segments that wear down in minutes or snap off point to a bond that’s too soft for the material. Abrasive stone or green concrete will wash away a soft bond fast. Excessive pressure and hitting rebar also kill segments.
Use a harder bond for abrasive material, ease up on the pressure, and switch to a PCD cup wheel if you’re cutting embedded metal. Always check the manufacturer’s RPM and bond recommendations before you start.
Now that you can troubleshoot, let’s make sure you’re working safely and staying compliant.
Safety, Dust Control and PPE
You’ve got the skills. Now protect your lungs and your crew. Silica dust isn’t just a nuisance; it’s a killer.
Understanding Silica Dust and OSHA Regulations
Concrete grinding releases respirable crystalline silica. Inhale it long enough and you get silicosis scarred lungs that can’t be fixed. OSHA’s standard 1926.1153 Table 1 mandates a dust collection system with 99% filter efficiency for handheld grinders. Wet methods cut airborne silica even more.
Most guys treat a respirator like a suggestion until they see a 50-year-old mason who can’t climb stairs. I watched a crew chief with 20 years of grinding without dust control he’d cough mid-sentence. By year 7, I’d been using a P100 and HEPA shroud on every job. His lungs were shot mine weren’t. The OSHA Table 1 rule about 99% filter efficiency is the line between a long career and a short one.
Essential Personal Protective Equipment (PPE)
A half-face respirator with P100 filters is the minimum. Pair it with safety glasses, earmuffs and gloves. Long sleeves and pants keep dust off your skin.
Expert Tip: A half-face respirator with P100 filters is a small investment that protects your lungs from irreversible silica damage.
Setting Up a Safe Work Area
Contain dust with a shroud and HEPA vacuum. Post warning signs and keep bystanders clear. Open a window or use a fan for ventilation. Watch for sparks near flammables.
Safety doesn’t stop when the grinder shuts off. Proper maintenance keeps your tools and your body in working order.
Maintenance, Storage and Extending Tool Life
Your tools are an investment. Treat them right and they’ll pay you back in consistent performance. The difference between a blade that lasts six months and one that’s shot in six weeks often comes down to a few simple habits.
Cleaning and Dressing Diamond Tools
Why did that blade stop cutting halfway through the morning? Glazing. I keep a dedicated dressing block (a chunk of soft concrete) on the truck. Before the first cut, I give the blade a few light passes. It takes ten seconds and exposes fresh diamond.
On a day when I’m cutting hard, dense concrete, that quick dress is the difference between a blade that skates and one that bites. Dressing removes the metal bond that has smeared over the diamonds especially when you’re working hard aggregate.
Do it whenever the blade feels like it’s polishing instead of cutting.
Expert Tip: Some pros keep a dedicated ‘dressing block’ (a piece of soft concrete or cinder block) on the truck. A quick pass before starting a job ensures the diamonds are exposed and ready.
Proper Storage to Prevent Damage
Moisture and rust are the silent killers of steel cores. Store blades flat or hung by the arbor hole. Never lean them against a wall where they can warp. Cup wheels go dry on a shelf, not in a damp corner. Temperature swings don’t help either. A consistent, dry space extends life.
Maximizing Tool Life: Do’s and Don’ts
The single biggest factor in tool life? Matching bond hardness to the material. Hard, dense aggregate demands a soft bond that wears fast to expose fresh diamond. Abrasive material needs a hard bond that resists being washed away. Get this wrong and you’ll either glaze the blade or burn through it in an hour.
Do dress regularly. Do store dry and flat. Do match the cup wheel to the task: a single-row wheel hogs off stock fast but wears quicker; a double-row leaves a smoother finish and lasts longer. Don’t force a dull blade. You’re just building heat. Don’t let slurry dry on the segments.
Theory is good but nothing beats seeing it in action. Here’s a real-world case study.
Real-World Case Study: From Rough Pour to Polished Floor
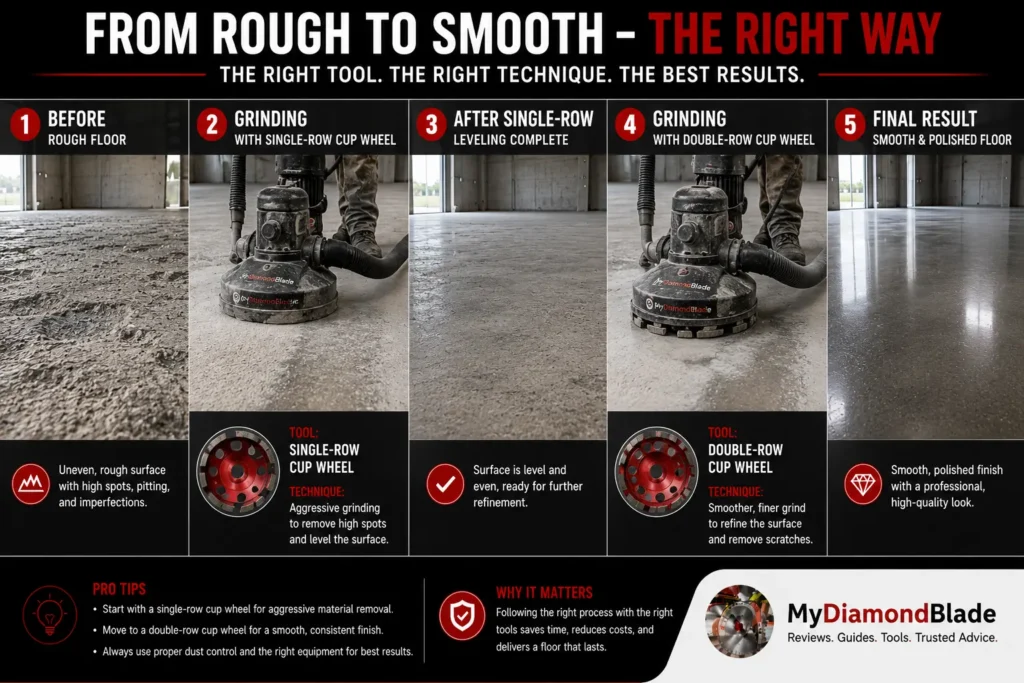
Let’s put everything together with a real job: a rough basement pour turned smooth and ready for polish.
Project Overview
A 500 sq ft basement with a rough, uneven pour required aggressive leveling before polishing. 3,200 square feet of rough slab taught me: a single-row cup wheel is the only tool for aggressive leveling.
Step 1: Assessment and Setup
Inspect for high spots and laitance. Mark trouble areas. Suit up with a respirator, goggles and hearing protection.
Step 2: Aggressive Leveling with Single-Row Cup Wheel
Grab a single-row cup wheel and work in overlapping passes. It hogs off high spots fast, leaving swirl marks that’s expected.
Expert Tip: Don’t chase a perfect finish with the single-row cup wheel; its job is fast stock removal, swirl marks are normal and will be cleaned up by the double-row cup wheel.
Step 3: Smoothing with Double-Row Cup Wheel
Switch to a double-row cup wheel. Use lighter pressure and steady sweeps to erase swirls and achieve a smooth CSP 2 profile.
Step 4: Cleanup and Inspection
Vacuum thoroughly with a HEPA vac and shroud. Inspect the floor: it’s now flat, smooth and ready for polishing.
You’ve seen the process now test your knowledge with our interactive quiz.
Interactive Decision Quiz: “Which Diamond Tool Do You Need?”
Still not sure? Take this quick quiz and get a personalized recommendation.
I used to obsess over bond hardness charts and segment height specs, convinced the numbers held the secret. They don’t. What actually matters is what you’re cutting, whether you’re hogging off material or chasing a clean edge and the finish the job demands. The quiz skips the noise and lands on the right tool in three clicks. That’s the difference between a blade that glazes in five minutes and one that eats.
Now you’re equipped. Here’s your action plan to put it all to work.
Conclusion: Your Diamond Tool Action Plan
You’ve made it through the complete guide, now here’s your quick-start plan to put it all into practice.
Identify your material then grab the right blade segmented for concrete, turbo for asphalt, continuous rim for masonry. Match bond hardness to aggregate. Run at proper RPM with water or a HEPA dust shroud. Dress the blade the moment it glazes. Inspect tools before every use and follow OSHA Table 1.
The cup wheel skated across the slab, leaving a polished smear instead of a profile. We’d been fighting a glazed bond for half a morning. Once we dressed the blade and matched a softer bond to that hard aggregate, the wheel bit in and hogged off material in minutes. That’s the difference between fighting your tools and letting them work.
Now put the plan into action on your next job.