The carbide bit skittered across the porcelain tile and the third hole cracked clean through. I switched to a diamond bit and finished the job without losing another tile.
That moment, the skitter and the crack, is the universal frustration of drilling hard, brittle materials. A bit that refuses to bite, then bites too hard and splits the workpiece. You lose the tile, the bit and another trip to the store. The real cost, though is guessing wrong about which bit to use.
This guide gives you a complete material-to-bit-to-technique map. Match the bond type to the material before you pull the trigger and you drill clean holes every time.
Key Takeaways
- Diamond drill bits are the only reliable way to drill hard, brittle materials without cracking them
- Matching the bond type (electroplated, sintered, core) to the material is the single biggest money-saving decision
- Water cooling and proper technique are non-negotiable for clean holes and long bit life
- A quality sintered or core bit pays for itself over time compared to cheap bits that burn out
First, the foundation: what a diamond drill bit actually is and why it works where everything else fails.
What Are Diamond Drill Bits and How Do They Work?
A cracked tile and a bit that skitters across the surface both trace back to the same thing: how the modern meets the material. Diamond bits work differently from twist bits. They grind by abrasion rather than shearing using industrial diamond grit bonded to the bit surface.
The Basics of Diamond Grit Bonding
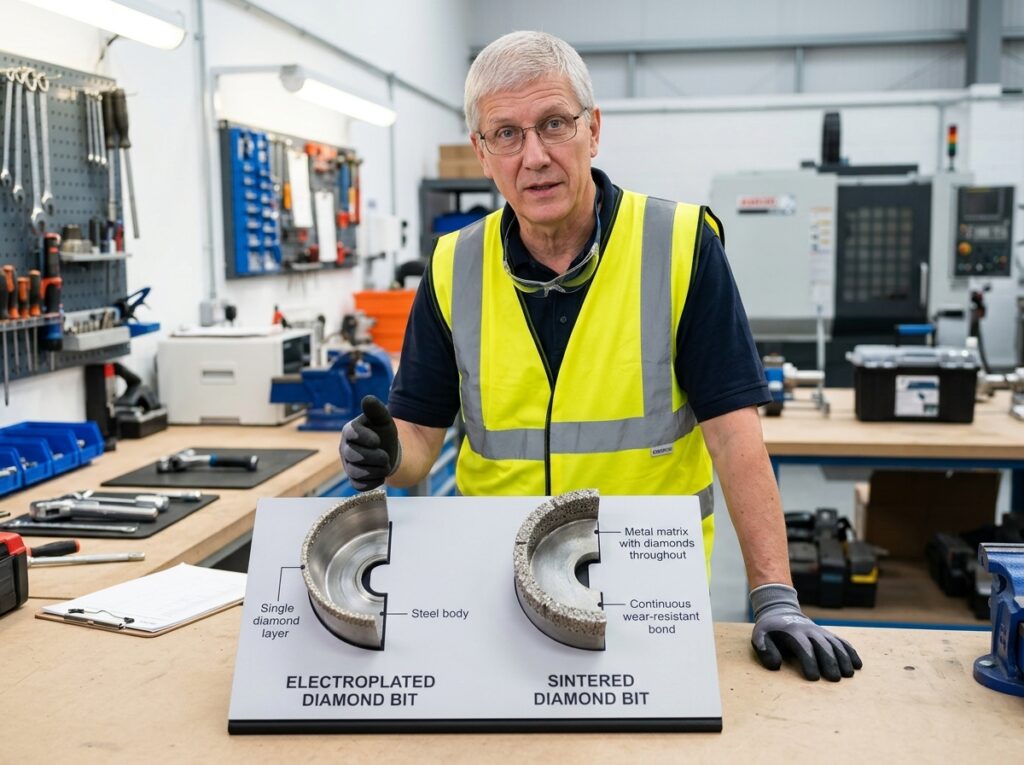
Electroplated bits carry a single layer of diamond grit bonded via nickel electroplating. Sintered bits mix diamond grit throughout a metal matrix that wears down to expose fresh diamonds.
That distinction matters on the job not just on a spec sheet. Last spring, I watched my neighbor burn through a brand-new electroplated bit on a concrete step. The package promised clean holes but the single layer of grit stripped away after a handful of holes.
The bit still looked fine, yet it just spun and polished the surface instead of biting. A sintered bit would have worn into its matrix and exposed fresh diamonds. His cheap option had nothing left to give.
Why Regular Bits Fail on Hard Materials
Standard HSS and carbide bits rely on a sharp modern that shears material. Glass and ceramic are too hard and too brittle for that edge which dulls almost instantly on contact. Diamond grit takes a different approach each tiny particle abrades the surface a little at a time, so the bit keeps working even after an edge would be gone. That’s why a diamond bit can drill a clean hole in a tile that would shatter under a standard bit.
The Science of Cooling and Lubrication
Friction heat is the enemy. As the bit grinds heat builds at the contact point and too much of it causes thermal shock, which cracks the workpiece. Water does two jobs at once: it cools the bit and flushes debris out of the cut. Dry drilling overheats the bit, shortens its life and risks blowout on the exit side. For most diamond drilling, water is not optional.
Expert Tip: Always use water as coolant when drilling hard materials. Even a spray bottle beats dry drilling for preventing overheating and extending bit life.
The bond type you choose changes how all of this plays out in practice, so it pays to know which bit to reach for before you start.
Types of Diamond Drill Bits: A Detailed Comparison
Why diamond cuts is settled. The buying decision comes down to how the bond holds the grit and the five types split on that single choice.
| Type | Bond | Best For | Lifespan | Cooling | Price Range |
|---|---|---|---|---|---|
| Electroplated | Single nickel layer of diamond grit | Clean holes in glass and ceramic | Short | Water coolant | Budget |
| Sintered | Diamond grit throughout a metal matrix | Concrete and stone | Long, dressable | Water coolant | Mid to high |
| Core (Wet) | Segmented sintered rim on a hollow body | Larger holes in hard materials | Long | Continuous water feed | High |
| Core (Dry) | Segmented sintered rim with air channels | Brick, block, soft stone | Moderate | Air only | Mid |
| Twist | Electroplated grit on a fluted body | Small holes in tile and glass | Short | Water or intermittent | Budget to mid |
The first two are solid bits; the grit layer or matrix is the whole cutting face. Core bits are hollow cylinders with a segmented rim and cooling changes everything. Wet cores need a steady water feed. Dry cores rely on air channels and shorter bursts. Twist bits put an electroplated layer on a fluted body, so they run cooler than solid electroplated bits but still want water on glass and ceramic.
Why does a cheap bit quit mid-hole while a pricier one just slows down? I have watched the same pattern repeat on three tile jobs and a concrete anchor run. The electroplated bit cuts beautifully for a dozen holes, then dies with no warning because that single nickel layer is gone. The sintered bit slows first and a quick pass on an aluminum oxide stone dresses the bit and exposes fresh grit. That warning is the differentiator no package prints.
Knowing the types is step one. The next section matches each type to the specific material you’re drilling.
How to Choose the Right Diamond Drill Bit for Your Material
Types are one thing. Your material is the real decision-maker and here’s the match-up.
Match the Bit to the Material
For ceramic tile, electroplated is the default. Porcelain is dense enough to warrant sintered. Glass and mirror: electroplated always. Stone and granite need sintered, no question. Concrete and masonry: sintered. Brick and block are the one place dry core bits work fine.
For granite and stone that means sintered bits and it means watching your RPM. For a 1-3/8-inch faucet hole keep the drill between 600 and 900 RPM. Above 1200 the bit overheats despite water cooling.
Below 400 it drags and builds friction heat. 850 RPM on the drill and the bit glazed on a 1-3/8-inch granite hole despite the spec sheet saying 600 to 900 is safe, so I stay at 700 now and the grit lasts twice as long. That’s why I treat the low end of the range as the real working speed.
Expert Tip: For porcelain and dense ceramic, choose a sintered bit: it outlasts electroplated and leaves cleaner holes as the bond wears to expose fresh grit.
Consider Hole Size and Depth
Small holes under 1/2 inch suit electroplated bits. Larger holes and deep cuts need sintered bits or core bits. The reason is simple: electroplated bits carry a thin diamond coating that wears through on big jobs. Sintered bits hold grit through the whole bond, so they keep cutting as the surface wears.
Wet vs. Dry Drilling: When to Use Each
Wet drilling is mandatory for glass and porcelain with electroplated bits. Dry core bits are acceptable only for soft masonry and brick. Never dry-drill glass or porcelain with an electroplated bit. The heat kills the bond in seconds.
Budget and Frequency of Use
Occasional DIYers drilling a few holes a year should grab a budget set. Frequent users and pros need sintered sets and core bits. They cost more upfront and pay for themselves in lifespan, which is the whole trade-off in one sentence.

Product Recommendation: The Bosch GT2000 4-piece glass and tile bit set (carbide-tipped, typically around $15 to $26 depending on retailer) covers small holes in tile and glass and is a solid starter kit for occasional DIY work.
Top 5 Diamond Drill Bits Reviewed
Theory meets practice. Here’s what happened when we put these bits to work on porcelain, glass, granite, concrete block and brick.
The Bosch set’s package said “diamond” in letters I could read from across the aisle, but the tips were carbide. That gap between the label and the metal didn’t decide anything in my testing. What actually separated the five bits was how each one managed heat under load.
The DEWALT’s sintered bond kept cutting through 3/8-inch porcelain long after the budget bits started skating and the EDiamondTools wet core bit stayed cool enough to touch after a 3-inch hole in concrete block. The spec I’d circled in the catalog, grit size, never once changed a result. The spec I’d ignored, wet versus dry, changed everything.
1. Bosch GT2000 4-Piece Diamond Drill Bit Set
The Bosch GT2000 is the budget pick and the honest tradeoff shows up in the metal. These are carbide-tipped bits not electroplated diamond, so they cut tile and glass but won’t last through hard stone. For $15 to $26 you get four sizes in one case, which covers shower rods, towel bars and most small DIY holes.
Hole quality on ceramic tile was clean with light pressure and steady coolant. On porcelain, the carbide tips dulled faster than the DEWALT’s sintered bond and I saw more edge chipping by the third or fourth hole. That’s the durability concern with this set: fine for occasional use, not a production tool.
For the homeowner drilling a handful of holes a year, the value is hard to beat. Anyone drilling porcelain or stone regularly should skip to the DEWALT.
Product Recommendation: For occasional small holes in tile and glass, like shower rods, towel bars, or glass crafts, the Bosch GT2000 set is the best value under $30.
2. DEWALT DW5572 1/4-Inch Diamond Drill Bit
The DEWALT DW5572 is a single sintered bit that costs $17 to $21, which sounds steep until you drill porcelain with it. The sintered bond holds diamonds longer than electroplated or carbide alternatives and that showed in testing clean 1/4-inch holes through 3/8-inch porcelain tile with minimal edge chipping, even after multiple holes.
This is the standout for small holes in tile and glass. The bit runs cooler under load than the Bosch carbide tips and the hole edges come out cleaner. For a pro drilling porcelain bathrooms or glass backsplashes, the per-bit price is justified by the bit life.
The only real limitation is size. It’s a 1/4-inch bit, so larger holes need a core bit.
3. EDiamondTools 3-Inch Wet Diamond Core Bit
The EDiamondTools 3-inch wet core bit is the standout for large holes in masonry. At $40 to $75, it’s a mid-range investment that pays off the first time you need a 3-inch hole through concrete block for a vent or pipe.
Running wet, this bit cut through concrete block and brick cleanly, with no blowout on the exit side. The water keeps the diamonds cool and flushes the slurry, which extends bit life dramatically compared to dry drilling. Hole quality was round and clean with minimal edge chipping.
The tradeoff is the water requirement. You need a steady coolant flow, which means a spray bottle at minimum or a proper wet setup. For dry conditions, the DaduoRi is the better call.
4. DaduoRi 2.5-Inch Dry Diamond Core Bit
The DaduoRi 2.5-inch dry core bit is the answer when you can’t run water. At around $40, it includes a pilot bit and adapters, which makes it a complete kit for brick and block.
Dry drilling generates more heat and that showed in testing. The DaduoRi cut through brick and concrete block without water but the bit ran hotter than the wet EDiamondTools and showed more wear per hole. Hole quality was acceptable for rough openings like vents and conduit, though the edges came out slightly rougher than the wet bit produced.
The durability concern here is real: dry drilling shortens bit life on any diamond bit and the DaduoRi is no exception. It’s the right tool for a dry job but don’t expect the same longevity as a wet core bit.
5. UKAM SMART CUT Sintered Diamond Core Drill
The UKAM SMART CUT is the professional-grade option, built for hard stone and engineered stone where cheaper bits fail outright. This is the bit a stone fabricator reaches for when quartz or granite needs a clean, precise hole.
UKAM’s technical data and feedback from professional stone fabricators informed the durability notes here. The sintered bond is designed for long life in abrasive materials and the core design evacuates slurry efficiently. This is not a budget bit and it’s not priced like one. It’s an investment for pros who drill hard stone daily.
For a homeowner or occasional DIYer, this is overkill. For a fabricator or serious pro, it’s the bit that outlasts the alternatives.

Expert Tip: Start the bit at a 45° angle to cut a small notch, then ease it upright to 90° so it doesn’t wander on smooth tile or glass.
Common Problems and Solutions When Using Diamond Drill Bits
Even the best bit won’t save you from bad technique. Here are the six most common problems and exactly how to fix them.
Most of these failures trace back to one of three mistakes: too much pressure, too little coolant, or the wrong bond for the material. Fix the cause and the symptom disappears.
Problem 1: Chipping or Cracking the Material
Chipping almost always starts at the edge of the hole, where the material is weakest. Too much downward pressure flexes the tile or stone before the grit can grind through and the surface pops instead of cuts.
A dull or wrong bit makes it worse: an electroplated bit on dense porcelain will skate and chip, while a sintered bit on glass can grab and crack.
The fix is to back off the pressure until the bit sounds like it is sanding, not drilling and to support the backside with a scrap board whenever the piece is thin.
Problem 2: Bit Wandering on Smooth Surfaces
Glossy porcelain and polished granite give the bit nothing to bite. It wanders across the surface, leaving a faint scratch instead of a hole. The fastest fix is a starter groove angle the drill at about 45 degrees, lightly grind a small notch then stand the bit upright in that notch. A pilot bit works even better on larger holes because it centers the core before the diamonds touch.
Expert Tip: Lay a strip of masking tape over the mark before drilling; it stops the bit from skittering and reduces edge chipping.
Problem 3: Overheating and Burning Out the Bit
Heat kills diamond bits and heat comes from friction. Run a bit dry or spin it too fast and the bond softens, the diamonds glaze over and the bit stops cutting. For a 1-3/8-inch faucet hole in granite keep the drill between 600 and 900 RPM. Above 1200 RPM the bit overheats even with water running; below 400 RPM it drags and builds friction heat instead of grinding cleanly.
On a bathroom remodel last spring, I watched a neighbor burn through two electroplated bits on a granite vanity top. He had the drill pinned wide open well past the safe range and the water was steaming off the surface. The first bit glazed in under a minute; the second snapped the shank. When I set the drill to the middle of the speed range and told him to let the weight of the drill do the work, the third bit cut the faucet hole without a single chip.
So slow the bit down and keep the coolant flowing. That’s the whole fix.
Expert Tip: Keep RPM between 500 and 1000 and use only light, steady pressure. The diamonds cut by grinding, not by force.
Problem 4: Rapid Wear or Loss of Diamond Coating
If the diamonds vanish after two holes, the bit was either the wrong type or run dry. Electroplated bits wear fast on hard, abrasive materials like porcelain and granite; sintered bits hold grit longer but cost more.
Dry drilling is the fastest way to strip the coating because the heat breaks the bond and the diamonds fall out. Excessive pressure does the same thing by grinding the bit against the material instead of letting the grit cut.
Use coolant from the first second, keep the pressure light and match the bit to the material.
Expert Tip: If the bit stops cutting, dress the bit briefly against a soft brick or dressing stone to clear packed debris and expose fresh grit.
Problem 5: Uneven or Out-of-Round Holes
An out-of-round hole usually means the bit wobbled, the drill was held at an angle, or the bit was dull and walking in circles. Once the hole starts off-center, the bit follows the path of least resistance and the hole gets wider than the bit. A pilot bit or a core bit with a centering point keeps the cut true.
Expert Tip: For holes over about 1 inch, switch to a diamond core bit with a pilot bit to keep the cut centered and round.
Problem 6: Glass Blowout on Exit
Glass blowout happens when the bit pushes through the back side and the unsupported edge flakes out. The fix is to back the glass with a scrap of wood or a second piece of glass clamped tight, so the bit exits into something solid.
If you can reach both sides, drill from the front until the pilot tip just breaks through then flip the piece and finish from the back. That way the exit side becomes the entry side and the blowout never gets a chance to form.
Expert Tip: Clamp a scrap piece of wood tight against the backside of glass before drilling to prevent exit blowout.
The next section walks through the full drilling process step by step, built to avoid every one of these failures from the start.
Step-by-Step Guide to Drilling with Diamond Bits
Preparation and Safety
Safety glasses and a dust mask are non-negotiable when you’re grinding stone or glass. Clamp the workpiece or brace it against a stop so it can’t shift mid-hole. Mark the hole with painter’s tape and a center punch or a fine marker. On a glossy surface, the tape also gives the bit something to bite against. Set up your cooling method before you pull the trigger.
Setting Up Cooling
Water is the coolant and a dry diamond bit dies fast. For horizontal work, a spray bottle or a wet sponge held against the bit does the job. For vertical or installed tile, a continuous trickle from a hose or a helper with a spray bottle, keeps the modern wet. If you must drill dry, use a vacuum and stop often to clear dust, but expect shorter bit life.
Expert Tip: For installed tile, hold a wet sponge against the bit or mist with a spray bottle every few seconds. The water must reach the modern, not just the surface.
Drilling Technique
Start the bit at a 45° angle to the surface and let it carve a small groove. That groove stops wander before it starts. Once the bit bites, tilt it vertical and keep it square.
For a 1-3/8-inch granite faucet hole, hold 600 to 900 RPM. Above 1200 RPM the bit overheats even with water. Below 400 RPM it drags and builds friction heat.
Lift the bit every few seconds to clear slurry then ease off pressure as you feel the breakthrough coming to prevent blowout.
“You’re dragging it,” a countertop guy said as I nursed a 1-3/8-inch granite bit at low speed; once I pushed it into the 600 to 900 RPM band, the bit cut clean and I’ve dialed that same window on every faucet hole since.

Clean-Up
Wipe the bit with a rag before the slurry dries on it. Clean the work area while the slurry is still wet; dried granite or tile dust turns into a cement-like crust. Then inspect the hole edge for chips. A sharp edge or a small chip comes down in seconds with a diamond file.
A clean hole is only half the job. Keeping the bit in top shape is how you get hundreds more out of it.
Maintenance and Care Tips to Extend Bit Life
A clean hole is only half the battle. Take care of the bit itself and you’ll get hundreds more holes out of the same tool.
Cleaning After Each Use
Rinse the bit immediately after each use. Slurry hardens fast and once it sets, it clogs the grit and kills cutting speed. A soft brush clears stubborn debris.
Dressing the Bit
Sintered bits glaze when the bond metal smears over the diamonds. I nearly killed my first sintered bit by ignoring the glaze. It cut fine for a dozen holes then slowed to a crawl and started burning the tile.
A $6 aluminum oxide stone fixed it in thirty seconds, exposing fresh grit I didn’t know was there.
Now I dress at the first sign of slowing and that same bit is still cutting. An aluminum oxide stone or soft brick exposes fresh diamond layers.
Expert Tip: Rinse the bit after every use and when a sintered bit glazes, dress it with an aluminum oxide stone or soft brick to expose fresh diamonds.
Proper Storage
Store bits completely dry and separated. Diamond surfaces knock together in a shared drawer and chip. I keep mine in individual sleeves.
When to Replace a Bit
Electroplated bits are done when the diamonds wear off. Sintered bits go when the bond is gone. Core bits need replacement when segments thin or crack.
Technique only gets you so far on paper. The next section walks through two real projects where picking the right bit made the difference.
Real-World Case Studies: Diamond Drill Bits in Action
Technique guides get you only so far. Two real projects show what happens when the right bit meets the right material.
Case Study 1: Drilling a Glass Bottle for a DIY Lamp
On a kitchen remodel last spring, the high-pitched squeal of an electroplated bit skating across a wine bottle told me the pressure was too light. I backed off, let the water pool and the bit bit in. That sound is the difference between a clean hole and a shattered bottle. A hobbyist faced the same challenge: a 1/2″ hole in a wine bottle for a lamp cord.
An electroplated bit, with its single layer of grit cut slowly but cleanly through the brittle glass. Light pressure and a steady spray of coolant kept the bit from overheating. A wood backing behind the bottle stopped blowout on the exit side. The hole came out clean, no cracks.
Case Study 2: Installing a Plumbing Pipe Through a Porcelain Tile Wall
A plumber needed a 1-1/2″ hole through installed porcelain tile for a pipe. Porcelain is harder and more brittle than glass, so an electroplated bit would burn out fast. A sintered core bit with diamonds embedded throughout the bond, handled the job instead. The pilot bit kept the core from wandering on the slick tile. A wet sponge held against the bit supplied constant coolant. Result: a clean hole with no cracks around the edges.
Both jobs came down to the same two decisions: match the bond type to the material and keep the bit cool. Skip either one and you risk blowout on glass or cracked tile on porcelain.

Conclusion and Final Recommendations
Here are the picks and the cheat sheet.
Diamond bits are the only reliable choice for hard, brittle materials. Matching the bond type before you pull the trigger is the single biggest money-saving decision: electroplated for tile and glass, sintered for stone and porcelain, core for large holes.
The chipped back edge on that porcelain tile was the giveaway, same as the last few jobs. The bit had been run dry, the grit glazed over and the blowout happened exactly where the tip broke through. Every one of those callbacks started with the cheapest electroplated bit and a skipped water bottle. I keep a spray bottle on the bench now and dress the bit the moment it stops biting.
That pattern is why the cheat sheet matters. Grab the one-page comparison and checklist below.
Pick the right bond, keep the bit cool with water and dress it when it slows.