The raking light caught it first: a surface I’d spent three hours on, flawless under the bench lamp, now showing a field of micro-scratches. The paste had nothing to do with it. Cross-contamination, a skipped grit, a rushed wipe-down between steps killed the mirror.
Forum threads will sell you a dozen micron sequences and never once mention the why. The third cloudy blade in a single afternoon and I finally stopped blaming the paste, trading my old speed for a finish that holds up under raking light.
Key Takeaways
- A mirror finish fails from process errors (cross-contamination and skipped grits), not from the paste itself
- Halve micron size at each step and clean obsessively between every grit
- Match carrier fluid and backing to your material and surface orientation
- Let the diamonds do the work: light, even pressure beats force every time
- The final grit sets the floor of your finish; skipping it guarantees haze
This guide treats every hazy result as a diagnosable process failure. Keep it at the bench. Before the technique, you need to know exactly what you’re buying, so we start with what diamond paste actually is.
What Is Diamond Polishing Paste?
There is nothing mysterious about diamond polishing paste. It is the most predictable abrasive I have ever put on a lap and once you understand what it actually is, the haze problems start making sense.
Defining Diamond Polishing Paste and Compound
Paste is synthetic diamond particles suspended in a carrier fluid. The carrier is usually oil- or grease-based, which gives paste its thick, stay-put consistency. Compound gets used interchangeably, though paste implies that thicker body. A suspension is a liquid where particles settle out freely; a slurry is a thinner, water-based mix. Paste stays on a felt or lap without running and that is why it is the default for bench polishing.
Why Diamond Outperforms Other Abrasives
Diamond sits at Mohs 10. It cuts steel, glass, ceramic, and gemstone that would dull silicon carbide or alumina in minutes; the same diamond-abrasive principle underlies how diamond blades work. Many diamond particles, especially polycrystalline grades, fracture under pressure to expose fresh edges, so the abrasive keeps cutting instead of rounding over. That consistent cutting rate is why a mirror finish becomes repeatable rather than lucky.
Expert Tip: Diamond is the hardest known abrasive, cutting steel, glass, ceramic, and gemstone without dulling the way silicon carbide or alumina do.
Suppliers label pastes across overlapping micron ranges. Kemet’s lineup runs from coarse pastes around 45 µm for rapid stock removal down to 0.1 µm for a super-smooth finish. That range means the word “fine” on a syringe is meaningless. Check the micron number, not the adjective.
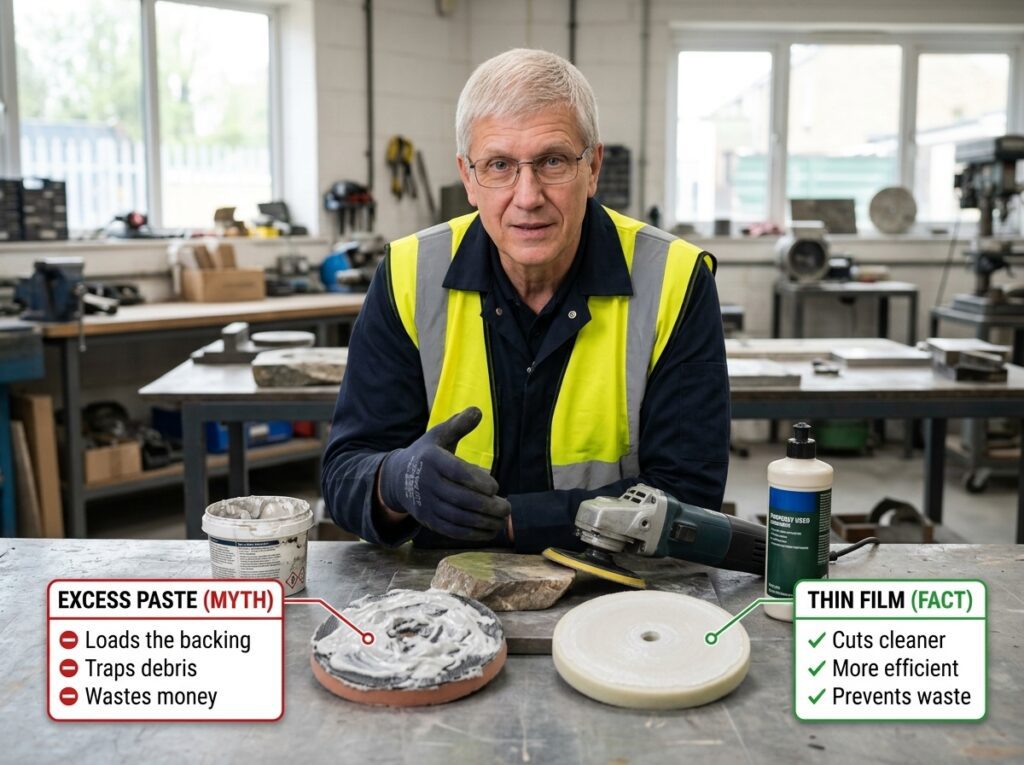
A knifemaker I share bench space with loaded a felt wheel with a thick bead of 45 µm paste, convinced more abrasive meant faster stock removal. Within ten minutes the felt glazed, the paste caked into ridges and the blade came off with a dull grey haze instead of a cut; this felt-loading problem differs from the bond glazing involved in restoring a glazed diamond blade. He blamed the paste. The paste was fine the film was not.
A thin, replenished layer cuts cleaner because fresh diamond keeps meeting the steel. A thick layer just traps swarf and loads the backing. More paste does not polish faster. A thin, replenished film cuts cleaner than a thick, caked layer that loads the backing and traps debris.
Knowing what the paste is only helps if you understand the number printed on the syringe. That number is the micron rating and it decides everything downstream.
Grit Size and Micron Explained
The number on the syringe is the whole game, so it pays to know what micron actually means.
Understanding Micron Ratings
A micron is the average particle diameter in a paste. One micron equals 0.001 millimeters, so a 3-micron paste carries particles about three thousandths of a millimeter across. That is small enough to disappear into a fingerprint, yet it is the difference between a visible scratch and a mirror.
Micron beats grit numbers because grit systems are not standardized across manufacturers. FEPA F230 maps to roughly 53 microns and F1500 to about 2 microns, but those conversions shift depending on whose chart you consult. Two pastes both labeled 3000 grit can cut completely differently. The micron rating means the same thing on every syringe from every supplier.
Why does one “3000 grit” paste cut like 1200 and another polish like 8000? Because grit numbers are a mess. I have watched this pattern repeat every time I switched suppliers at the bench. The FEPA chart says F230 is 53 microns and F1500 is 2 microns but the moment a second manufacturer enters the picture, those numbers drift. A paste labeled 3000 grit from one house behaves nothing like a 3000 grit from another. The micron rating on the label is the only number I trust now.
Grit-to-Micron Relationships
Diamond paste spans roughly 90 microns at the coarse end, where it removes stock fast and leaves visible furrows, down to 0.1 microns at the ultra-fine end, where it polishes to a true mirror. Between those poles sits a continuum of steps each roughly half the size of the one before it.
The FEPA grit scale offers a rough map: F230 corresponds to about 53 microns, F1500 to about 2 microns. These conversions are approximate and standard-dependent. A FEPA chart from one source will not match another exactly and some manufacturers use their own internal scales entirely.
Expert Tip: Treat micron-to-grit ranges as overlapping guides for relative aggressiveness, then confirm the exact rating on your product’s label.
How Particle Size Determines Finish Quality
Larger particles remove more material per pass, but they also cut deeper. A 30-micron particle gouges a visible scratch; a 0.5-micron particle leaves a mark too shallow for the eye to resolve under normal light. That is the entire logic of grit progression.
Each finer step replaces deeper scratches with shallower ones. The 30-micron scratches disappear under the 15-micron pass, the 15-micron scratches under the 7-micron pass, and so on down the chain. At some point, the remaining scratches fall below the visible threshold and the surface reads as a mirror. Finish quality depends on whether every previous step removed the damage from the one before it, not on the final step alone.

With the numbers readable, one rule governs which sizes to pick: the halving rule.
Grit Selection Guide
You can read micron now. Here’s the rule that turns it into a plan.
The Halving Rule for Grit Progression
Cut your micron size roughly in half at each step. A sequence like 30 to 15 to 6 to 3 to 1 gives every stage one job: remove the scratches the previous stage left behind. Skip the halving and you force a fine grit to erase gouges it was never sized for. That’s how you end up with a surface that looks polished under bench light but turns into a scratch field the moment you hit it with raking light.
Six micron to three micron was the step where it clicked for me on a hardened D2 blade, I’d been jumping 6 straight to 1 and spending forty minutes chasing ghost scratches that a single 3 µm pass would have knocked out in five.
Expert Tip: Halve micron size at each progression step, 30 to 15 to 6 to 3 to 1, so each stage removes only the scratches left by the previous one, not new ones.
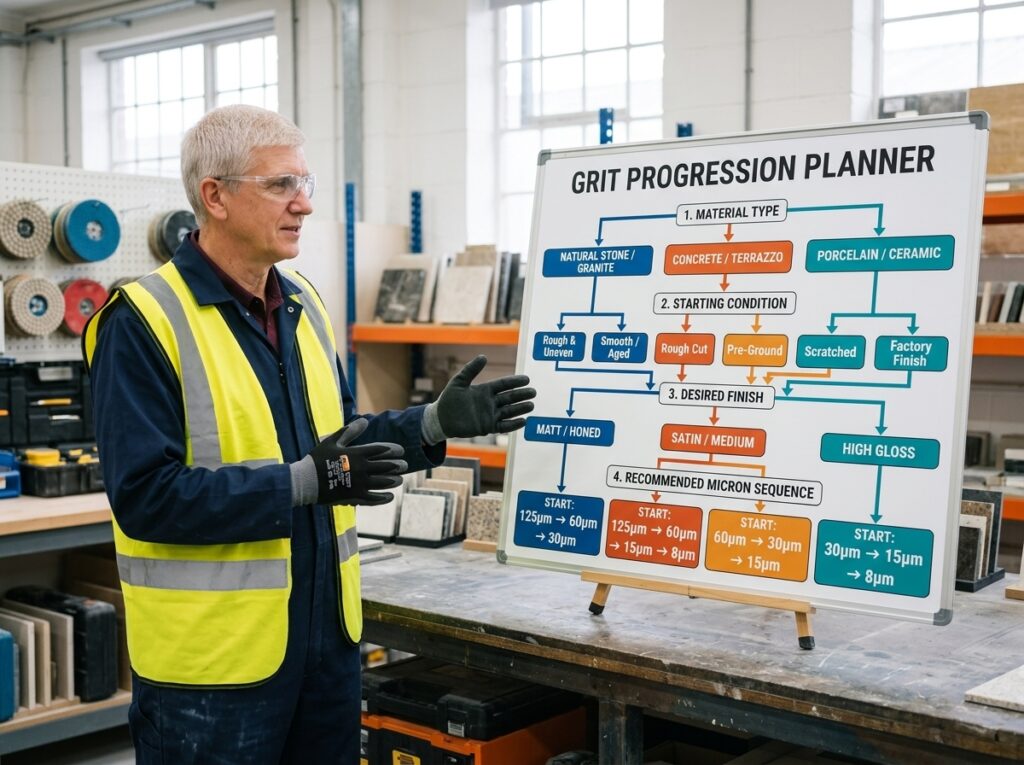
Deviate only when the material demands it. Soft metals like aluminum or copper tolerate slightly larger jumps because they deform under the abrasive rather than fracturing. Hard or brittle materials (tool steel, sapphire, ceramics) need tighter steps, sometimes a two-thirds reduction rather than a full half because each grit has to fully obliterate the previous scratch pattern before you move on.
Choosing Your Starting Grit
Pick your starting micron from the surface in front of you, not from a brand’s label. A part fresh off a 220-grit belt has a scratch depth that demands a 40-90 µm entry point for stock removal. A surface already sanded to 600 grit can start at 15-30 µm. Starting too coarse wastes time refinishing what’s already smooth. Starting too fine means you polish over deep scratches that will telegraph through every later step.
Material hardness shifts the floor for paste progression and also matters when choosing the right diamond blade. Harder steels and ceramics hold a sharper scratch pattern at the same micron size, so you may need one extra intermediate step. Softer gummy metals cut faster but load your backing, so you can sometimes compress the early steps.
Choosing Your Finishing Grit
The final grit sets the floor of your finish quality. Everything before it is preparation. Nothing after can compensate for stopping too coarse.
Three practical targets. 3-6 µm gives you a functional smooth surface clean to the touch, no visible scratches under normal light but not reflective. 1–3 µm gets you a proper reflective finish that throws back a clear image under raking light. 0.5-1 µm is where you land a true mirror, the surface that disappears under directed light because there’s nothing left to scatter it.
Expert Tip: The final grit sets the floor of finish quality, extra time at 3 micron cannot produce what 1 micron can, and skipping it guarantees haze.
I spent an entire afternoon at 3 µm on a mould insert convinced I could buff my way to a mirror and the raking light showed me the same faint haze every time, one pass at 1 µm on a dedicated felt bob erased it in under ten minutes.
Grit-to-Application Reference Table
| Micron Range | Polishing Stage | Typical Materials | Expected Finish |
|---|---|---|---|
| 40–90 µm | Coarse stock removal | Tool steel, hardened dies, heavy weld removal | Uniform matte, removes deep gouges |
| 15–30 µm | Pre-polish refinement | Steel, titanium, ceramics after coarse step | Smooth matte, scratch pattern narrowing |
| 6–15 µm | Intermediate polish | Most metals, stone, hard composites | Semi-smooth, faint directional pattern |
| 3–6 µm | Fine polish | Jewelry metals, knife bevels, mould surfaces | Functional smooth, no visible scratches |
| 1–3 µm | Reflective polish | Precious metals, optical moulds, lapidary | Clear reflective surface |
| 0.5 µm and below | Mirror finishing | Final-pass metals, gemstones, metallography samples | True mirror, no scatter under raking light |
A plan is only as good as its execution. The step-by-step application guide is next.
Step-by-Step Application Guide
The grit plan gives you a sequence. The bench is where that sequence either holds or falls apart. Every step in this chain depends on the one before it leaving nothing behind. Prep leaves a clean surface. Backing selection leaves a controlled contact point. Paste application leaves a thin even charge. Technique leaves consistent scratch removal. Cleaning leaves zero carryover. Final buff leaves nothing but the mirror. Break one link and the next step inherits the failure.
Step 1: Surface Preparation
Start with a clean surface. Wipe the workpiece with IPA on a lint-free cloth to remove oils, fingerprints and shop dust. Any residue left here gets ground into the surface by the first stroke.
Then assess the scratch condition under raking light. A low-angle directed light reveals residual scratches that normal lighting hides. This tells you whether the surface is ready for your chosen starting grit or whether deep tool marks need pre-leveling first.
Expert Tip: Inspect under raking light before you start: a low-angle directed light reveals residual scratches that normal lighting hides.
If deep gouges remain from machining or coarse shaping take them down with a finer abrasive step before you begin the diamond sequence. Starting too fine on a deeply scratched surface wastes paste and time.
Step 2: Selecting Your Backing Material
The backing is the delivery system. It holds the diamond particles against the work and controls how much pressure reaches any single point. The wrong backing for the job means uneven contact, uneven scratch removal and a finish that looks good only from one angle.
Leather strops work for hand finishing flat or gently curved edges. The leather has enough give to follow slight contours while keeping the abrasive in contact. Felt bobs suit rotary work on small parts and inside curves, where the compressed felt reaches areas a flat strop cannot. Wood blocks or wheels give a firm, flat surface for larger flats and edges. Cast iron or glass lapping plates provide the rigid, dead-flat reference needed for true planar surfaces.
Expert Tip: Use a dedicated backing per grit and color-code or label strops, felts, and plates: cross-contamination in leather or felt is nearly impossible to wash out.
The backing choice also determines how much paste you need and how often you recharge. A porous felt drinks paste. A glass plate holds a thin film on the surface.
Step 3: Applying the Paste
Less paste, more often. A small amount spread thin does more work than a heavy smear, because excess paste loads the surface and the abrasive rolls instead of cutting.
Dispense a small dot of compound onto the backing. Spread it with a clean fingertip or a dedicated spreader until it forms a thin, even film. For rotary tools, charge the felt or strop lightly and run the tool at low speed for a few seconds to distribute the compound before touching the work.

Expert Tip: Less paste, more often: apply a small amount and replenish as it thins, because excess paste loads the surface and wastes abrasive.
Product Recommendation: Diamond extender / lapping fluid: a few drops on the backing keeps the paste active and prevents drying during long sessions.
Replenish as the film thins. A dry backing generates heat, slows cutting and leaves the diamonds embedded unevenly.
Step 4: Polishing Technique, Pressure and Motion
Light, consistent pressure. The diamonds cut because they are hard; pushing harder adds nothing. Forcing the tool drives abrasive unevenly and deepens scratches instead of removing them.
Hand stropping uses long, even strokes with the workpiece held at a consistent angle. Change direction occasionally to break up any directional scratch pattern. Rotary tools need moderate speed and light contact moving steadily across the surface rather than dwelling in one spot. Lapping plates work best with a figure-eight or circular motion and even hand pressure across the whole part.
Expert Tip: Let the diamonds do the work: light, consistent pressure, because forcing the tool drives abrasive unevenly and deepens scratches.
Duration depends on the surface area and the grit. A small part may need only a minute or two per grit. A larger flat may need several minutes. Watch the surface under raking light as you go. When the previous grit’s scratches are gone, stop. More time on the same grit does not improve the finish once the scratches are removed.
Step 5: Inter-Step Cleaning
This is the make-or-break step. A single coarse particle carried forward from one grit to the next is the most common cause of cloudy mirror finishes. The particle sits in the finer abrasive and scratches the surface at exactly the depth you are trying to remove.
Wash the workpiece thoroughly between every grit. Soap and water work for most materials. For small workpieces such as rings, gemstones and small metal parts, an ultrasonic cleaner removes particles from recesses that hand washing misses.
Expert Tip: Clean obsessively between grits: wash the workpiece, tools, and hands thoroughly, because a single coarse particle carried forward ruins the finish.
Product Recommendation: Ultrasonic cleaner: for thorough inter-step cleaning of small workpieces such as rings, gemstones, and small metal parts.
Clean your hands too. Abrasive sticks to skin and transfers back to the work. Clean the bench surface and any tool rests. Wipe down the backing if it is a non-porous material. For porous backings like leather and felt, the dedicated-backing rule from Step 2 is what protects you because washing cannot remove embedded particles.
Product Recommendation: Lint-free wipes and isopropyl alcohol: keep a dedicated cleaning station, use fresh wipes per grit transition, and never reuse a wipe across stages.
The mirror looked perfect under the bench lamp. I was ready to call the job done. Then I tilted the part toward the window and the low-angle light caught it: a fine haze of micro-scratches running in one direction, invisible under normal lighting. From that point on, the inspection method mattered more to my results than the paste brand ever did. Marketing copy sells micron ratings and carrier fluids.
It never mentions raking light. But the finish that passes under a direct lamp and fails under raking light is the finish that comes back from a customer. I started inspecting every surface under low-angle light before and after every grit step. The cloudy results disappeared. Same paste, same backings, same cleaning routine. The difference was that I stopped polishing blind.
Step 6: Final Buffing and Residue Removal
After the last grit, the surface carries residue. Carrier fluid, spent abrasive and fine metal or stone dust all sit in a thin film that dulls the finish over time.
Wipe the surface with IPA on a fresh lint-free cloth. This removes the residue without scratching. Then buff with a clean microfibre cloth dedicated to final-stage use only.
Expert Tip: Final-clean with solvent: after the last grit, wipe with IPA on a lint-free cloth to remove residue that dulls the finish over time.
Product Recommendation: Polishing cloths (microfibre): for final buffing and residue removal, dedicated to final-stage use only.
Finish with a final raking-light inspection. Tilt the part under low-angle light and look for any remaining haze or directional scratches. If the surface passes under raking light, it will pass under any normal lighting. If it does not, go back to the last grit that left visible scratches and work forward again.
Every one of those steps runs on the carrier you chose. Water-based and oil-based pastes behave differently under pressure, on different backings and at different speeds. That choice shapes the whole sequence, so let’s settle it before you load the first strop.
Water-Based vs Oil-Based Paste
Every step you just learned behaves differently depending on the carrier. Here’s the choice.
Understanding Carrier Types
The carrier fluid is the water- or oil/grease-based medium that suspends the diamond particles. Water-based paste rinses off with water and dries faster. Oil/grease-based paste clings to vertical surfaces and stays workable longer but it needs solvent for cleanup. Selection comes down to adhesion, dwell time and cleanup, not brand.
Matching Carrier to Your Application
Flat lapping and water-tolerant materials lean water-based: the rinse is quick and the surface stays clean between steps. Vertical mould and die work plus long-dwell polishing lean oil/grease-based because the paste stays where you put it.
Expert Tip: For vertical mould/die work, choose oil/grease-based paste so it stays put; for flat lapping and water-tolerant materials, water-based rinses off faster.

On a batch of die-cast mould cavities last winter, I watched a colleague fight a water-based fine-grit paste on a vertical wall. The consensus said water-based cleans up easier, so he picked it. What actually happened: the carrier dried before the diamond had finished cutting and the dried residue set harder than any oil film I’ve ever cleaned.
He spent twenty minutes with solvent anyway, which defeated the whole point. My honest finding after that job: easy cleanup only matters if the paste stays wet long enough to work. On vertical surfaces, oil/grease wins on dwell time and the cleanup trade-off is smaller than the consensus suggests.
Carrier chosen. Now the material you’re polishing changes the recipe again.
Material-Specific Polishing Sections
Same paste, different material. The recipe shifts because the substrate fights back differently. Metal work-hardens, glass chips, gemstones hide contamination in every crevice. The grit progression that gives a knife maker a mirror will frost a sapphire if you skip the inter-step cleaning.
Polishing Metal: Steel, Carbide, and Tool Surfaces
Before you pick a micron, read the surface. Let the existing scratch depth set your starting point rather than the chart on the paste jar. A 400-grit belt finish needs a different entry than a machined surface that still shows tool marks. Match the first grit to the deepest scratch you can see under raking light, then work down from there.
After the starting grit is set, the abrasive type matters more than the carrier fluid. Soft, ductile metals like copper, brass and mild steel reward monocrystalline diamond for its uniform scratch pattern. Hardened tool steel and carbide are a different fight. Polycrystalline diamond fractures as it cuts, exposing fresh edges, so it keeps cutting where monocrystalline would glaze over.
Expert Tip: For soft/ductile metals choose monocrystalline diamond for uniform scratch patterns; for hardened tool steel and carbide choose polycrystalline for faster cutting and self-sharpening.
Backing and carrier fluid follow the metal’s temperament. Ductile metals tolerate a slightly softer backing, but hardened steel wants a firm felt or hard leather strop to keep the abrasive cutting the surface instead of sinking in. Oil-based carrier fluid stays put on vertical tool surfaces water-based washes away too fast when you are working a die cavity upside down.
Work-hardening is the quiet killer. Austenitic stainless and some tool steels harden under pressure and heat, so a heavy hand at a coarse grit can create a skin that fights every finer step after it. Light pressure, short passes and patience at the coarse end save you from a surface that refuses to finish.
Polishing Glass and Ceramic
Before you touch a coarse grit to glass, understand what you are risking. Glass does not scratch the way metal does. A coarse diamond particle does not leave a groove you can polish out; it creates a cone of subsurface damage that hides under the surface and reappears as haze when you think you are done; cutting porcelain tile without chipping addresses a separate problem: edge damage during cutting. Ceramic behaves the same way, just slower when cutting porcelain, continuous-rim versus segmented blades concern the separate issue of edge chipping.
After you accept that coarse grits are off the table, the setup changes. Rigid backing is non-negotiable. A soft felt wheel lets the diamond particles roll and gouge; a hard lap or rigid felt keeps them cutting flat. Water-based carrier fluid is the right call here. It keeps the surface cool and washes debris away, which matters because glass and ceramic generate fine swarf that would otherwise scratch the surface you just polished.
Light pressure is the discipline. Push hard and you drive damage deeper. Let the abrasive do the work, keep the surface wet and check under raking light between steps. Patience produces the mirror; force produces damage.
Polishing Gemstones and Lapidary Materials
Before you start, commit to the halving rule and the flex shaft. Gemstone facets are small, precise and unforgiving. A flex shaft or micromotor with a felt bob gives you the control to work a single facet without rounding the edges. The halving rule keeps your grit progression tight enough that each step erases the last, not just softens it.
After each grit, the real work is the cleaning. Gemstones trap diamond particles in every crack, inclusion and facet junction. Skip the ultrasonic clean between grits and you carry coarse particles into your fine polish, which is exactly how a “finished” stone comes out hazy. Clean ultrasonically between every step. That habit separates a mirror from a fog.
Carrier fluid choice for gemstones leans oil-based for most stones. It stays on the facet longer, which matters when you are working a small area with a felt bob. Water-based works for heat-sensitive stones but you will reapply more often. Paste storage matters here too. A dried-out paste cuts poorly and inconsistently and gemstone work is too precise to tolerate either.
Expert Tip: Keep paste sealed and cool; exposure to air dries out the carrier, changing consistency and cutting performance, and dried-out paste cuts poorly.
Cross-contamination between materials is as damaging as between grits. A felt bob used on hardened steel carries metal particles that will scratch a soft stone.
A lap used for glass will transfer silica particles into your metal polish. “You mean I need a separate felt wheel for every stone type?” a client asked during a sapphire recut, eyeing the row of bobs on my bench.
The pattern repeats across every material switch: reuse a backing across materials and the next piece comes out hazy and the paste gets the blame. That is why I now keep dedicated backings for steel, glass and each stone family, labeled and stored apart and clean thoroughly when switching materials.

Even with the right recipe for each material, things go wrong. The troubleshooting matrix in the next section catches every failure mode from cloudiness to micro-scratches and tells you exactly what to fix.
Common Problems and Solutions
When the mirror doesn’t arrive, here’s how to diagnose exactly why. Every failed polish traces back to one of five process failures: insufficient paste, wrong micron choice, excessive pressure, poor inter-step cleaning or rushing the progression.
A batch of stainless kitchen knives for a restaurant order taught me the cost of rushing. I was moving through the progression from 80 µm down to 1 µm and skipped the inter-step cleaning between 3 µm and 1 µm because I was behind schedule. The finish looked clean straight-on but under raking light the haze was obvious. Residual 3 µm scratches the 1 µm paste couldn’t reach. I lost an afternoon going back to 6 µm and redoing three steps. Now every backing is dedicated to a single grit and I clean between every step, no exceptions.
Troubleshooting Matrix: Diagnosing and Fixing Polishing Failures
| Symptom | Likely Cause | Fix |
|---|---|---|
| Persistent haze after final grit | Incomplete progression or cross-contamination from a coarser grit on the backing | Go back two or three grit steps, clean the backing thoroughly or switch to a dedicated backing |
| Micro-scratches visible under raking light | Residual scratches from skipping a grit step or contaminated backing | Re-establish the progression from the coarsest visible scratch, halve micron at each step |
| Uneven polish | Inconsistent paste distribution or incompatible substrate | Apply paste evenly across the backing, check backing compatibility with the workpiece |
| Paste loading/caking on backing | Excess paste or uneven distribution | Reduce paste amount, spread it evenly, clean the backing before recharging |
| Poor cutting rate | Too little paste or excessive pressure | Add paste in small increments, lighten pressure |
| Swirl marks in the finish | Excessive pressure or contaminated backing | Lighten pressure, clean or replace the backing |
| Finish hazed under raking light only | Residual micro-scratches from incomplete progression or cross-contamination | Diagnose with raking light, go back one or two grit steps |
| Paste drying out during use | Carrier fluid evaporating, often from heat buildup under pressure | Add a small amount of carrier fluid, reduce pressure and speed |
Raking light is the diagnostic standard I reach for first. Haze visible only under raking light points to residual micro-scratches from incomplete progression or cross-contamination. Straight-on inspection misses these. The fix is going back and re-establishing the progression more polishing at the same grit just burnishes the damage in.
Debunking Common Diamond Paste Myths
More paste than the backing can hold leads to loading. The paste cakes on the surface, the diamond particles stop cutting and the finish gets worse. If the backing looks clogged, you used too much.
Skipping grits leaves deeper scratches behind. Under raking light, the scratches from the skipped grit are still there and the finer grit can’t remove them. You end up going back anyway, so the shortcut costs time.
Oil and water behave differently as carriers. The carrier fluid controls how the paste spreads, dries and cuts. Swap oil for water and the paste behaves differently on the backing.
Monocrystalline and polycrystalline diamond cut differently. The finish you get depends on which type you’re using not just the micron number; types of diamond blades for cutting are a separate product choice. Monocrystalline tends to leave uniform scratch patterns on soft, ductile metals polycrystalline cuts hard materials faster thanks to its self-sharpening fracture behavior.
Tools and Accessories Checklist
You know the process. Here’s the kit that makes it repeatable.
The cast iron lapping plate rang like a bell when I set it down, and that sound told me more about flatness than any spec sheet. I’d been fighting haze for weeks and the answer turned out to be a second plate, dedicated to a single grit, so the 45 micron particles from my stock removal stage never touched the 1 micron finish. That’s the whole checklist in one lesson: every tool earns its place by preventing cross-contamination.
Essential Tools for Diamond Paste Polishing
Start with the paste set because everything else hangs off it. Confirm it spans the full micron range your grit progression needs not just a few popular grits. Suppliers label coarse pastes differently and a set that skips a step forces you to overwork the next one.
Product Recommendation: Look for a multi-grit syringe set that spans the full micron range your progression needs, with water-based paste for easy cleanup.
Next to the paste sits extender fluid. When paste dries on a backing, it stops cutting evenly. A compatible extender reactivates it without changing the carrier chemistry.
Product Recommendation: Keep a compatible extender or lapping fluid on hand to reactivate drying paste and maintain consistent cutting action.
Backings follow surface geometry. Leather strops handle edges and blades, where a firm but forgiving surface prevents rounding.
Product Recommendation: Use leather strops for hand-applied edge and blade work where a firm but forgiving backing prevents rounding.
Felt bobs reach contoured and recessed areas when mounted on a rotary tool or flex shaft.
Product Recommendation: Felt bobs in assorted shapes reach contoured and recessed areas when mounted on a rotary tool or flex shaft.
For precision flat work, you need lapping plates: a flat, non-yielding reference surface.
Product Recommendation: Cast iron or glass lapping plates give a flat, non-yielding reference surface for precision flat work.
Every backing and plate must be dedicated to a single grit, or cleaned obsessively between stages. Cross-contamination is the top cause of haze.
Lint-free wipes and isopropyl alcohol are not optional. They remove residue between grit stages without leaving fibres behind.
Product Recommendation: Keep lint-free wipes and isopropyl alcohol at the bench for fast, residue-free cleaning between grit stages.
Clean microfibre cloths finish the job, lifting the last traces of paste without adding scratches.
Product Recommendation: Use clean microfibre cloths for final buffing and removing the last traces of paste without adding scratches.
Optional but Valuable Tools
An ultrasonic cleaner pulls embedded grit out of small workpieces between stages, far more thoroughly than wiping alone.
Product Recommendation: An ultrasonic cleaner removes embedded grit from small workpieces between stages, far more thoroughly than wiping alone.
Color-coded labels turn a shelf of identical syringes into a legible progression. A cleaning station keeps wipes, IPA and extender within arm’s reach, so you never skip a wipe because it’s inconvenient. Magnification and a raking light source turn a good result into a diagnosable one: you see the scratches you’re chasing instead of guessing.
Last thing before you start: how to handle and store the paste safely.
Safety and Cleanup
Diamond paste is inert, but the workflow around it has real hazards. Handle it right.
Safe Handling of Diamond Paste:
Avoid inhaling dried particles; wear nitrile gloves work ventilated with solvents.
The hazard is dried residue. Once the carrier fluid evaporates, loose diamond particles become airborne dust that settles in lungs. Work with airflow moving across the surface, not just circulating room air. Nitrile resists IPA and most carrier solvents without degrading.
Solvent Use Precautions:
IPA flammability, ventilation, storage in approved containers.
IPA’s flash point sits low enough that a spark from a bench grinder can ignite vapors pooling near the work surface. Work ventilated, keep containers closed and store them in an approved flammable-liquid cabinet, never a repurposed food jar.
Proper Disposal of Contaminated Materials:
Dispose of contaminated wipes/gloves per local regulations; avoid rinsing paste down drains; dedicated waste container.
Expert Tip: Keep a dedicated, clearly labeled waste container at your cleaning station for contaminated wipes, and empty it regularly to prevent solvent vapor buildup.
Contaminated wipes and gloves go into that container not the sink. Rinsing paste down drains moves the problem into plumbing and waterways. Check local regulations for whether solvent-soaked wipes count as hazardous waste.
Storing Diamond Paste:
Keep sealed and cool; cap syringes; store away from heat; check consistency periodically.
Expert Tip: Keep paste sealed and cool, because a dried-out paste cannot be reliably reconstituted to original performance. Prevention is the only reliable strategy.
The crusted syringe cap told the whole story when I found it on his bench, left uncapped overnight until the carrier fluid evaporated to a solid plug.
Cap syringes immediately after dispensing. Store them away from heat sources. Check consistency periodically: if the carrier fluid has separated, a gentle stir brings it back. If it’s crusted, it’s done.
Conclusion
A mirror finish comes from disciplined technique. The paste matters but the process around it decides whether the result comes out clear or cloudy. Cross-contamination between grits is the most common failure point and thorough washing of work, hands and backing between every stage prevents the haze that sends people back to buy a finer paste.
The bench light rakes across a freshly polished face and the haze is still there. I have seen this same scene repeat across several jobs: a jeweler or knife maker blames the paste, buys a finer grit and the cloud returns. The real cost was never the abrasive; it was the skipped wash between stages, the same contaminated backing carrying coarse grit into the fine step. Fixing the cleaning protocol took minutes and cost nothing.
Expert Tip: If you take away one principle, let it be this: cross-contamination is the single most common cause of failed mirror finishes. A disciplined cleaning protocol between grits is worth more than any paste upgrade.
Before your next polish, audit your cleaning protocol rather than buying a finer paste. That is the fix that actually changes the result.