Halfway through a porcelain floor, every dry segmented pass chipped the edge, and I kept feeding slower instead of switching to a continuous rim and water. I lost a glazed blade, gained a clean cut.
Most glazed blades and chipped edges trace back to a bad match: wrong rim, wrong bond, wrong tool or wrong feed. This guide gives you a decision framework for buying the right blade the first time. Two choices matter more than price. Rim type and bond hardness each get their own section ahead. And the blade never works alone; tool, cooling and feed rate are the rest of the system.
Key Takeaways
- A diamond blade has two decisions that matter more than price: rim type (segmented, continuous, or turbo) and bond hardness (soft, medium, or hard). Get both right and the blade almost chooses itself.
- The bond hardness rule is counterintuitive: soft bond for hard materials like porcelain and cured concrete, hard bond for soft, abrasive materials like green concrete and soft brick.
- The blade is only one part of the cutting system. The tool, cooling method (wet or dry), and feed rate decide whether a good blade cuts clean or glazes and chips.
- Segmented rims cut fast and rough, continuous rims cut slow and clean, turbo rims split the difference. Match the rim to the finish you can live with.
- Safety is non-negotiable: cutting concrete and masonry produces respirable crystalline silica, and the right PPE plus wet cutting or dust extraction is part of choosing the right setup, not an afterthought.
Before you can choose a blade, you need to understand what it actually does. The next section explains the grinding principle that makes every later decision make sense.
How a Diamond Blade Actually Cuts
The introduction promised you could stop wasting money on the wrong blade. First, you need to know what a diamond blade is actually doing.
A diamond blade grinds material into dust. It does not slice like a toothed saw. The metal bond holds diamond crystals, and as the bond wears away, fresh sharp diamonds are exposed. That is the whole engine of the cut.
If the bond wears too slowly, the exposed diamonds polish flat and the blade stops cutting. That is glazing, and it is the most common reason a blade “goes dull” while still looking fine.
The blade is a consumable. The segment wears away as it works, and that wear is not a defect. It is the mechanism.
“Long life” is the most dangerous claim on a blade package. A colleague bought one sold on exactly that promise and spent a morning fighting it through a concrete lintel. The bond was so hard it refused to wear, the exposed diamonds polished flat, and the cut stalled. He kept pushing harder, which made it worse. The blade was glazed, not dull, and no amount of force fixes that. It would indeed last a long time. It just would not cut while doing it.
The same wear-and-expose principle applies to diamond core drilling, where the bit grinds its way through rather than cutting.
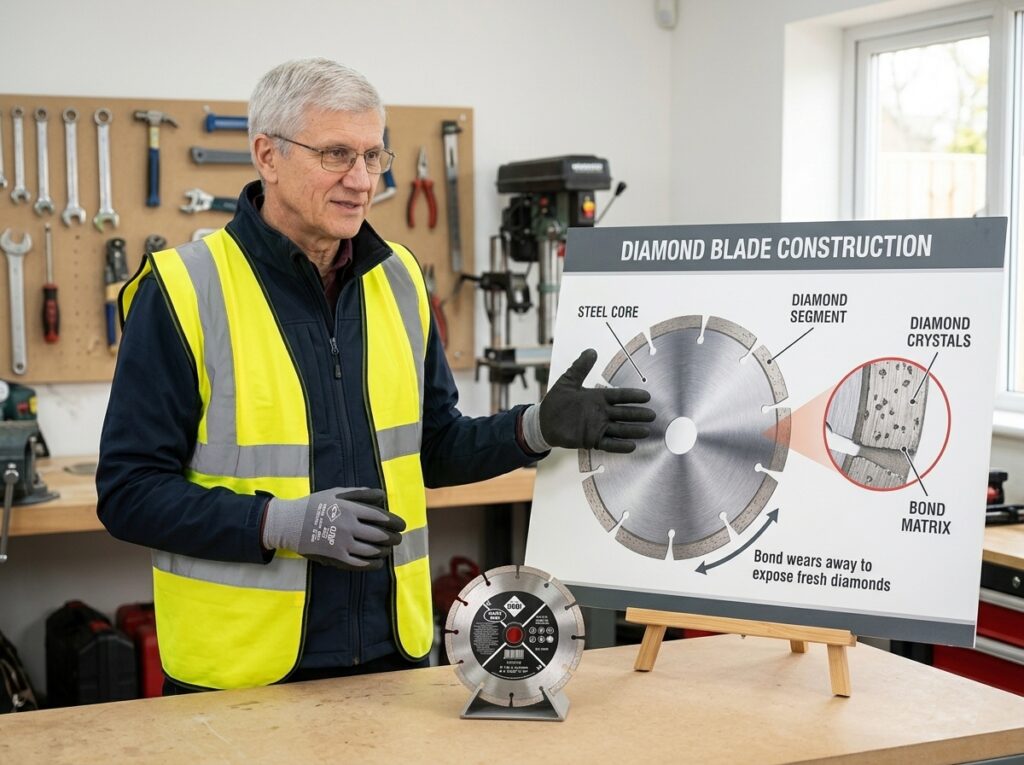
The blade grinds and wears itself away as it works. The rim type is the next variable that controls that grinding action and the finish you get.
The Three Rim Types: Segmented, Continuous and Turbo
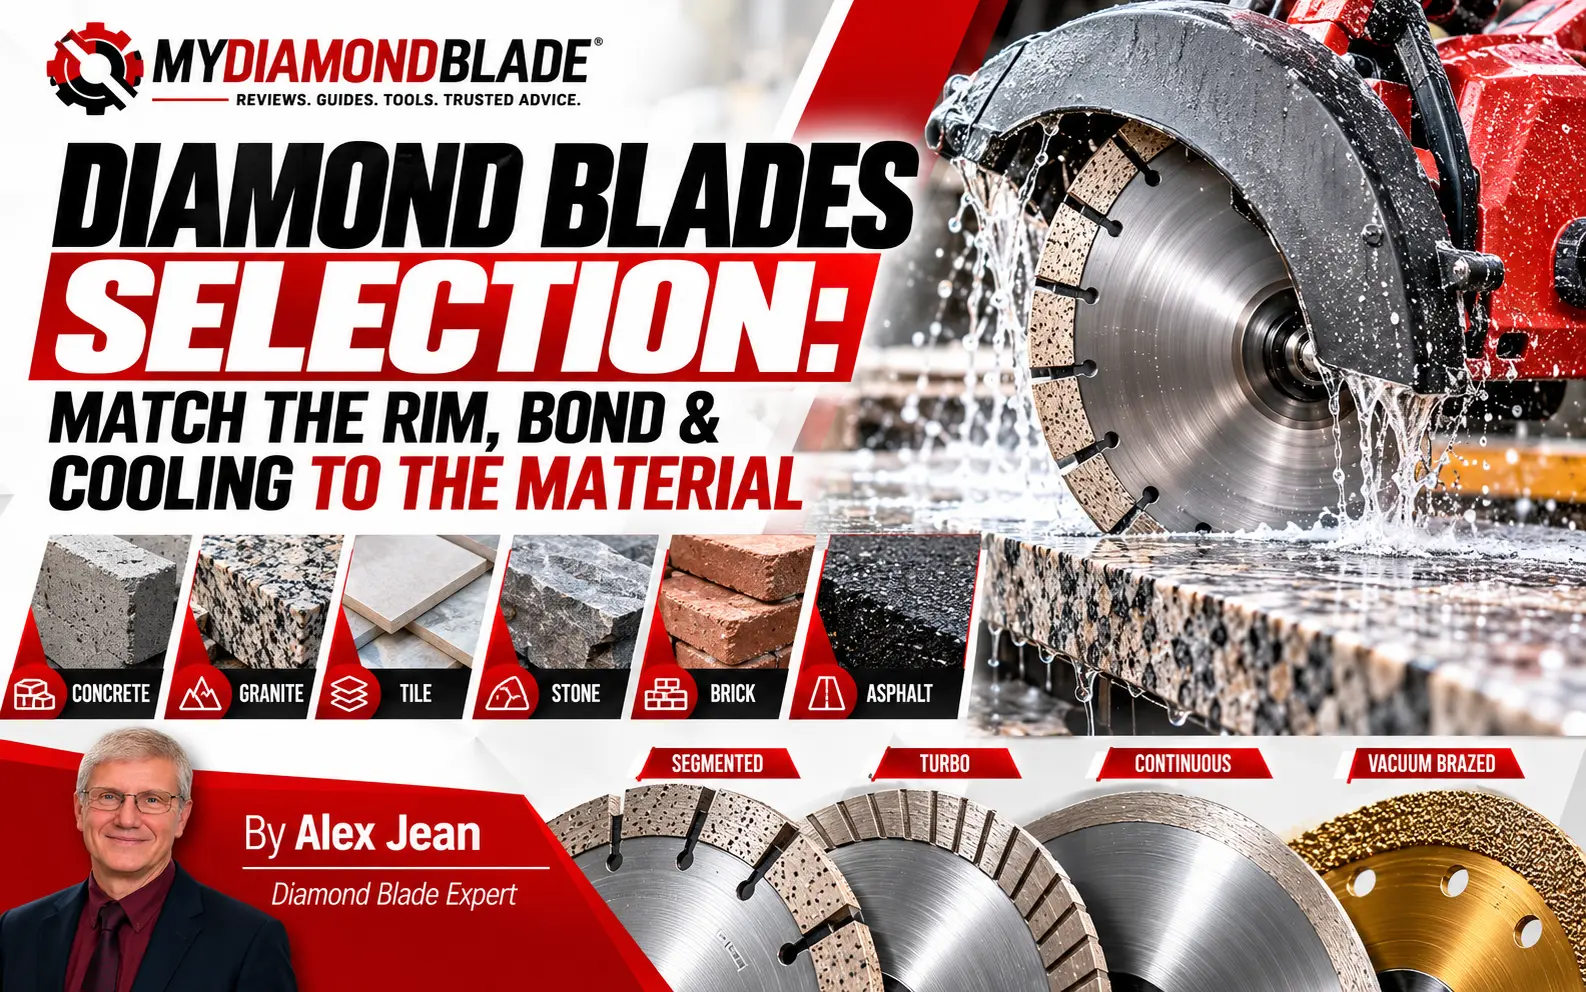
You now understand the grinding principle: a diamond blade wears its bond to expose fresh diamonds, and it grinds rather than cuts. The rim type is the first big decision, because it controls how the blade grinds, cools, and finishes the cut. Three rim shapes cover nearly every job: segmented, continuous, and turbo.
“Which rim do I actually need?” That question follows me onto every job, and the pattern across the tile bathrooms, concrete steps, and brick walls I have cut is always the same: the finish requirement decides the rim, not the price tag. I have watched a cheap segmented blade chew through a concrete slab in minutes and leave an edge rough enough to catch a glove. I have watched a continuous rim crawl through the same slab but leave a line clean enough to grout against. The cheaper blade was not the right blade.
That is why the rim type matters before you look at price, brand, or even bond hardness.
Segmented Rim Blades: Fast, Rough and Built for Masonry
The segmented rim is the one with gullets, the gaps between the individual diamond segments. Those gullets are not decoration. They pull air through the cut, which cools the blade, and they clear debris out of the kerf.
A segmented blade can therefore run dry on masonry and reinforced concrete without glazing over. The trade-off is the cut edge: it comes out rough, with visible chipping at the corners. For a concrete step or a block wall, that roughness does not matter.
For a glazed tile, it is a disaster.
Segmented rims earn their keep on concrete, where the gullets cool the blade and clear the dust. If you are cutting concrete with a circular saw, this is the rim you want.
Expert Tip: For dry masonry cuts, a segmented rim’s gullets are doing the cooling work. Skip the continuous rim unless you can run water.
Continuous Rim Blades: The Chip-Free Standard
The continuous rim has no gullets. The diamond edge runs uninterrupted all the way around, so the blade shears through material instead of hammering at it segment by segment. The result is the cleanest, most chip-free edge you can get from a diamond blade.
That is why continuous rims are the default for tile, porcelain, and finished stone, where a chipped edge means a ruined piece. The cost is speed and heat: a continuous rim cuts slowly, and because there are no gullets to pull air through, it needs water cooling to stay honest.
Run one dry for long and it will glaze.
If you are choosing a tile blade for porcelain or natural stone, the continuous rim is where you start.
Turbo Rim Blades: The Middle Ground
The turbo rim looks continuous at a glance, but the edge is serrated, a series of angled notches that split the difference between the other two. It cuts faster than a continuous rim and leaves a cleaner edge than a segmented one.
That makes it the versatile all-rounder, useful when one blade has to handle mixed materials on the same job. The compromise is real: a turbo blade is never the fastest choice and never the cleanest.

It is the blade you pick when you do not want to swap rims between cuts.
| Rim Type | Cut Quality | Cutting Speed | Cooling | Best Materials | Typical Use |
|---|---|---|---|---|---|
| Segmented | Roughest edge, visible chipping | Fastest | Air via gullets | Concrete, brick, block, masonry | Dry cutting, demolition |
| Continuous | Cleanest, chip-free | Slowest | Needs water | Tile, porcelain, finished stone | Wet tile saw |
| Turbo | Cleaner than segmented | Faster than continuous | Moderate, serrations aid airflow | Mixed materials | All-rounder |
The decision rule is simple: match the rim to the finish quality the job demands, not to the blade’s price. A cheap segmented blade will ruin a porcelain tile faster than any premium continuous rim will save it, and an expensive continuous rim will glaze and crawl on a concrete slab where a basic segmented blade would fly. The rim is a tool for a specific finish, not a quality tier.
Rim type is only half the equation. The other half is bond hardness, which determines how fast the blade wears to expose fresh diamonds. That is the rule most buyers get backwards, and it decides how long your blade lasts.
Bond Hardness: The Rule Most Buyers Get Backwards
Rim type controls cut quality. Bond hardness controls whether the blade keeps cutting at all. Most competitor guides gloss over this, or get it flat wrong.
The rule runs opposite to instinct: soft bond for hard, dense materials; hard bond for soft, abrasive materials. Granite, hard porcelain, and concrete with hard aggregates want a soft bond. Asphalt, green concrete, and soft brick want a hard one.
Here’s why. A diamond blade cuts because the metal matrix holding the diamonds has to wear away, exposing fresh, sharp edges. Cut something hard and dense and the material barely touches the bond, so a soft bond sheds fast enough to keep the edge open. Cut something soft and abrasive and the material eats the bond quickly, so a hard bond holds the diamonds in place instead of releasing them early.
Bond hardness comes in three grades: soft, medium, and hard. The catch? Most blades never print this on the label. You’ll see “universal” or “multi-purpose” far more often than an honest bond rating. Trust material-specific recommendations from the manufacturer, and treat any blade sold as universal with suspicion.
Get it wrong in either direction and the failure shows up fast. A too-soft bond sheds diamonds early, so the blade wears down quickly and dies young. A too-hard bond glazes. The bond refuses to wear, the exposed diamonds polish flat, and the cut slows to a crawl while you dress it constantly just to keep it biting.
Nine minutes into a porcelain job, the blade stopped biting because I’d grabbed a hard-bond blade thinking harder meant tougher; it glazed on the dense tile, and a soft-bond swap brought the cut back in under a minute.
That mistake is why porcelain is the classic hard-material case, and it’s the same reason segmented rims chip porcelain when the bond is wrong.
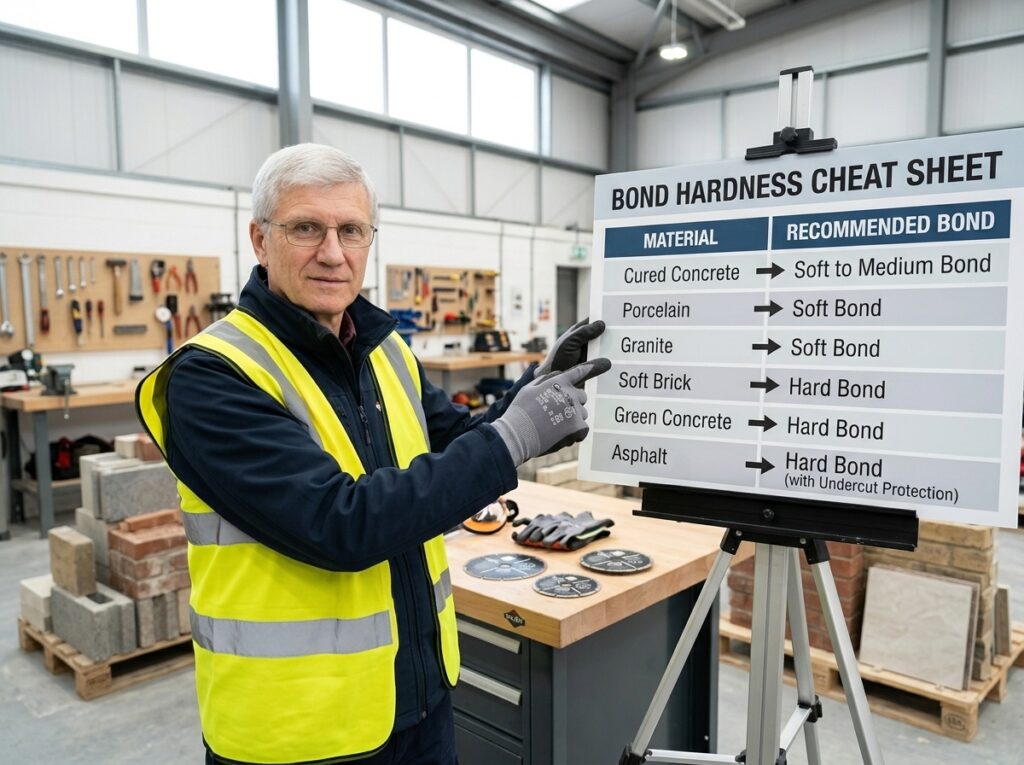
The bond rule only pays off when you match it to a specific material. The next section runs through the materials you’re actually cutting and gives you the bond, rim, and wet-or-dry call for each one.
Matching the Blade to the Material
The bond rule stops being theory the moment you stand over a slab. Soft bond for hard material, hard bond for soft. Get it backwards and the blade tells you within seconds. Here is the setup for each material you are likely to cut.
| Material | Recommended Rim | Recommended Bond | Wet or Dry | Key Note |
|---|---|---|---|---|
| Cured concrete | Segmented | Soft to medium | Dry or wet | Hard aggregates want soft bond |
| Reinforced concrete | Segmented | Medium | Dry or wet | Gullets clear the steel |
| Porcelain tile | Continuous | Soft | Wet | Mohs 7-8, chip-free edge |
| Ceramic tile | Continuous | Medium | Wet | Mohs 5-6, more forgiving |
| Brick and block | Segmented | Medium | Dry usually | Abrasive but forgiving |
| Granite | Continuous or turbo | Soft | Wet | Mohs 6-7, hard and dense |
| Marble | Continuous | Soft | Wet | Softer stone, clean edge matters |
| Asphalt | Segmented | Hard | Dry | Soft and abrasive, undercut protection |
| Green concrete | Segmented | Hard | Dry or wet | Soft and abrasive while curing |
Concrete and Reinforced Concrete
Cured concrete is the most common job, and the call comes down to the aggregate. Hard aggregates want a soft bond; standard mixes run fine on a medium bond. A segmented rim is the practical choice because the gullets clear the cut, and on reinforced concrete they give the steel somewhere to pass. Dry or wet both work depending on the job. But concrete dust is silica dust, so keep it managed at the source.
Porcelain and Ceramic Tile
Porcelain is where blade choice shows up instantly. It runs 7-8 on the Mohs scale, hard enough that a soft bond is non-negotiable, and a continuous rim is what keeps the edge chip-free.
A segmented blade leaves the edge ragged before you finish the first tile. Ceramic sits at 5-6 and forgives more, but the same continuous rim and wet cut give the cleanest result.
The full technique for cutting porcelain without chipping covers the face-up versus face-down rule as well.
Brick, Block and Masonry
Brick and block are softer and more forgiving than concrete. A segmented rim on a medium bond cuts fast, and dry cutting is usually fine. These materials are abrasive, so the bond wears back steadily. They will not punish a slightly wrong setup the way porcelain does.
Stone, Granite and Marble
Finished stone wants a clean edge, so a continuous rim is the default. A turbo rim is acceptable for hidden edges where speed matters more than finish. Granite is hard and dense, and a soft bond is the only way to keep fresh diamond exposed. Marble is softer but still demands a wet cut and a soft bond for a clean line.
The blade stopped biting about six inches into the first granite worktop on a kitchen job. I had a hard-bond segmented blade on the grinder, and it went from cutting to skating in the time it took to finish the first pass. The edge had gone shiny, the diamonds polished flat. I swapped to a soft-bond blade and the same grinder pulled through the rest of the run at full speed. Granite sits at 6-7 on the Mohs scale, hard enough that a hard bond never wears back fast enough to expose fresh diamond, so the blade glazes. That one swap cost ten minutes and taught me more about bond hardness than any spec sheet.
Asphalt
Asphalt flips the rule. It is soft and abrasive, the opposite of porcelain, so it wants a hard bond that resists wearing, plus undercut protection to stop the shoulder from eating away. A segmented rim clears the cut. This is where buying by rim type alone fails hardest: the same segmented rim that suits concrete needs a completely different bond here.
Material and blade are matched, but cooling is the third decision that decides whether the cut stays clean or the blade glazes. Wet versus dry comes next.
Wet vs Dry Cutting: Choose the Cooling Method
You’ve matched the blade to the material. Now decide how to cool it. The wet vs dry choice affects blade life, cut quality, and your lungs.
Wet cutting cools the rim and suppresses silica dust. It leaves slurry behind and needs a water source. Dry cutting is portable and fast, but it produces respirable silica dust and relies on gullets and airflow for cooling.
The real decision is to match the method to the job site. Indoor tile work usually calls for a wet tile saw, because the water source is right there and the slurry is easier to contain. Outdoor concrete often goes dry with a dust shroud, because hauling water to a kerb line is a hassle.
Blade design matters too. Continuous rim blades cut cleanest wet, where the water carries heat away and the bond wears evenly. Turbo rims split the difference. But a blade rated wet-only will glaze over if you run it dry, and a dry-only blade can clog its gullets with slurry if you add water.
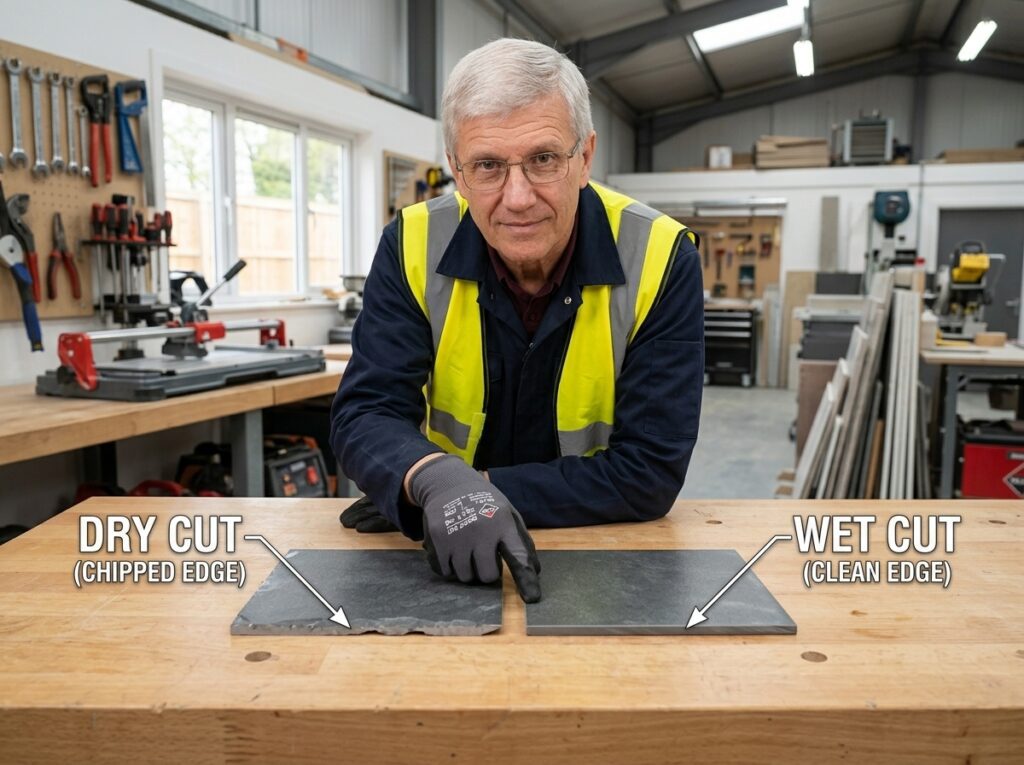
On a bathroom refit in Cardiff last autumn, I watched a mate cut large porcelain tiles dry with a turbo rim blade. Every edge chipped at the corners. He blamed the blade and swapped it for a new one, and got the same result. The box said “wet or dry,” so he never questioned the setup.
I ran the same blade on the same tile with a trickle of water and the edge came out clean. The water kept the rim cool and the bond wearing, so fresh diamonds stayed exposed. A blade rated for both modes still behaves differently in each: hard porcelain glazes the bond fast when it runs dry.
Cooling method chosen, the tool you mount the blade on is the next decision to get right, and it matters just as much as the blade itself.
Matching the Blade to the Tool
Blade and cooling method are settled. Now the tool itself: its speed, power, and setup change what the blade can do. The same blade cuts differently in a different tool.
“Same blade, different saw, why’s it cutting different?” a builder asked me mid-patio; I’ve heard that line enough times to know the answer before he finished: RPM and feed pressure wear the bond at different rates, so a blade that glazes on a slow grinder can throw segments on a fast saw.
An angle grinder spins a small blade far faster than a circular saw spins its larger one. That speed gap is where most mistakes start. Push a grinder blade too hard and the exposed diamonds polish flat.
The bond stops wearing, the blade glazes over, and you’re left pressing a shiny disc against concrete that won’t cut. The other failure is worse. Run a blade above its maximum speed rating and the segment braze overheats segments come off.
I’ve seen it happen on dry cuts where the operator leaned into the grinder to finish faster.
The circular saw changes the equation more power, a bigger blade, a deeper cut. Feed it slow and steady and the bond wears at the right rate. Before you buy, match the blade’s maximum speed rating to the tool’s RPM. That one check saves more blades than any other.
Tile saws and core drills punish the same mistake: forcing the feed. A tile saw’s continuous rim has no gullets, so it cuts clean but holds heat. Push a porcelain tile through too fast and the edge chips before the blade gets a chance.
Let the water do the cooling and feed it slow. A core drill wants the same patience. Rock the drill, let it wander, or lean on it and you chip the hole edge or glaze the segments.
Steady pressure, straight entry, let the rim do the work.
The concrete chainsaw is a different animal. A diamond chain runs wet or it dies. The chain needs constant water to cool the links and flush the cut, and it needs tension checked more often than a wood chain. What ruins a chain fastest is running it dry, or running it loose and letting it slap. If you’re choosing a concrete chainsaw, think about the chain and the water supply together, not the bar alone.
Overheating shows up most on dry angle grinder cuts and on any circular saw cut without a shroud. The fix is the same every time: slow the feed, let the blade spin free for a few seconds each pass, and add water wherever the tool allows. A blade too hot to touch is a blade about to fail.
Product Recommendation: For concrete cutting with a circular saw, pair a segmented diamond blade with at least 10mm segment height with a dust shroud and compatible HEPA vacuum. Treat the blade, shroud, and vacuum as one system, not a blade alone.

Tool matched, but none of this matters if you’re not safe. The next section covers the silica dust hazard that most guides skip.
Safety and Silica Dust: The Part Most Guides Skip
You’ve got the right blade, tool, and cooling method. Now protect yourself: cutting concrete and masonry produces silica dust, and it can permanently damage your lungs.
Crystalline silica is the fine dust released when you cut concrete, brick, tile, or stone. The particles are small enough to lodge deep in your lungs, and they don’t come back out. Long-term exposure causes silicosis, a scarring of the lungs that keeps getting worse even after you stop breathing the dust. It also raises your risk of lung cancer and COPD. Even a single weekend job deserves respect.
The hierarchy of controls matters here more than anywhere else in blade selection. Engineering controls come first: wet cutting or dust extraction that captures the dust at the source. PPE is the last line of defence, the thing you wear when the engineering controls can’t get the job done alone.
For wet cutting, the water suppresses most of the dust before it becomes airborne. You still need eye protection, hearing protection, and gloves for handling the blade and material. A respirator is less critical when the water is doing its job, but if you’re cutting indoors or in a confined space, wear one anyway.
Dry cutting is where the rules change. A dust shroud on the saw, connected to a vacuum with a proper filter, is not optional. The shroud captures the dust at the cut point before it spreads, and the vacuum pulls it away. Skip this setup and you’re standing in a cloud of silica every time you pull the trigger.
I learned this the expensive way on a patio job cutting concrete pavers dry with an angle grinder. No shroud, no vacuum, just me and the blade. The dust was so thick I could taste it, and by the end of the day my sinuses were raw and the inside of my nose was caked grey. That night I coughed more than I had in years.
The fix was immediate: a dust shroud that clips onto the grinder, a hose running to a shop vacuum with a HEPA filter, and a P3 respirator on my face. The difference was instant. I could see the cut line, the air stayed clear, and the cough never came back. The shroud cost less than the blade I’d just worn out, which put the whole thing in perspective.
Setting up the shroud properly matters. It needs to seal against the surface you’re cutting, and the vacuum needs enough airflow to pull the dust through the hose before it escapes. A standard shop vacuum with a fine-dust filter works for most jobs; a proper H-class extractor is the gold standard for daily use.
For the respirator itself: a disposable FFP3 mask is the minimum for silica dust. The “3” means it filters the finest particles, which is exactly the silica fraction. A reusable half-mask with P3 filters is more comfortable for long sessions and seals better around the face. Fit matters more than the filter rating: if air leaks around the edges, the best filter in the world does nothing.
A safe setup still needs a healthy blade, though. The next section covers maintenance and how to fix the most common failure: glazing.
Blade Maintenance: Glazing, Dressing and Storage
A good blade is an investment. Keep it cutting and you fix the most common failure before it costs you a blade.
The grinder’s note went flat mid-cut, and the dust turned from gritty chips to fine grey flour. I looked at the rim and it had a polished, almost chrome shine. That’s glazing, and it’s the one blade problem that looks like a dead blade but isn’t.
Glazing happens when the bond fails to wear. The exposed diamonds polish flat against the material, and the blade stops cutting even though diamonds remain. It feels dull, but the diamonds are still there; the bond simply stopped exposing fresh ones.
Dress a glazed blade by cutting an abrasive material: a silicon carbide stone, a soft brick, or a cinder block. That wears back the bond and exposes fresh diamonds underneath. A few passes usually brings the bite back.
Watch for the warning signs. The blade slows, produces fine dust instead of chips, and the rim looks shiny or polished. Catch it early and a quick dress fixes it. Let it run and the glaze heats and damages the diamonds.
Expert Tip: Keep a silicon carbide dressing stone (around $12) in the tool bag and dress the blade the moment it starts to slow, before glaze damages the diamonds.
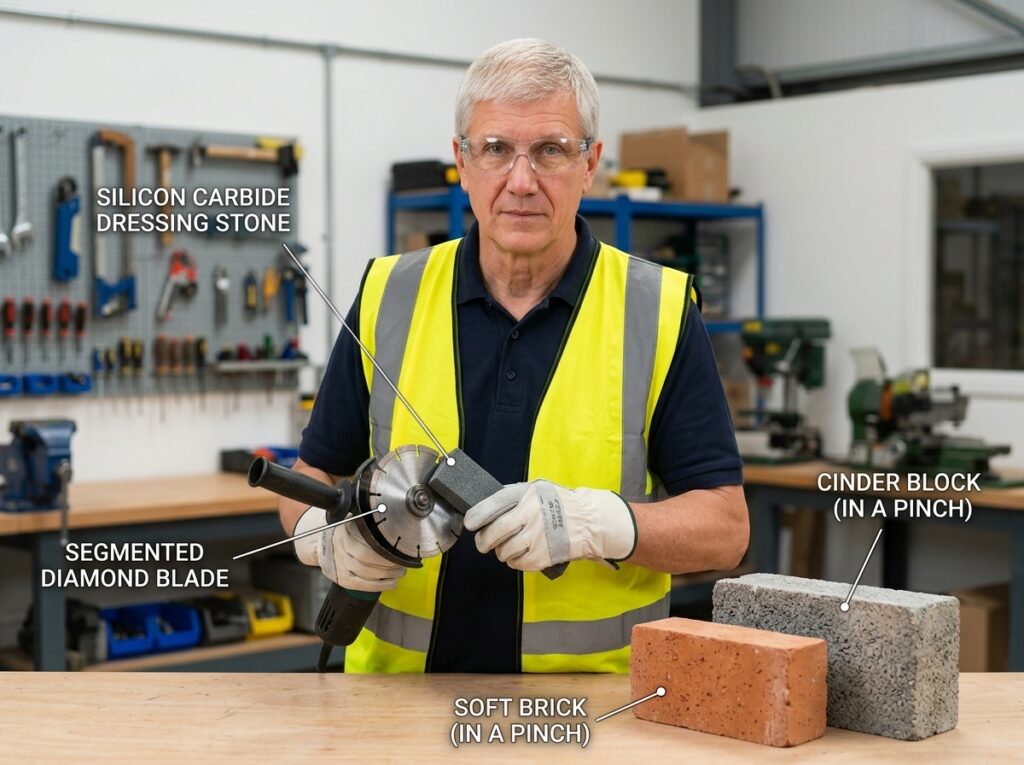
Product Recommendation: A silicon carbide dressing stone is the cheapest high-value maintenance tool; a soft brick or cinder block works in a pinch for a quick dress on a segmented blade.
Store blades flat or hung, dry and protected from moisture and impact. A chipped segment from a dropped blade is a write-off. Replace when dressing no longer restores the cut, or when segments are worn down to the steel core.
Maintenance keeps your blade alive, but buying the right blade in the first place is even better. Reading a blade spec before you spend is how you avoid the cheap blade trap.
How to Read a Blade Spec and Avoid the Cheap Blade Trap
You know how to maintain a blade, but the best maintenance is buying the right blade in the first place. Four numbers on the label actually matter: diameter, arbor size, max RPM, and intended material. The rest is marketing filler.
The max RPM check is where cheap blades fall apart. The neighbour’s cheap blade came apart at the flange because the label never listed a max RPM, and he was running it on a grinder that spun faster than the blade could take. The few quid he saved cost him a grinder guard and a morning of cleanup. That is the cheap blade trap in one scene.
A cheap blade is fine for occasional soft-material cuts where the bond wears slowly. It’s false economy on hard material or high-volume work, and especially when the label omits bond hardness and intended material entirely.

You now know more about blade selection than most people selling blades. The FAQ below answers the most common questions, and the conclusion ties it all together.
Conclusion
That’s the whole guide. Here’s the short version.
A blade that glazes over, chips the edge, or dies halfway through a job isn’t a mystery. It’s a mismatch. The fix is one rule: soft bond for hard material, hard bond for soft material. Get that backwards and no rim type saves you.
The rim pattern gets all the attention, but the bond decides whether you finish the job. On my last porcelain job, the blade stopped cutting clean about twenty minutes in. The bond was too hard for the tile. I swapped to a softer bond and the same saw finished the rest without a single chipped edge.
Three decisions matter. Pick the rim type for the cut: segmented for fast rough cuts, continuous for clean tile, turbo for the middle ground. Match the bond to the material. Choose wet for dust control and blade life, dry when water isn’t practical.
Get those three right and the blade cuts clean, wears evenly, and finishes the job without drama.
So before you buy: match the bond to the material, then buy the blade for the job. Not the other way round.