I stood over a glazed blade halfway through a concrete patio, doing the mental math on what that $70 mistake actually cost per foot of cut.
That’s the real price of guessing. The ruined cuts. The trip back to the supplier. The hour of daylight gone while you stand there wondering what went wrong.
Every contractor has been there: staring at a wall of blades, all promising the same thing, none telling you which one fits the material in front of you. You pick one. It glazes in twenty minutes. Or it wears down to the arbor before lunch.
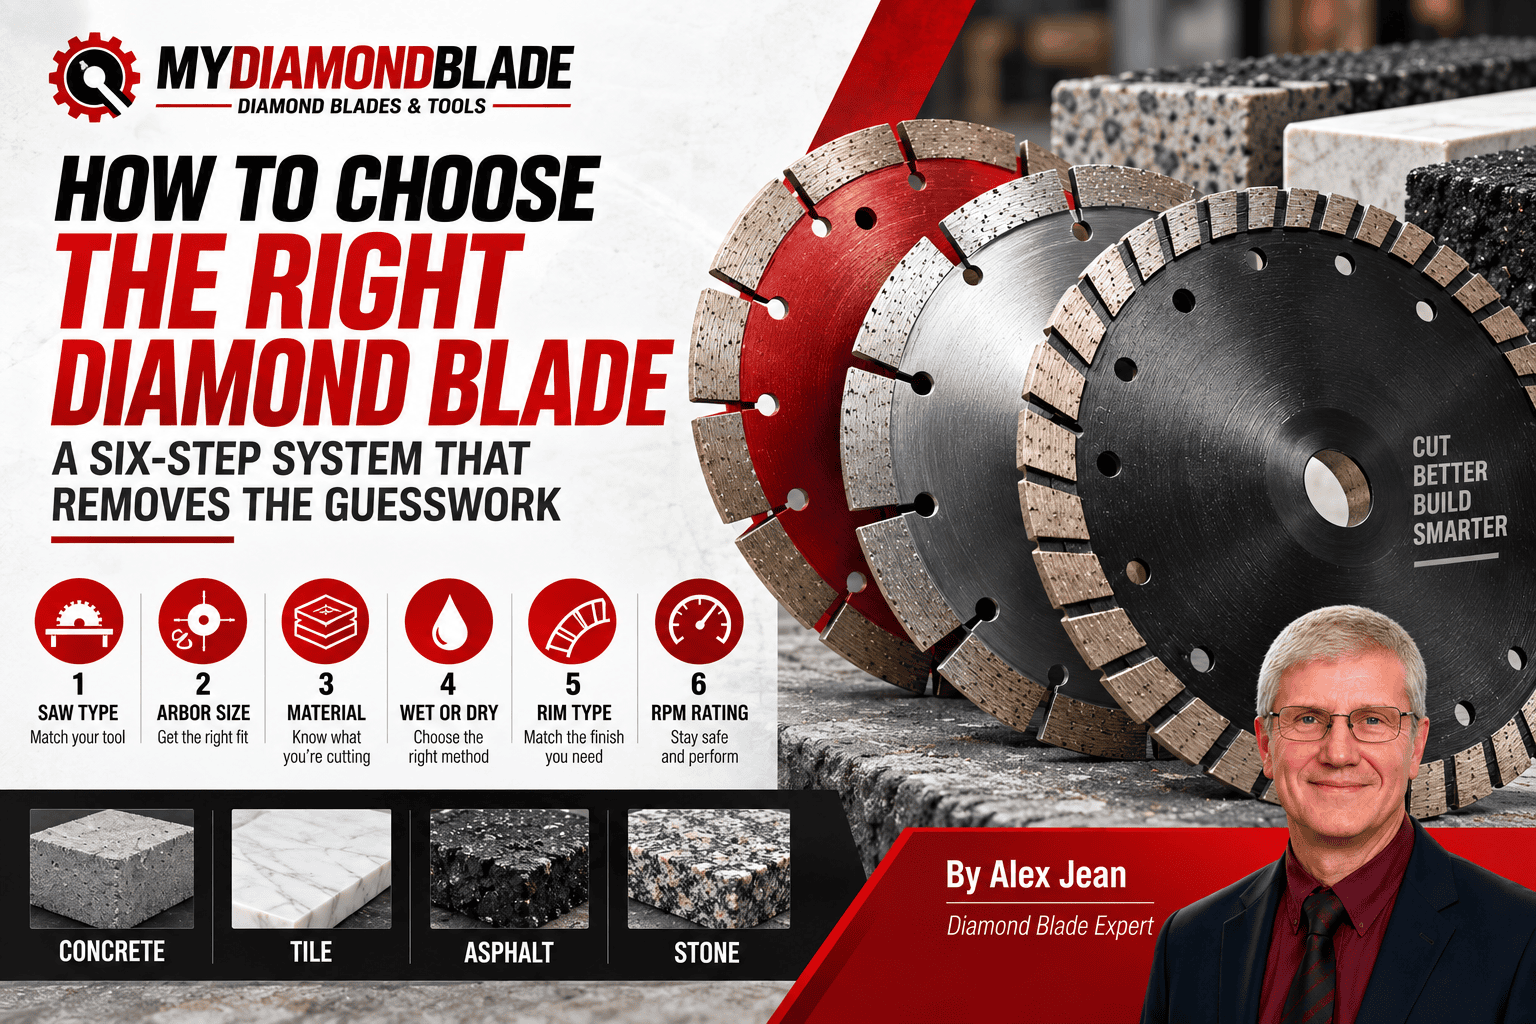
This guide skips the blade list entirely and gives you a step-by-step system that removes the guesswork.
You’ll also get what most guides skip: the common mistakes that cost you money, troubleshooting for when a cut goes wrong, and a cost-per-cut analysis that changes how you buy blades.
Key Takeaways
- Match bond to material: hard bond for soft/abrasive materials, soft bond for hard/dense materials, the single most important rule
- Check RPM before mounting: a blade spinning past its max rating can shatter
- Use wet cutting whenever possible, it protects both the blade and your lungs
- Dress a glazed blade by cutting abrasive material; don’t force it or throw it away
- One wrong blade choice costs $60–$100 plus lost time, and the right blade pays for itself

Before the steps, you need to understand one thing most guides skip: how a diamond blade actually works.
How Diamond Blades Work: The Grinding Principle
You’ve seen what a wrong blade costs. One principle prevents it.
The Grinding, Not Cutting, Action
A diamond blade doesn’t cut like a wood saw. It grinds. Exposed diamond crystals on the rim scrape material away as the blade spins, and the bond holding those diamonds wears down at the same rate to reveal fresh crystals underneath. Sandpaper works the same way: the grit does the work while the backing paper slowly erodes, so new grit keeps meeting the surface.
The Role of Diamond Grit and Bond
The bond is the metal or resin that holds the diamonds in place. Grit size, concentration, and quality all matter. But the bond decides whether those diamonds actually do their job. Here’s the rule: bond hardness must be inverse to material hardness. Hard bond for soft, abrasive material. Soft bond for hard, dense material.
Most guys pick a blade by price, not by what they’re cutting. I watched that cost a colleague a full morning on a high-psi concrete slab with quartz aggregate. His blade stopped biting after twenty minutes. The diamonds had glazed over because the bond was too hard for that material. He kept pushing harder, which only made it worse. The fix was simple once he understood the inverse rule: hard bond for soft material, soft bond for hard material. He swapped to a softer bond blade and finished the same cuts in half the time. That mistake is why I now check the material before I check the price tag.
Expert Tip: Match bond hardness inversely to material hardness: hard bond for soft, abrasive material and soft bond for hard, dense material. Get that right and you’ll avoid both glazing and premature wear.
Why Understanding This Matters for Selection
Concrete’s compressive strength and aggregate type shift where a material sits on that inverse scale. Below 3000 psi, concrete is soft and needs a hard bond. Above 6000 psi, it’s hard and needs a soft bond. Hard aggregate like quartz, trap rock, and basalt dulls diamonds quickly, so it needs a softer bond.
Get the bond wrong and you get one of two failures. On hard material with a hard bond, the bond won’t wear fast enough. The diamonds glaze over and the blade stops cutting. On soft material with a soft bond, the bond wears too fast and the diamonds fall out before they’ve done their work.
With the grinding principle in your head, the first step is identifying exactly what you’re cutting.
Step 1: Identify Your Material and Its Hardness
The grinding principle tells you bond must match material. So step one: know your material. Know the exact concrete, with its compressive strength and aggregate type. That specificity separates a blade that cuts clean from one that glazes in twenty minutes.
Common Materials You’ll Encounter
Concrete is the big one, and it comes in three flavours that behave very differently. General cured concrete sits in the 3000 to 6000 psi range, the baseline for most jobs. Below 3000 psi, it’s soft. Above 6000 psi, it’s hard.
Green concrete, poured within the last few days, is still soft and full of moisture. It cuts like butter but glazes a blade fast if you treat it like cured concrete. Reinforced concrete adds steel rebar, which changes how the diamonds wear.
Asphalt is soft and abrasive. Brick and CMU (concrete masonry units) sit in the middle. Tile splits into ceramic, which is softer, and porcelain, which is dense and hard. Natural stone ranges from soft limestone and marble up to hard granite. Then there are the abrasive materials: sandstone, pavers, anything with quartz or trap rock in the aggregate.
Ever had a blade glaze on concrete you were sure was cured? I’ve watched that exact failure repeat across a dozen jobsites, from driveway pours to foundation repairs. The pour looks set, the surface is firm, so someone grabs a blade rated for cured concrete and starts cutting. Twenty minutes in, the blade stops biting and starts polishing the surface instead.
The concrete was green, still soft underneath, still full of moisture, nowhere near the 3000 psi that marks the soft end of cured concrete. The bond was wrong for that soft material, so the diamonds never got a chance to expose themselves. The packaging said “cuts concrete,” and technically it did. It just didn’t say which concrete. That mistake cost a blade and half a morning’s work. Which is why hardness testing comes before blade selection every single time.
That mistake is why I now test hardness before I even look at a blade. The material tells you everything.
The Mohs Hardness Scale: A Quick Guide
The Mohs scale runs 1 to 10, with talc at the bottom and diamond at the top. It’s a scratch test scale: a harder mineral scratches a softer one. Most construction materials fall between 3 and 7. That narrow band is where almost every cut you’ll ever make lives.
| Mineral | Hardness | Common Material |
|---|---|---|
| Talc | 1 | Not relevant |
| Gypsum | 2 | Drywall |
| Calcite | 3 | Limestone, marble |
| Fluorite | 4 | Some ceramics |
| Apatite | 5 | Glass, some tile |
| Orthoclase | 6 | Granite, porcelain |
| Quartz | 7 | Quartzite, engineered stone |
| Topaz | 8 | Not common |
| Corundum | 9 | Not common |
| Diamond | 10 | Not common |
Product Recommendation: Keep a printable Mohs hardness pocket card in your saw kit. It maps limestone, granite, porcelain, and other common materials to their Mohs ratings and points you to the bond match in Step 2.

The CSDA publishes blade specification standards covering Mohs hardness and bond grade. If you want the formal reference, that’s the document to find.
How to Test Material Hardness in the Field
You don’t need a lab. A steel nail sits at about 5.5 on the Mohs scale. Scratch the material with it. If the nail leaves a mark, the material is softer than 5.5. If the nail skates off without scratching, the material is harder. A carbide scribe pushes the test higher, into roughly the 7 to 8 range.
Visual cues help too. Porous, open-textured materials like soft brick or limestone are usually on the softer end. Dense, glassy surfaces like porcelain or engineered stone sit harder. Aggregate exposure matters: if you can see quartz or trap rock poking through the surface, that aggregate will dull diamonds faster than the surrounding paste.
When the material is unusual or the job is expensive, consult the supplier. A hardness pick set gives you a calibrated scratch test across the full range, and it costs less than one ruined blade.
Once you know the material’s hardness, you can match the bond. That decision makes or breaks every cut.
Step 2: Match the Bond to the Material
You’ve identified the material. Now comes the decision that separates pros from amateurs: matching the bond.
The bond is the metal or resin holding your diamonds in place. Get it wrong and you’ll either glaze the blade or watch it disintegrate. Get it right and the blade cuts clean for its full life. The rule is simple but counterintuitive: hard bond for soft materials, soft bond for hard materials.
Soft Bond vs Hard Bond: The Inverse Relationship
A soft bond wears quickly. As it wears, it releases spent diamonds and exposes fresh ones. That constant renewal is exactly what you need on hard, dense materials like granite, porcelain, and high-psi concrete, because those materials dull diamonds fast. If the bond doesn’t release them, you’re rubbing dull stones against the cut face and generating heat.
A hard bond wears slowly. On soft, abrasive materials like asphalt and green concrete, the material itself grinds the bond away. If the bond were soft, it would disappear before the diamonds were used up. A hard bond holds diamonds in place long enough to get full life out of them on abrasive jobs.
That’s the friction logic: the material and the bond must work against each other in balance. Hard material needs a bond that gives up diamonds readily. Soft abrasive material needs a bond that holds on.
Bond Selection Chart
| Material | Recommended Bond |
|---|---|
| Asphalt | Hard bond |
| Green concrete | Soft bond |
| Cured concrete | Medium-hard bond |
| Reinforced concrete | Hard bond (metal-bond) |
| Brick/block | Medium bond |
| Ceramic tile | Soft bond |
| Porcelain | Very soft bond |
| Granite | Soft bond |
| Marble | Soft bond |
| Abrasive sandstone | Hard bond |
Concrete below 3000 psi compressive strength is soft, so use a hard bond. Above 6000 psi it’s hard, so use a soft bond. Hard aggregate like quartz, trap rock, and basalt dulls diamonds quickly and needs a softer bond regardless of the psi number.
Product Recommendation: Download the Diamond Blade Bond Hardness Reference Chart, a one-page cheat sheet listing 20+ materials and their ideal bond.
Real-World Examples: What Happens When You Get It Wrong
6000 psi on a spec sheet and a hard-bond blade that stopped cutting granite after 20 linear feet, the rim glassy and smooth to the touch, that was the day the inverse rule stopped being theory. I was cutting a granite worktop edge with a blade I’d grabbed because it was “for stone.” The bond was too hard for the density. Diamonds dulled, the bond refused to let them go, and the rim glazed into a polished strip that just bounced off the granite. The blade wasn’t dull. It was sealed shut.
The opposite failure is faster and more expensive. A soft bond on asphalt wears away faster than the diamonds can do their work. I’ve seen segments worn down to nubs in a single afternoon of cutting a driveway. The abrasive asphalt eats the bond for breakfast, and the diamonds drop out before they’ve earned their keep. You don’t get glazing. You get nothing left.
Special Cases: Reinforced Concrete, Green Concrete, Abrasive Materials
Reinforced concrete adds steel rebar to the mix, and standard concrete blades hate steel. They glaze on the bar or lose segments from the shock. You need a blade with high diamond concentration and a bond rated for metal cutting.
Expert Tip: For reinforced concrete, choose a blade with high diamond concentration and a metal-cutting bond, because standard concrete blades glaze or lose segments on rebar.
Green concrete is still curing, which makes it soft and highly abrasive. Use a soft bond, same as you would on any abrasive material. The green mix grinds the bond away fast, so a hard bond here just means premature glazing.
Multi-material blades exist and they’ll get you through a mixed job, but they compromise on every material. Maximum performance and blade life come from matching the bond to the specific material you’re cutting. The universal blade is the blade that’s mediocre at everything.
Bond matched. Next decision: what shape should the rim take?
Step 3: Choose the Right Rim Type (Segmented, Continuous, Turbo)
Bond matched to the material? Good. Now comes the choice of diamond blade types, specifically rim shape, which controls cut quality and speed once the bond is right.
The first cut on that kitchen backsplash chipped the glaze along the entire edge. I had grabbed a turbo blade for porcelain tile, figuring the serrated edge would split the difference between speed and finish. The MK Diamond manual lists porcelain under continuous rim for a reason. Three tiles ruined before I stopped. I switched to a continuous rim with water and the chipping stopped completely. That one job cost me an extra box of tiles and half a day. The manual was right. My shortcut was wrong.
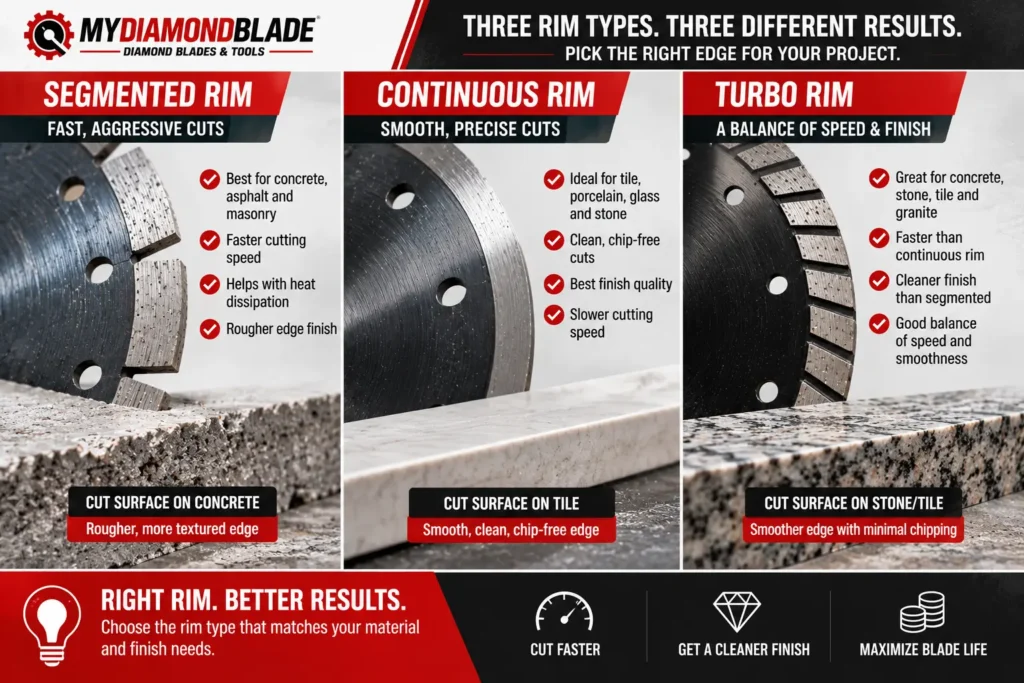
Segmented Blades: For Fast, Rough Cuts
Segmented rims have gullets between the segments. Those gaps do three jobs: airflow, cooling, and debris clearance. On abrasive material like concrete, asphalt, and block, the airflow keeps the blade cooler while the gullets carry waste out of the cut.
Pros: fast cutting, long life, dry-capable. Cons: rough finish, chipping on the edges.
Demolition and rough work. That’s this blade. Need a clean edge? Look elsewhere.
Continuous Rim Blades: For Smooth, Chip-Free Cuts
A continuous rim has no gullets. The solid edge leaves no gaps for debris to escape, so the blade needs water to flush the cut and keep the rim cool.
Pros: minimal chipping, smooth finish. Cons: slower cutting, wet-only, shorter life in abrasive materials.
This is the blade for tile, porcelain, marble, and granite. The MK Diamond manual is clear on it: continuous smooth rim for glazed ceramic tile, marble, granite, and porcelain.
Expert Tip: For glazed ceramic tile and porcelain, use a continuous rim blade with water; a turbo rim can still chip the glaze.
Turbo Blades: The Best of Both Worlds?
The turbo rim is serrated, a middle ground between segmented and continuous. The serrations give it some of the airflow and debris clearance of a segmented rim, but the rim stays more continuous than segmented, so the finish comes out smoother.
Pros: faster than continuous, smoother than segmented, wet or dry capable. Cons: not as smooth on delicate tile, not as fast on heavy concrete.
Turbo blades work well for general-purpose concrete, brick, and some stone. They are not the answer for everything.
Rim Type Comparison Table
| Rim Type | Cut Quality | Speed | Wet/Dry | Typical Materials |
|---|---|---|---|---|
| Segmented | Rough | Fast | Dry or Wet | Concrete/asphalt/block |
| Continuous | Smooth | Slow | Wet only | Tile/porcelain/stone |
| Turbo | Medium | Medium | Wet or Dry | General masonry/some stone |
Rim chosen. Now decide: are you cutting wet or dry?
Step 4: Wet vs Dry Cutting: Which One and When
Rim type chosen. Now the wet/dry decision. It affects blade life, cut quality, and your lungs.
The Benefits of Wet Cutting
Wet cutting is the primary control for respirable crystalline silica. OSHA 1926.1153 sets the permissible exposure limit at 25 µg/m³ over an 8-hour time-weighted average, and water captures dust at the cut point before it becomes airborne.
Water also keeps the blade cool. A diamond blade’s bond wears at a controlled rate to expose fresh diamonds. Heat accelerates that wear and can glaze the blade. Water keeps the temperature down, so the bond wears at the intended pace.
For tile and stone, wet cutting improves cut quality. Water lubricates the cut, reduces chipping, and carries away debris that would scratch the surface. Continuous rim blades require wet cutting. Run one dry and it fails quickly.
On the Leeds kitchen extension, my mate Dave spent a week comparing rim types and bond hardness before he touched a tile. Then he set up his angle grinder dry on the porcelain. Within two minutes the hallway filled with a fine white cloud you could taste. I hooked up a pump sprayer and the difference was immediate: clear air, cooler blade, cleaner cut. The spec that actually mattered wasn’t the one he’d been researching. It was whether water was flowing.
The wet vs dry tile saw choice matters more than most numbers printed on the blade box.
When Dry Cutting Is Acceptable (and the Risks)
Dry cutting has a narrow place. Outdoors, on segmented blades, cutting concrete, asphalt, or block. That’s the list.
The risks stack up fast. Dry cutting generates heat, which shortens blade life and can glaze the bond. It produces silica dust, a serious health hazard. And it cuts slower because there’s no water to clear debris from the kerf.
Expert Tip: Use wet cutting whenever possible: it’s the primary control for silica dust, which can cause silicosis, and it also extends blade life.
If you must cut dry, wear a respirator rated N95 or better and use dust control. A vacuum attachment or dust shroud helps, but neither replaces water.
Blade Compatibility: Wet-Only vs Dry-Capable
Not every blade can run dry. Wet-only blades rely on water for cooling and dust suppression. Run one dry and the bond overheats, the diamonds pull out, and the blade is destroyed in minutes.
Dry-capable blades can run wet or dry. The bond handles higher temperatures, but wet use still extends life. Water keeps the bond cooler and the cut cleaner.
Check the label. If it says wet only, respect that. If it says dry capable, you have options, but wet is still the better choice for longevity.
Setting Up a Wet Cutting System
Tile saws have the easiest setup: a built-in tray and pump recirculate water to the blade. Fill the tray, check the pump, and cut.
Hand-held saws need a pressurized tank or a garden hose connection. The tank gives portability; the hose gives continuous flow. Both work, but a hose ties you to a water source.
Concrete saws typically have a water connection built in. Hook up a hose, open the valve, and water flows to the blade.
For small jobs, a pump sprayer works. It’s not a full wet system, but a steady mist at the cut point controls most of the dust and keeps the blade cooler than running fully dry.
Product Recommendation: Download the Wet Cutting System Setup Guide: a step-by-step PDF with photos for connecting water to tile, hand-held, and concrete saws, plus a DIY pressurized tank parts list.
Safety Gear Checklist for Cutting Operations
Whatever the cutting method, the PPE list stays the same:
- Safety glasses or face shield
- Hearing protection
- Respirator, N95 minimum
- Gloves
- Steel-toe boots
- Long sleeves and trousers
Wet cutting reduces dust but doesn’t eliminate it. Dry cutting makes the respirator non-negotiable. Either way, protect your eyes from flying debris and your ears from the saw.
Wet or dry decided. Now check the numbers that keep you safe: RPM.
Step 5: Ensure RPM and Saw Compatibility
Wet or dry, decided. Now the safety check too many people skip: RPM.
“It’s only a few hundred over,” a foreman shrugged, tapping the max RPM printed on the blade. Same shrug on three different sites, and every one ended with a blade swap or worse.
Why RPM Mismatch Is a Safety Hazard
Run a blade faster than its rated maximum and it can shatter, throwing segments across the work area. Run it too slow and you lose cutting efficiency. Either way, the fix is the same: match your saw’s no-load RPM to the blade’s max RPM before the blade ever touches material.
Expert Tip: Never run a blade above its printed max RPM. Over-speeding a blade can cause it to fail, and a failing blade throws segments like shrapnel.
How to Find Your Saw’s RPM and Blade’s Max RPM
Two numbers, both easy to find.
Saw RPM: check the nameplate or the manual. Whether you’re weighing gas vs electric cut-off saws, on gas models look for spindle speed, not engine speed. They’re not the same thing, and mixing them up is how mismatches happen.
Blade max RPM: printed right on the blade or its packaging.
If the saw’s RPM exceeds the blade’s max, don’t use that blade on that saw. No exceptions.
Using the RPM Compatibility Calculator
Select your saw, select your blade size, and the tool gives you a green or red result in seconds. It does the cross-check for you, so there’s no mental math on the job site.
Product Recommendation: Use the RPM Compatibility Calculator to cross-check your saw’s no-load RPM against the blade’s max RPM before every cut.
RPM verified. One mechanical check left: size and arbor.
Step 6: Blade Size and Arbor Considerations
RPM checked. Now make sure the blade physically fits your saw.
Matching Blade Diameter to Saw Capacity and Cutting Depth
Blade diameter sets your maximum cutting depth, and when you need holes instead of cuts, diamond core drilling bits follow the same material-matching principles. For hand-held saws, that’s roughly one-third of the diameter. Never exceed the saw’s rated capacity.
Common sizes run 4.5″, 7″, 12″, 14″, and 20″. On a patio job last spring, I mounted a blade that was too large for the saw. The tell was the blade’s max RPM rating, lower than my saw’s speed.
That mismatch meant the blade could fly apart. I swapped to the correct size before cutting. Check the diameter before you even think about the arbor.
Arbor Size: Getting the Right Fit
The arbor must match the saw shaft exactly. Common sizes: 7/8″, 1″, 20mm, 22.2mm. A wrong arbor causes wobble and vibration, and vibration kills both cut quality and blade life. Use adapters only if the manufacturer explicitly recommends them.
Expert Tip: Use the exact arbor size and mount the blade dead-center. Even a slight offset causes vibration, poor cuts, and uneven wear.
Proper Blade Mounting and Direction
Mount the blade with the directional arrow pointing the right way. Seat it flat against the arbor flange. Then tighten to the manufacturer’s torque spec. A loose blade wobbles, damages the arbor, and can cause serious injury.

Six steps done. But knowing what NOT to do is just as valuable. Here are the seven mistakes that cost people the most.
Common Diamond Blade Selection Mistakes (and How to Avoid Them)
You know the six steps. Now learn the seven mistakes that cost people the most, so you don’t repeat them. Every one of these traces back to the same root cause: skipping the material hardness check before you buy a blade.
The smell hit me first, a hot metallic tang like overheated brake pads. I’d grabbed a hard-bond blade off the shelf without checking the granite’s hardness. Half an hour in, the blade was glazed smooth, the diamonds buried under melted bond. That mistake cost me a blade worth about ninety pounds and a full afternoon of lost cutting time. The granite didn’t care that I was in a hurry. It just laughed at the wrong bond.
That afternoon taught me the first rule: know your material before you buy. Here are the seven mistakes that follow when you don’t.
Mistake 1: Choosing the Wrong Bond for the Material
The most frequent and costly error. A hard bond on granite glazes over; a soft bond on asphalt wears away fast. The fix is simple: identify the material’s hardness first, then consult a bond chart. Skip that step and you’ll burn through blades and money. Plan on roughly $60 to $100 for a replacement blade, plus half an hour of lost productivity.
Mistake 2: Ignoring RPM Ratings
A 6,000 RPM blade on an 8,000 RPM saw is a disaster waiting to happen. The blade can shatter or fly apart. Check both numbers before mounting. A shattered blade costs money. An injury costs far more.
Mistake 3: Dry Cutting with a Wet-Only Blade
Wet-only blades overheat without water. Diamonds pop out, the blade warps or cracks. Read the label before you start. A ruined blade means a replacement and rework on the cut you already made.
Mistake 4: Forcing the Blade Through the Cut
Pushing too hard overheats the blade, glazes the bond, and bends the core. Let the blade cut at its own pace. A glazed blade and a bent core both need replacing. That’s money and time you didn’t budget for.
Mistake 5: Using a Dull or Glazed Blade
A glazed blade won’t cut, so users push harder, which makes it worse. Dress the blade periodically by cutting abrasive material. Wasted effort, a ruined blade, and lost time add up fast.
Mistake 6: Overlooking Blade Size and Arbor Fit
A too-large blade hits the guard. A wrong arbor causes vibration. Measure twice, mount once. A damaged guard and an unsafe setup cost more than a careful check ever will.
Mistake 7: Not Considering Reinforcing Steel
Standard blades can’t handle rebar. They chip or break. Use a blade specifically designed for metal. A broken blade mid-cut risks injury and leaves the job half done.
Mistakes are one thing. There’s also a whole layer of bad advice out there. Time to separate myth from fact.
Diamond Blade Myths Debunked
You’ve seen the mistakes. Now let’s kill the bad advice that causes them.
Myth 1: “All Diamond Blades Are the Same”.
Fact: blades vary wildly in bond hardness, diamond quality, and rim design; an asphalt blade won’t cut tile.
Bond hardness flips with the material. Same rule, same result, every time.
Myth 2: “A Harder Bond Cuts Harder Materials”.
Fact: it’s the opposite: hard materials need soft bond, soft/abrasive materials need hard bond.
This one costs the most money. Get it backwards and the blade glazes in minutes.
Myth 3: “You Can Sharpen a Diamond Blade with a File”.
Fact: diamond blades glaze, not dull; dressing with abrasive material is the only way to refresh them.
A file does nothing. Dress it or bin it.
The blade went back on the saw and cut like new, after I’d watched a colleague bin a glazed blade as “dull” without knowing a quick dress would bring it back.
Myth 4: “Wet Cutting Is Always Messy and Inconvenient”.
Fact: modern wet systems are clean and efficient; dry cutting dust is far more inconvenient and dangerous.
Silica dust hangs in the air for hours. A wet saw keeps it on the floor.
Myth 5: “Higher RPM Means Faster Cutting”.
Fact: cutting speed depends on blade design and material, not just RPM; exceeding max RPM is unsafe.
Blade design and material dictate speed. Push past the rated RPM and the rim can come apart.
Myth 6: “Diamond Blades Last Forever”.
Fact: all blades wear out proper selection and use extend life but nothing lasts forever.
The diamonds wear down, the bond erodes. Pick the right blade and you get maximum cuts before it’s done.
Myth 7: “Any Blade Can Cut Reinforced Concrete”.
Fact: rebar requires high diamond concentration and metal-cutting bond; standard blades fail quickly.
Hit rebar with a standard blade and the diamonds strip off in seconds.
Myths busted. Even with the right blade, though, problems happen. Here’s how to fix them.
Troubleshooting Guide: Solving Common Cutting Problems
Myths busted. But even with the right blade, problems happen. Here’s how to diagnose and fix them.
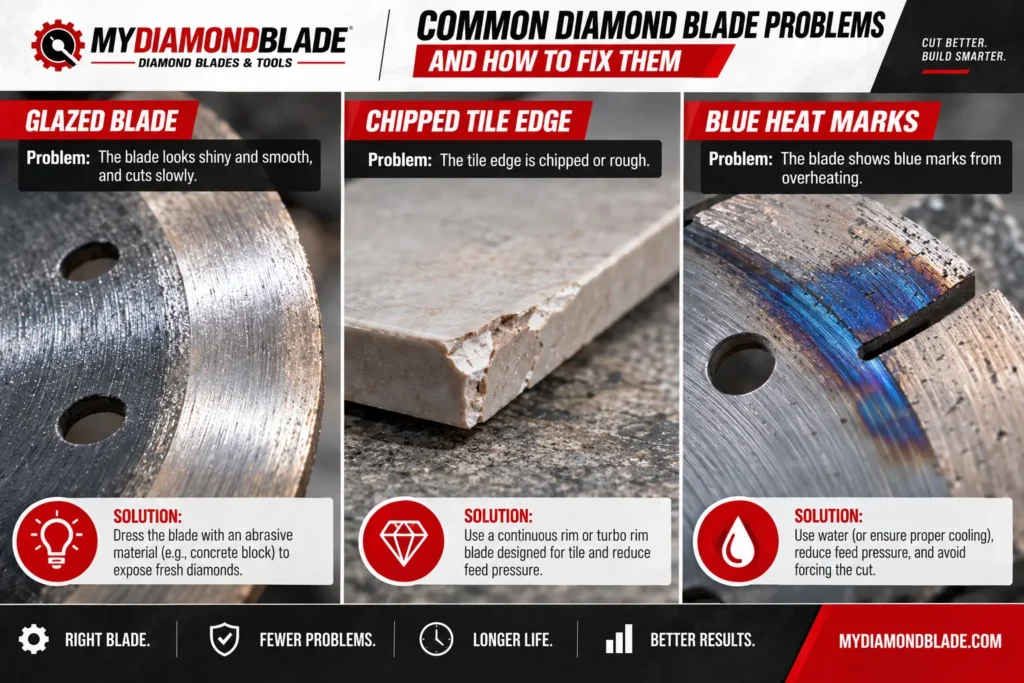
Problem: Blade Glazing (Smooth, Won’t Cut):
Causes: wrong bond (too hard), insufficient water, forcing;
Solutions: dress by cutting asphalt/dressing stone/abrasive block, switch to softer bond.
A glazed blade looks polished and stops cutting. The diamonds are still there, but the bond has overheated and smeared over them. Wrong bond is the usual culprit: too hard for the material. The blade stopped biting halfway through a concrete lintel. I backed off and saw the telltale shine.
That glazed bond had been the same story on three jobs that month. Wrong bond, too hard for the aggregate. I switched to a softer bond and the blade cut like it was new.
The fix cost nothing but a dressing block and ten minutes. So before you replace the blade, dress it and check the bond.
Expert Tip: Dress a glazed blade by cutting an abrasive material like asphalt or a dressing stone; it’s the quickest way to restore cutting performance.
Problem: Excessive Chipping or Edge Breakout:
Causes: wrong rim type (segmented on tile), too much pressure, dull blade;
Solutions: continuous rim, reduce feed pressure, ensure sharp blade.
Chipping on tile or stone almost always means the rim is too aggressive. A segmented rim tears through hard materials but leaves ragged edges on brittle tile. Switch to a continuous rim for chip-free cuts. Reduce feed pressure and make sure the blade is sharp; a dull blade drags and chips more.
Problem: Slow Cutting Speed:
Causes: glazed blade, wrong bond, low RPM, blade too large;
Solutions: dress blade, check bond, verify RPM, correct size.
Slow cutting is rarely the blade wearing out. It’s usually glazing, wrong bond, or the saw spinning below the blade’s rated RPM. Check the saw’s RPM against the blade’s rating. A blade too large for the saw also drags. Dress the blade, verify the bond, and use the correct size.
Problem: Blade Wobble or Vibration:
Causes: wrong arbor, loose mounting, bent core, worn bearings;
Solutions: check arbor fit, tighten nut, inspect for warping, check bearings.
Wobble means something is out of round or loose. Check the arbor fit first; a blade that doesn’t sit flush will vibrate. Tighten the mounting nut. Inspect the core for warping and the saw’s bearings for wear. Most wobble is a mounting problem, not a blade defect.
Problem: Uneven Wear or Segment Loss:
Causes: misaligned saw, forcing, hitting rebar with wrong blade, manufacturing defect;
Solutions: align saw, reduce pressure, use reinforced concrete blade, inspect before use.
Uneven wear and lost segments come from the saw fighting the material. A misaligned saw forces one side of the blade to work harder. Forcing the blade through a cut does the same. Hitting rebar with a blade not rated for reinforced concrete can tear segments off. Wrong bond can also cause uneven wear; a bond too hard for the material wears unevenly. Align the saw, ease off the pressure, and use a reinforced concrete blade when rebar is likely.
Problem: Overheating and Blue Discoloration:
Causes: dry cutting wet-only blade, insufficient water, excessive pressure;
Solutions: adequate water, reduce feed pressure, allow cooling.
Blue heat marks mean the blade got hot enough to change the steel. Dry cutting a wet-only blade is the fastest way to do it. Add water or switch to a dry-rated blade. Running the blade below its rated RPM also builds heat. Reduce feed pressure and let the blade cool between cuts. Overheating ruins the bond and can warp the core.
Now that you can troubleshoot, the quick-reference table in the next section belongs in your toolbox.
Quick Reference: Diamond Blade Selection by Material and Job
Keep this table handy as a field reference. It’s a starting point, not a substitute for manufacturer specs: verify current models and regional availability before you buy. If your printed version has room, add a Typical Saw Type column.
| Material | Recommended Bond | Rim Type | Wet/Dry | Example Blade Type |
|---|---|---|---|---|
| Concrete (cured) | Medium-hard | Segmented | Wet or Dry | General purpose segmented blade |
| Reinforced concrete | Hard (metal-bond) | Segmented | Wet | High diamond concentration blade |
| Asphalt | Hard | Segmented | Dry | Asphalt-specific blade |
| Green concrete | Soft | Segmented | Dry | Soft bond blade |
| Brick | Medium | Segmented or Turbo | Dry | Brick and masonry blade |
| Concrete block (CMU) | Medium | Segmented | Dry | Masonry blade |
| Ceramic tile | Soft | Continuous | Wet | Tile blade |
| Porcelain tile | Very soft | Continuous | Wet | Porcelain blade |
| Granite | Soft | Continuous or Turbo | Wet | Granite blade |
| Marble | Soft | Continuous | Wet | Marble blade |
| Limestone | Soft | Continuous | Wet | Stone blade |
| Sandstone (abrasive) | Hard | Segmented | Dry | Hard bond blade |
| Pavers (concrete) | Medium-hard | Segmented | Dry | Paver blade |
A blade that’s dressed, stored dry, and run at the right RPM will outlast a neglected one by a wide margin, which is why maintenance matters as much as selection.
Blade Maintenance and Storage Tips
A good blade costs money. Maintenance is what makes that money last.
Cleaning Your Blade After Use
Rinse slurry and debris off with water and a stiff brush. Skip solvents; they can attack the bond. For heavy buildup, a soak in mild detergent loosens the crud. Then dry the blade thoroughly before storage. Moisture on the steel core invites rust.
Dressing a Glazed Blade: When and How
Segments look smooth and shiny. The cut slows. The blade skates instead of biting. That’s glaze: the bond has overheated and smoothed over, hiding the diamonds.
Dress it by cutting an abrasive material like asphalt, a dressing stone, or soft brick for 10 to 20 seconds. That wears the bond back down and exposes fresh diamonds. Do this whenever cutting speed drops.
Ever wonder why your blade cuts like new after a few seconds in a soft brick? I’ve kept the same segmented blade going for months on site just by dressing it the second it slows, because the bond wears to expose fresh diamonds rather than dulling them.
Proper Storage: Flat or Hanging, Not Leaning
Store blades flat or hanging from the arbor hole. Never lean them against a wall, and never stack heavy objects on top. Keep them dry.
Expert Tip: Store blades flat or hanging from the arbor hole, never leaning or stacked, because even slight warping causes wobble, poor cuts, and kickback risk.
Regular Inspection: What to Look For
Check every blade before you spin it up. Look for segment wear down to the steel core, hairline cracks especially around the arbor, core warping or dents, and an elongated or damaged arbor hole.
Expert Tip: Before every use, check for segment wear to the steel core, hairline cracks near the arbor, and core dents; any of these means replace the blade, not risk it.
A blade that’s cleaned, dressed, stored, and inspected will outlast a neglected one by a wide margin.
Conclusion and Final Recommendations
Maintenance keeps blades alive. Now here’s the wrap-up and your next move.
Eighteen blades in a year. That’s what my old foreman burned through before he learned to read the bond. He’d grab the cheapest segmented rim for every job, then curse when the glaze set in halfway through a patio. I started tracking his cost per foot: the cheap blades were costing him more than the premium ones, because he was buying three times as many. That’s the whole point of the cost-per-cut lens.
The six-step process collapses into one loop: identify the material, match the bond to it, check your saw and depth, pick wet or dry, verify RPM, then cut. Run that loop every time and the wrong-blade purchase stops happening.
Hard material, soft bond. Soft material, hard bond. That one rule prevents most bad buys before they happen.
Grab the cheat sheet and run the interactive flowchart. It turns the loop into a two-minute decision.