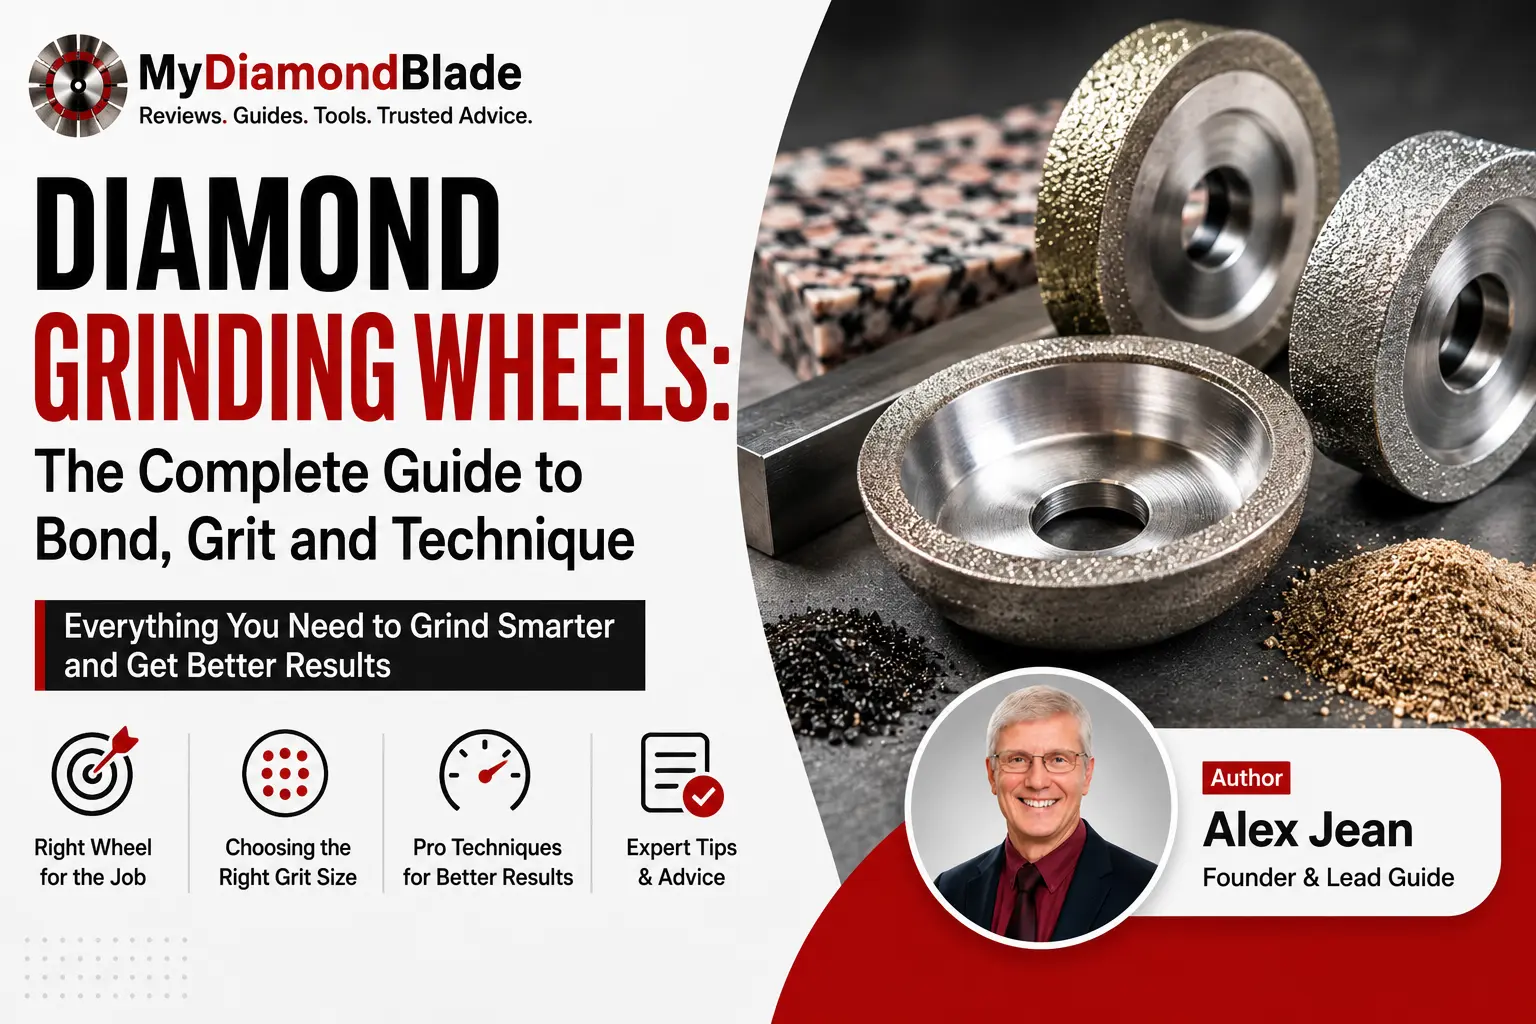
The wheel glazed in under three minutes on that granite countertop. I’d grabbed a hard-bond wheel for soft stone and the diamonds never stood a chance. That’s the cost of guessing.
Key Takeaways
- Match bond hardness to material: soft bond for hard granite, hard bond for soft concrete. Wrong match glazes or eats wheels.
- Double-row cup wheels balance control and finish for concrete leveling; single-row is for aggressive coating removal only.
- Progress grits in order: skipping from 30 to 100 grit doubles your work.
- Dry grinding without a shroud and HEPA vac is a silica hazard; wet grind granite and marble whenever possible.
- A dressing stick costs a fraction of a new wheel and can double its life: dress the moment it stops cutting.
This guide is built from years of hands-on fabrication work, not catalog specs, and our saw blade selection guide follows the same practical approach. You’ll walk away with a simple decision framework match bond to material, pick the right grit sequence and know when to dress or replace. Everything that follows is organized by task, not wheel type, so you can jump straight to what you need. Before you grab a wheel, you need to understand what you’re working with.
Understanding Diamond Grinding Wheels: The Basics
Before you grab a wheel, you need to understand what you’re working with. A diamond cup wheel is a precision tool that, when matched to the job, cuts faster, runs cooler and lasts far longer than the cheap stuff.
What Are Diamond Grinding Wheels?
A diamond grinding wheel is a metal disc with industrial diamond grit bonded to its working face. You mount it on an angle grinder and use it for stock removal, levelling high spots, shaping edges and stripping coatings.
Unlike abrasive discs that rely on friable grit that fractures and dulls, diamond wheels cut by ploughing through the material. The diamonds themselves don’t wear down quickly; the metal bond holding them does. That distinction is why a good diamond wheel can outlast a stack of abrasive discs and deliver a more consistent finish.
How Diamond Abrasives Work
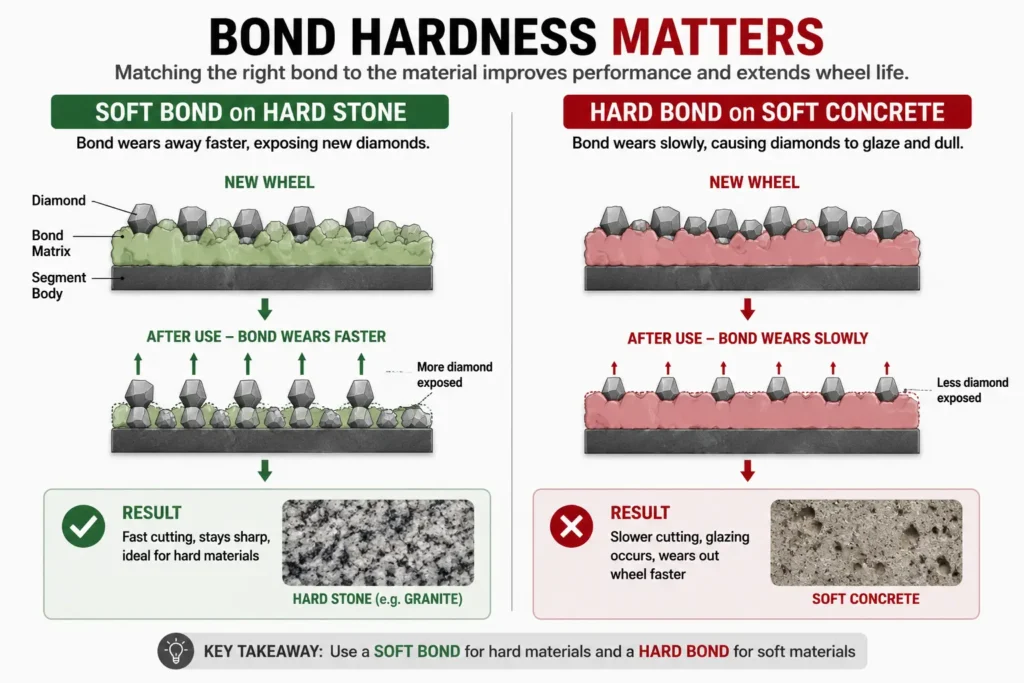
The bond matrix is the whole game, it’s also the foundation of how diamond blades work. As you grind, the bond wears away at a controlled rate, exposing fresh, sharp diamond points. This self-sharpening action keeps the wheel cutting instead of rubbing.
When the bond is too hard for the material, it won’t erode fast enough: the diamonds stay buried, the wheel glazes over and you generate heat instead of dust. Too soft and the bond lets go of the diamonds before they’ve done their work, so the wheel wears out prematurely. Heat and pressure accelerate both processes, which is why a light touch and the right RPM matter.
Expert Tip: Match bond hardness to material: soft bond for hard stone like granite to keep diamonds exposed, hard bond for soft concrete to avoid rapid wear.
Most manufacturer claims about “universal” bonds are marketing fluff. We learned that the hard way on a granite countertop job where a hard-bond wheel just skated across the surface, building heat until the epoxy started to smell. Swapping to a soft-bond wheel (same grit, same grinder) changed everything. The wheel bit in immediately, the cutting sound dropped to a steady grind, and the heat buildup vanished. That one swap saved us an hour of frustration and a potential resin burn.
Grit size determines the finish you leave behind. Coarse 30/40 grit (425–600 microns) hogs off material fast but leaves a rough surface. Medium 60/80 grit (181–250 microns) smooths out the deep scratches and fine 80/100 grit (151–181 microns) preps the surface for polishing. You can’t skip steps: jumping from coarse to fine just burnishes the peaks without levelling the valleys.
Primary Applications in Stone, Granite and Concrete
Diamond wheels are versatile across stone, granite, concrete and masonry, but each material demands a different approach, and the same material-specific thinking applies when using diamond core drilling bits. On granite and engineered stone, you’re typically profiling edges or prepping surfaces for polishing. Hard, dense material needs a soft bond to keep cutting.
Concrete work is more about levelling high spots, removing coatings or grinding down form lines; the softer, more abrasive nature of concrete calls for a harder bond so the wheel doesn’t disappear in a cloud of dust, and that same bond logic matters when choosing a concrete diamond blade. Marble and softer limestones need a light touch with a fine grit to avoid gouging. General masonry (mortar joints, brick, block) is rough work where a medium-grit wheel with a medium-hard bond strikes the right balance between speed and life.
Product Recommendation: A variable-speed angle grinder with soft start and electronic feedback maintains constant RPM under load; pair with a dust shroud and HEPA vacuum for dry grinding.
For effective grinding, run the wheel at 8,000–10,000 RPM. A variable-speed grinder lets you dial in that sweet spot: too slow and the diamonds skid, too fast and you risk overheating the bond or exceeding the wheel’s rated speed.
Now that you know the basics, let’s look at the four main wheel designs and when to use each.
Types of Diamond Cup Wheels and Segment Patterns
Four main wheel designs cover most job-site work, and the same logic applies when choosing between diamond blade types. Here’s when to reach for each.
Single-Row Cup Wheels: Aggressive Stock Removal
A single-row wheel packs one continuous row of diamond segments around the rim. That makes it the most aggressive option. It hogs off material fast, leaves a rough finish and shakes the grinder hard. Use it for heavy concrete leveling, thick coating removal or fast stock removal on hard stone when you’ll follow with a finer wheel. Save it for roughing.
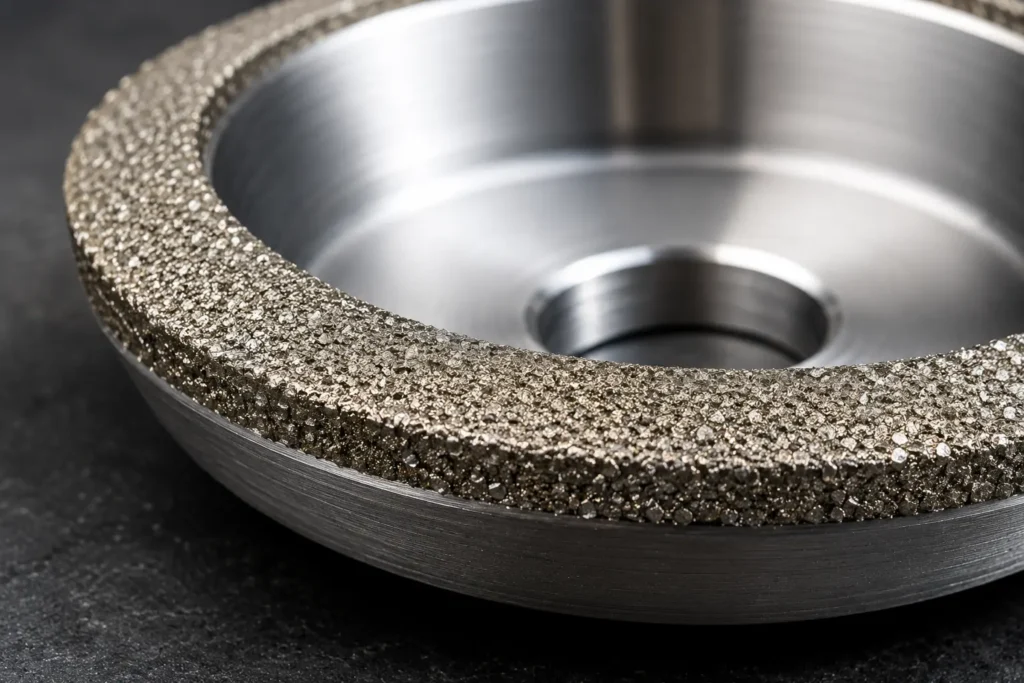
Double-Row Cup Wheels: Smooth Control
Double-row wheels run two rows of segments, often in a split pattern. They’re less aggressive than single-row, but you get a noticeably smoother finish and far less vibration. That makes them the most versatile general-purpose choice. For concrete leveling where you need a flatter surface or for granite edge shaping with control, a double-row gives you the removal rate you need without the deep gouges.

Expert Tip: For concrete leveling, use a double-row cup wheel instead of a single-row to avoid deep gouges and get a smoother finish.
Turbo Cup Wheels: Fast Shaping with Less Vibration
A turbo wheel has a continuous serrated or wavy rim. It cuts nearly as fast as a single-row but with a better finish and low vibration: the serrations break up the contact patch. That balance makes it the go-to for granite edge profiling.
Why does a turbo wheel leave a better edge on granite than a single-row? On a kitchen remodel last autumn, I shaped a 3cm granite countertop edge with a turbo cup wheel, then switched to a double-row for smoothing before moving to resin pads. The turbo hogged off material fast without the chatter I’d get from a single-row and the edge was clean enough that the 50-grit pad only needed a few passes. That two-step approach, turbo for bulk and double-row for control, cut my profiling time by nearly half compared to the single-row I’d used on a previous job.

For marble shaping or any job where you need fast removal and a decent finish, a turbo wheel is the right call.
Expert Tip: For granite edges, use a turbo cup wheel for fast shaping then switch to resin-bonded diamond pads for a polished finish, a two-step approach that saves time and yields pro results.
Segmented Cup Wheels: Cool Cutting and Long Life
Segmented wheels have individual diamond segments with gaps between them, a design choice that also comes up when comparing segmented versus continuous-rim blades for porcelain. Those gaps let air and water flow through, pulling heat away from the bond. The result is moderate-to-high aggressiveness, a moderate finish and low-to-moderate vibration. They’re a solid all-rounder especially for dry grinding where heat buildup can glaze a wheel. A medium-grit segmented wheel handles most materials without complaint.

Product Recommendation: A high-quality segmented cup wheel with a medium grit (50/60) is a versatile choice for fabricators who work with multiple materials.
How to Choose the Right Grit and Bond for Your Material
Whether you’re choosing the right diamond blade or a cup wheel, design is only half the battle. Grit and bond are where most people go wrong. I clocked noticeably less stock removal in the first five minutes on a hard bond on granite. Switched to a soft bond and the wheel bit immediately.
Expert Tip: Start coarse (30/40), then medium (50/60), then fine (80/100). Jumping grits leaves deep scratches that take extra time to remove.
Understanding Grit Sizes: Coarse, Medium, Fine
Lower grit = coarser. 30/40 (425-600 microns) hogs off material; 60/80 (181-250 microns) smooths; 80/100 (151-181 microns) preps for polish. Never skip a grit step.
The Bond-Material Match: Soft Bond for Hard Stone, Hard Bond for Soft Concrete
Hard stone needs a soft bond to expose diamonds; soft concrete needs a hard bond to resist wear. Mismatch causes glazing or rapid wheel loss. Check manufacturer labels.
Grit Progression for a Flawless Finish
Granite: 50→100→200→400→800→1500→3000 resin pads after shaping. Concrete: 30/40, 60/80, 80/100. Marble: 50/60 then 100/200 wet. Overlap passes, moderate pressure.
Expert Tip: Overlap passes, moderate pressure. Let the diamonds do the work to avoid heat buildup and premature wheel wear.
Here’s a quick-reference table to compare the four wheel types at a glance.
Wheel Type Comparison Table
Here’s how the four wheel types compare at a glance.
| Wheel Type | Aggressiveness (1-5) | Finish Quality (1-5) | Vibration Level | Best For (Granite) | Best For (Concrete) | Best For (Marble) | Typical Grit Range |
|---|---|---|---|---|---|---|---|
| Single-Row | 5 | 1 | High | Rapid stock removal, shaping edges | Heavy coating removal (epoxy, mastic) | Too aggressive: risk of chipping | ~16–30 grit |
| Double-Row | 3 | 3 | Low | General surface prep, leveling | Leveling high spots, general prep | Moderate stock removal, careful passes | ~30–50 grit |
| Turbo | 4 | 4 | Low | Edge profiling with good finish | Smoothing and light coating removal | Balanced speed and finish | ~30–50 grit |
| Segmented | 2 | 5 | Low | Not recommended. Use turbo or double-row | Not typical for concrete | Best for heat-sensitive marble, cool cutting | ~50–120 grit |
The consensus says double-row wheels are the versatile all-rounder. My experience on a black granite countertop edge I was shaping last winter says otherwise. The double-row glazed over in minutes on that dense stone, leaving me with a shiny, useless disc. I switched to a single-row. The table pegs it as too aggressive for finish work, but it hogged off material fast. It left a surface I could jump straight to 50-grit. That job taught me that on extremely hard granite, the “aggressive” wheel can sometimes be the smarter first step: it cuts where a moderate wheel just polishes itself.
Step-by-Step Grinding Techniques for Common Applications
Theory is useless without technique. Here’s how to put these wheels to work on real jobs.
Expert Tip: Use a double-row cup wheel for concrete leveling; single-row wheels are too aggressive and leave deep scratches.
Leveling a Concrete Floor
Set up a dust shroud and HEPA vacuum before you touch the grinder. Mount a double-row 30/40 or 50/60 grit cup wheel. Hold the grinder at a 15–20° angle and work in overlapping arcs. Never let the wheel sit flat. Check progress with a straightedge every few passes. On a warehouse floor resurface last winter, I kept the angle at exactly 15° after a few test sweeps any steeper and the wheel bit and chattered, any shallower and it just polished the high spots. That 15° setting turned a full-day fight into a steady, predictable cut. Move to a finer grit if the spec calls for a smoother profile, then vacuum thoroughly.

Product Recommendation: A dust shroud with universal fit and a compatible HEPA vacuum is essential for OSHA compliance, and a surface profile comparator verifies concrete surface prep meets coating specs.
Shaping a Granite Countertop Edge
Mark your profile line with a wax pencil. Rough-shape with a turbo cup wheel, keeping the grinder moving to avoid flat spots. Switch to a double-row or 50-grit resin pad to refine the shape, then progress through resin pads: 100, 200, 400, 800, 1500, 3000. Wet grinding keeps the stone cool and the dust down. Finish with a polishing compound on a felt pad.

Expert Tip: For granite edges, use a turbo cup wheel for fast shaping, then switch to resin-bonded diamond pads for a polished finish.
Removing Old Coatings and Adhesives
Identify the coating: thick epoxy, mastic, or paint. Grab a single-row or turbo 30/40 grit wheel. Keep the angle low, almost flat, and work in small sections to avoid heat buildup that melts adhesives. If the wheel glazes, dress it immediately on a dressing stick or a scrap concrete block. Once the bulk is off, switch to a double-row 50/60 grit to clean up the surface.
Expert Tip: To prevent glazing, occasionally grind a dressing stick or a piece of concrete block to refresh the diamond surface.
Product Recommendation: Keep a diamond dressing stick on hand to refresh glazed wheels and extend their life.
Smoothing a Marble Surface
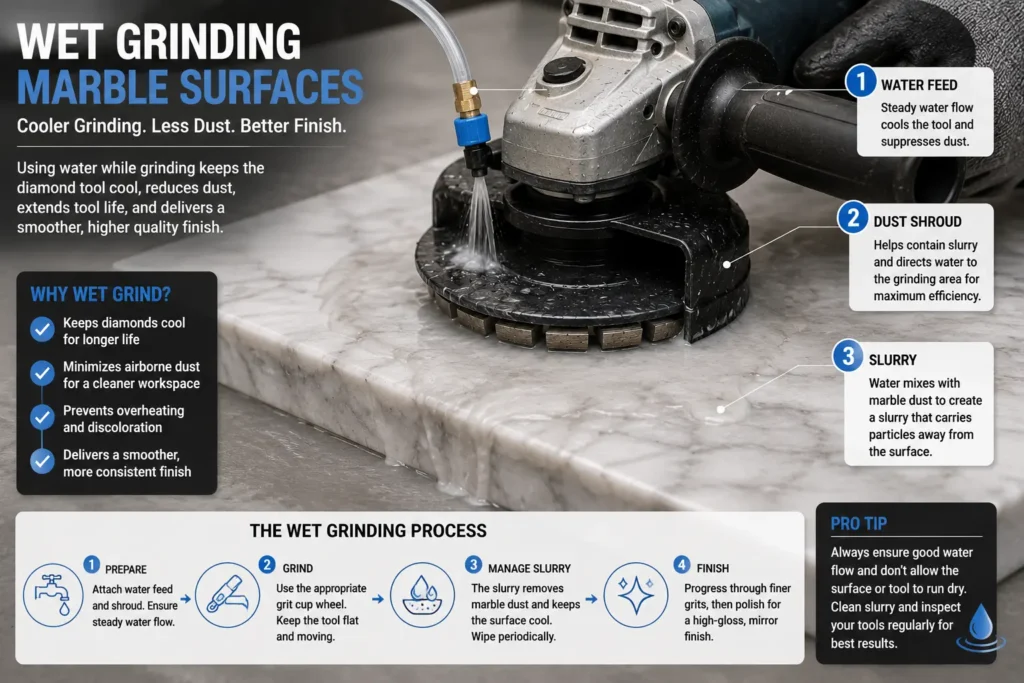
Marble chips easily, so start with a fine 50/60 grit cup wheel and use wet grinding, the same gentle approach matters when you need to cut porcelain tile without chipping. A water feed attachment keeps the surface cool and the slurry manageable. Apply light pressure and make overlapping passes. Progress to diamond polishing pads, working through the grits to the desired sheen. For vertical surfaces, a 4-1/2 inch wheel on a lighter grinder saves your arms.
Expert Tip: For vertical surfaces, use a lighter grinder and a 4-1/2 inch wheel for better maneuverability and less fatigue.
Even with the right wheel and technique, problems happen. Here’s how to fix them fast.
Troubleshooting: Common Grinding Problems and How to Fix Them
Even with the right wheel and technique, problems happen. Most fixes come down to speed, pressure, or bond match.
Wheel Glazing and Clogging
The grinder starts to sing a high-pitched whine and the wheel skates across the surface. That’s glazing. We’ve all heard that telltale high-pitched chatter and felt the grinder buck.
That’s a single-row cup wheel on hard concrete and it’s telling you to switch to a double-row or turbo. The wheel face turns shiny and smooth, stops cutting and builds heat fast.
The culprit is almost always a bond that’s too hard for the material or dry grinding without enough cooling. Soft, sticky materials can also load up the wheel.

Expert Tip: Dress a glazed wheel by grinding a dressing stick or a scrap of concrete block to expose fresh diamonds.
If dressing doesn’t bring it back, switch to a softer bond or add water. Better dust extraction helps too. A clogged shroud traps heat and debris against the wheel.
Excessive Vibration and Chattering
When the grinder shakes and the wheel bounces, you get a wavy, uneven surface. First, check the mounting: a worn arbor or a wheel that isn’t seated flat will cause vibration. Next, look at the wheel design. Single-row cup wheels are the most aggressive but also the roughest and highest-vibration. For general work, a double-row or turbo wheel cuts smoother with far less chatter.
Expert Tip: Match your grinder’s RPM to the wheel’s rating; for most cup wheels, a variable-speed grinder set to 8,000–10,000 RPM reduces vibration and heat.
Too much pressure makes it worse. Back off and let the wheel do the work. If the problem persists, the wheel may be unbalanced; replace it.
Uneven Grinding and Gouging
Deep grooves and low spots come from holding the grinder at too steep an angle or lingering in one spot. Keep the wheel at a shallow angle, roughly 15 to 20 degrees and use overlapping passes. If you’re still gouging, the wheel is too aggressive for the task. Step down to a double-row or turbo. Mark high spots with a pencil and check your progress often.
Overheating and Blueing
A metal bond that turns blue or brown is a clear sign of overheating. The diamonds lose their grip and the material can discolor. This happens when RPM is too high, pressure is excessive or you’re grinding dry without breaks. Reduce speed, ease up on the pressure and either switch to wet grinding or take short cooling pauses. A dust shroud connected to a HEPA vacuum also pulls heat away from the wheel.
Premature Wheel Wear
If the wheel diameter shrinks fast or segments wear unevenly, the bond is likely too soft for the material. Hard, abrasive stone eats a soft bond quickly. Excessive pressure, incorrect RPM and a steep grinding angle all accelerate wear. Match the bond to the material, use moderate pressure and keep the wheel flat. When the job’s done, store wheels flat in a dry place. Moisture and temperature swings can warp the bond.
Expert Tip: Store wheels flat in a dry place, away from moisture and extreme temperatures, to prevent warping and bond degradation.
Wet vs. Dry Grinding: Pros, Cons, and Safety
One of the biggest decisions you’ll make on every job: wet or dry?
Dry grinding a granite edge indoors is a mistake I won’t make twice. I was touching up a countertop overhang in a finished kitchen, no water source handy, so I ran a turbo cup wheel dry with just a dust mask. Within seconds the room filled with a haze of silica dust that hung in the air for hours. I stopped, rigged a garden sprayer to mist the wheel and finished wet.
The edge came out glass-smooth with zero airborne dust, but I spent the next hour squeegeeing slurry off the floor and cabinets. That day I learned the real trade-off isn’t speed: it’s whether you’d rather manage a slurry mess or a respiratory hazard that OSHA regulates down to 50 micrograms per cubic metre. For granite and marble, I’ll take the slurry every time.
The Case for Wet Grinding: Cooler, Cleaner, Smoother
Wet grinding keeps the wheel and the stone cool, which prevents heat checking and glazing on dense materials like granite and marble. The water captures silica dust at the source, so you’re not breathing it. Finish quality jumps because the diamond grit cuts freely without loading up.
The downsides are real: you need a water feed or a spray bottle, the slurry gets everywhere, and vertical surfaces or indoor finished spaces make containment a headache. For fabrication work where you can set up a wet station, it’s the clear winner.
Product Recommendation: A wet grinding attachment or water feed system for your angle grinder is a worthwhile investment for stone fabrication.
Dry Grinding: Convenience and Dust Control Challenges
Dry grinding means no water mess and faster setup: you grab the grinder and go. That convenience makes it the default for concrete leveling, outdoor slabs, and quick touch-ups. But the silica dust it throws is no joke. Without proper extraction, you’re creating a health hazard that can lead to silicosis.
Heat buildup is another issue: dry grinding can glaze a wheel fast if you push too hard. The method works, but only when you treat dust control as non-negotiable.
Expert Tip: When dry grinding, always use a dust shroud connected to a HEPA vacuum and wear a P100 respirator. Silica dust is a serious health hazard.
Essential Equipment for OSHA-Compliant Dry Grinding
If you’re grinding dry, OSHA standard 29 CFR 1926.1153 sets the permissible exposure limit for respirable crystalline silica at 50 μg/m³ over an 8-hour workday. Meeting that on a job site demands more than a dust mask. You need a dust shroud with a brush skirt that seals to the surface, a HEPA vacuum rated to capture 99.97% of particles at 0.3 microns and a P100 respirator.
Add a full-face shield and hearing protection: the shroud and vacuum are loud and a shattered wheel fragment is unforgiving.
Making the Right Choice for Your Job
Wet grinding is the go-to for granite and marble whenever you can manage the slurry, and a similar wet-versus-dry decision comes up when choosing a tile saw. For concrete leveling, outdoor work or any job where water isn’t practical, dry grinding with full dust controls is the answer.
If you must grind dry indoors, seal off the work area, run a HEPA air scrubber and wear a P100 respirator, no shortcuts. The material and the site dictate the method, not personal preference.

Grinder Compatibility, RPM and Mounting
Your grinder is just as important as your wheel. Let’s make sure they’re compatible.
Understanding Arbor Sizes and Thread Types
Why does a wheel that’s perfectly balanced on the bench start shaking the moment you spin it up? I chased that question for years before I admitted the answer was right in my hand: the arbor. I’d been using a cheap adapter to fit a 7/8″ wheel onto a 5/8″-11 spindle and the tiny run-out it introduced turned every grind into a fight. The day I bought a wheel with the correct arbor, the vibration vanished.
Now I never compromise on that fit. The two common arbor sizes are 5/8″-11 for 4.5″ and 5″ grinders and 7/8″ for 7″ grinders. Some cup wheels have a threaded hub that screws directly onto the spindle others need a backing flange. Never use an adapter. They introduce run-out and vibration that can crack the wheel or damage the grinder’s bearings.
Expert Tip: Adapters introduce run-out and vibration, risking wheel failure always match the wheel’s arbor directly to your grinder’s spindle.
Matching Wheel RPM to Grinder Speed
Every cup wheel carries a maximum RPM rating stamped on its body. Your grinder’s no-load speed must not exceed that number. Exceeding it can shatter the wheel. Most cup wheels perform best between 8,000 and 10,000 RPM, which is why a variable-speed grinder is the right tool for the job. Check the grinder’s nameplate before mounting any wheel.
Expert Tip: Always verify your grinder’s no-load speed doesn’t exceed the wheel’s max RPM, and use a variable-speed grinder set to 8,000-10,000 RPM for optimal performance.
The Importance of a Variable-Speed Grinder
A variable-speed grinder lets you dial in the optimal speed for the material and wheel type. Soft start reduces the torque kick that can yank the tool out of your hands. Electronic feedback maintains constant RPM under load, so the wheel doesn’t bog down and leave an uneven surface. For consistent results, this is the one upgrade that pays for itself in control and wheel life.
Product Recommendation: Choose a variable-speed grinder with soft start, electronic feedback, and a lock-on switch for consistent speed under load and reduced fatigue.
Proper Mounting and Run-Out Checks
Seat the wheel flat against the backing flange. Tighten the arbor nut securely, but don’t over-tighten: you’ll distort the flange or crack the wheel. Before grinding, run the grinder briefly at low speed and watch for vibration or wobble. If the wheel doesn’t spin true, re-mount it or check for a bent arbor. A quick spin-check takes seconds and prevents a ruined edge or a dangerous failure.

Maintenance and Storage Tips to Extend Wheel Life
A well-maintained wheel cuts faster and lasts longer. Here’s how to protect your investment.
How to Dress a Glazed Wheel
When the bond smothers the diamonds, the wheel shines and stops cutting. Dressing grinds away that worn bond to expose fresh grit. Run a diamond dressing stick or a soft abrasive stone across the wheel face for a few seconds. 40 drains a month taught me that a glazed wheel is a time thief. I’d dress it with a concrete block and feel the bite return. A piece of soft brick works in a pinch.
Expert Tip: A quick pass with a diamond dressing stick or a scrap of concrete block restores a glazed wheel’s bite in seconds.
Product Recommendation: A diamond dressing stick is an inexpensive tool that can double your wheel’s life by refreshing the diamond surface.
Cleaning and Inspecting Your Wheels
After use, scrub the wheel with water and a stiff brush to remove slurry and debris. Inspect for cracks, missing segments or uneven wear. Discard any damaged wheel immediately. Check the arbor hole for elongation or damage. A loose fit leads to vibration and failure.
Proper Storage Practices
Store wheels flat in a dry, temperature-controlled environment. Moisture corrodes the bond; extreme temperatures warp the wheel. Keep them in original packaging or a dedicated rack. Never stack heavy items on top.
Expert Tip: Flat storage in a dry, temperature-controlled space stops bond corrosion and warping.
Safety Precautions and Required PPE
None of this matters if you’re not going home safe at the end of the day.
I used to think a quick grind without a shroud was no big deal, until I actually read the OSHA silica standard. Fifty micrograms per cubic metre, averaged over an eight-hour shift. That’s an invisible dose, and I’d been taking it straight to the lungs. Swapping a basic dust mask for a P100 respirator and a HEPA shroud wasn’t an upgrade; it was a line I should have drawn years earlier.
The Non-Negotiable PPE List
Every grinding job demands a full-face shield, hearing protection, an N95 or P100 respirator, anti-vibration gloves, safety boots and long sleeves. The shield stops flying grit and wheel fragments; the respirator catches what you can’t see. Gloves dampen vibration that numbs hands over a long shift, and boots with metatarsal guards protect against a dropped grinder. Long sleeves aren’t optional: hot sparks and sharp chips find bare skin fast.
Safe Operating Practices to Prevent Kickback
Kickback happens when the wheel binds or catches, whipping the grinder back at you in a fraction of a second. Five habits stop it cold:
- Keep both hands on the grinder, with a firm, controlled grip.
- Leave the wheel guard in place, positioned between you and the wheel.
- Start the grinder away from the workpiece and let it reach full speed before contact.
- Never use a wheel that’s been dropped or shows cracks. Bin it.
- Know the torque reaction direction and brace for it especially on edge work.
Silica Dust: The Invisible Killer
Respirable crystalline silica causes silicosis and lung cancer. OSHA standard 29 CFR 1926.1153 sets the permissible exposure limit at 50 μg/m³ over an eight-hour workday. When exposure exceeds that engineering controls (water or dust extraction) and respiratory protection are mandatory. For dry grinding always pair a dust shroud with a HEPA vacuum. Wet grinding suppresses dust at the source. Either way, you’re keeping silica out of your lungs.

Interactive Decision Flowchart: Find Your Perfect Wheel
Still not sure which wheel to grab? Use this flowchart to narrow it down.
We’ve stood in front of a rack of cup wheels, a half-finished slab waiting and the cost of grabbing the wrong one isn’t just time: it’s a wheel that glazes over in ten minutes or leaves chatter you’ll spend an hour smoothing out. That’s why we built this tool. Answer three questions: your material, grinder size and task (heavy removal, surface prep or fine finishing). The flowchart matches those answers to the wheel characteristics that matter, single-row for aggressive hogging, double-row for general work, turbo for balanced speed and finish, segmented for cool cutting and gives you a grit range to start with.

Real-World Case Study: From Rough Slab to Polished Countertop
Let’s see all of this come together on a real granite countertop job.
Step 1: Rough Shaping with a Turbo Cup Wheel
The fabricator starts with a raw granite slab and a 5″ turbo cup wheel on a variable-speed grinder set to 9,000 RPM. Long, smooth passes along the marked profile line hog off the bulk material fast. The coarse grit bites deep, leaving a rough but accurately shaped edge.

Step 2: Smoothing with a Double-Row Wheel
Switching to a double-row cup wheel at 8,000 RPM refines the edge. The 50/60 grit removes the deep scratches left by the turbo wheel, producing a much smoother, more uniform surface. Consistent, moderate pressure prevents gouging.

Step 3: Fine Grinding with Resin Pads
The wet polisher comes out, and the real transformation begins. Resin-bonded diamond pads progress from 100 through 200, 400, 800, 1500, to 3000 grit.
Water flows continuously to cool the stone and flush away swarf, preventing scratches. I watched the fabricator pause after 400 grit, wipe the edge dry and inspect it under a work light: the jump from coarse shaping to near-polish came from refusing to skip a single step. Each finer grit erases the previous pattern until the edge feels glass-smooth.

Expert Tip: Patience and consistent pressure are key. Don’t rush the grit progression, and always keep the pad wet to prevent overheating and scratching.
Step 4: Polishing to a Mirror Finish
A final buff with a felt pad and polishing compound brings up a high-gloss mirror shine. The fabricator inspects the edge under bright light, tilting it to catch any remaining haze. No scratches remain. Just a deep, reflective finish that looks factory-cut.

Conclusion
You’ve got the knowledge now put it to work. Most fabricators I’ve talked to wish they’d had a cheat sheet like this years ago.
I’ve seen crews burn through wheels because nobody told them to match the bond to the stone. Hard bond for soft stone, soft bond for hard stone. Keep the wheel flat, let the grinder’s weight do the work.
Control dust: wet cutting or a HEPA vacuum. Bookmark this guide. Share it with your crew. Drop a comment if you have a question.