
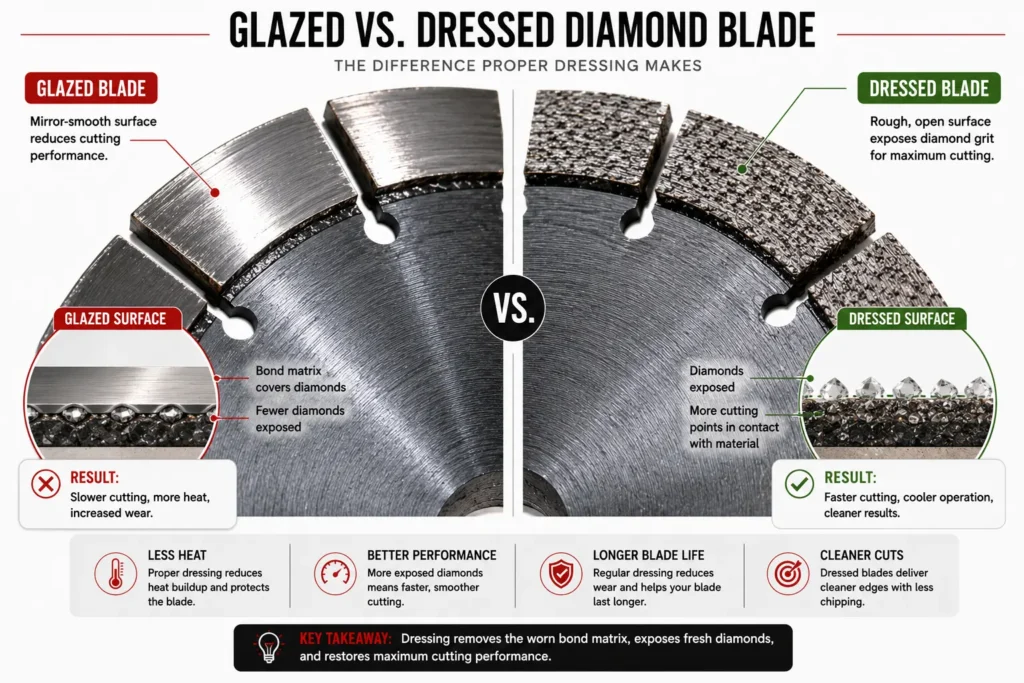
Most “worn out” diamond blades are just glazed. The bond was too hard for the material, so it smoothed over the diamonds and left a shiny surface that won’t cut. The blade sat on the bench, rim smooth and shiny and I was reaching for a new one when a fabricator dressed it on the spot and handed it back cutting like new.
Key Takeaways
- Most ‘worn out’ blades are just glazed and can be rescued
- Dressing removes only a thin layer of bond to expose fresh diamonds
- Match the dressing method to the blade type and glazing severity
- A simple maintenance routine prevents most glazing
- Keep a log to anticipate dressing needs and avoid downtime
Dressing strips only a thin layer of bond to expose fresh diamonds. That’s the whole fix.
This guide walks you through the four steps diagnose, clean, dress and maintain. But first, you need to understand what’s happening inside your blade.
Understanding Diamond Blade Anatomy
To fix a glazed blade, you first need to know what you’re looking at.
The Bond, the Diamonds and Why Glazing Happens
A diamond blade is a steel core with metal-bonded segments holding diamonds. Normal cutting wears the bond away, exposing fresh diamonds, the same principle applies to diamond core drilling bits.

Glazing happens when the bond is too hard for the material being cut, choosing the right concrete diamond blade for your material is the first line of defense. The bond doesn’t wear away fast enough, so the diamonds stay buried under a smooth, shiny surface. A glazed blade still has diamonds; it needs bond removal, not replacement. Bond hardness must match the material: hard bond for soft materials like asphalt or green concrete, soft bond for hard materials like granite or engineered stone.
Manufacturers love to sell one blade for everything, but that’s a lie we learned on a granite countertop job, and the same bond-mismatch problem applies when choosing a diamond grinding wheel for granite. The blade claimed to cut granite and asphalt, but the bond was too hard for granite, so it glazed within a few cuts. We thought the blade was dead, but the diamonds were still there, just buried under a smooth, shiny surface, that’s why we now trust tested diamond blade reviews over marketing claims. That mistake taught us to match bond hardness to the material, not the marketing.
Expert Tip: Match bond hardness to the material: hard bond for soft materials like asphalt or green concrete, soft bond for hard materials like granite or engineered stone. The wrong bond accelerates glazing.

The signs of glazing are easy to spot once you know the mechanism.
Signs Your Blade Needs Cleaning
A glazed blade gives clear warning signs, once you know what to look for.
Visual and Performance Indicators
Shiny, mirror-smooth segments are the clearest sign. Ever had a blade that cut fine yesterday and just skates over the tile today? On a porcelain job, my wet saw’s segments went from gritty to glassy in an afternoon, a reminder that picking between continuous rim and segmented blades matters for clean porcelain cuts. The blade wasn’t dead the bond had smeared over the diamonds. That’s glazing. Slow cutting, a burning smell, vibration or chipping often show up alongside it; if chipping is your main issue, learning to cut porcelain tile without chipping can help you tell a glazing problem from a technique problem. Check segments before each use for wear, cracks or warping to catch glazing early.
Expert Tip: Before each cut, run a thumbnail across the segments. If they feel slick and mirror-smooth rather than gritty, the blade is glazed and needs dressing.
Before you touch the blade make sure you’re protected.
Safety Precautions Before You Start
Dressing a blade means working with sharp edges and abrasive materials. Don’t skip safety.
Essential Gear and Safe Handling
Wear OSHA-compliant eye protection and cut-resistant gloves before you handle any blade. 1910.133 is the OSHA line I check before every blade change now, after a glazed segment nicked my thumb through a cheap glove. Unplug the saw or disconnect power before removing the blade, and if you’re deciding between gas and electric cut-off saws, the same safety rules apply. Support it with both hands segments stay sharp even when glazed. When dry-dressing, wear a respirator or dust mask to limit silica and abrasive dust.
Product Recommendation: Choose cut-resistant gloves with a nitrile-coated palm for grip, such as Ansell or MaxiFlex models.


Gear on? Then you’re ready to pick a cleaning method.
Step-by-Step Cleaning Methods
Five ways to bring a glazed blade back to life. Each method matches a specific blade type and glazing severity, so pick the one that fits what you’re seeing on the segments.
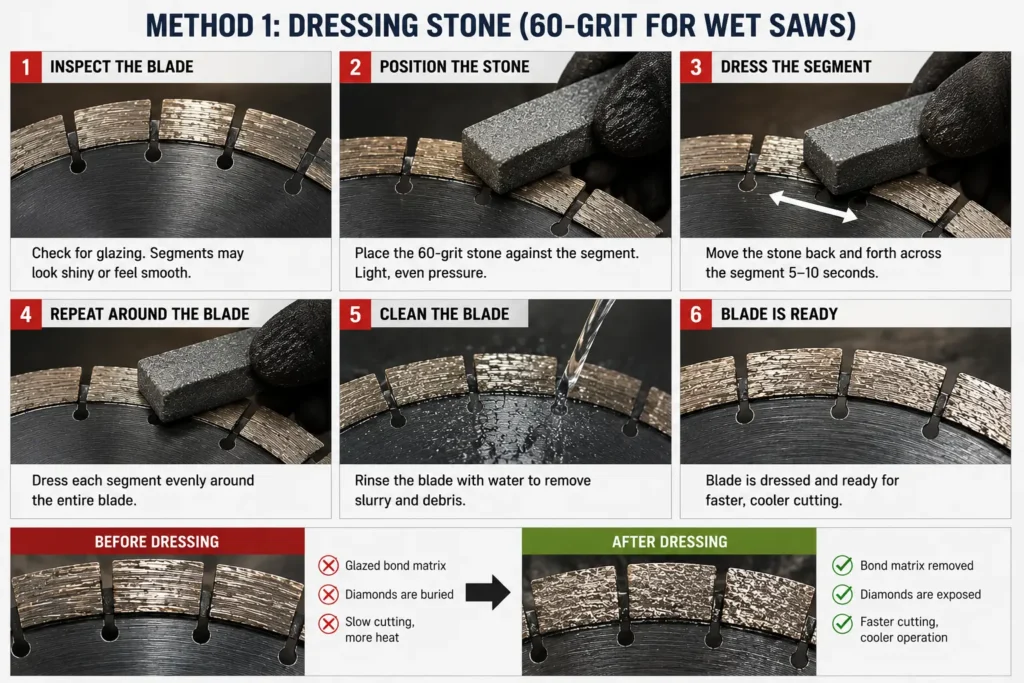
Method 1: Dressing Stone (60-Grit for Wet Saws)
For wet saw blades with moderate to heavy glazing, a 60-grit dressing stone is the workhorse. You’ll know it’s time when the blade skates across the tile instead of biting and the segments look smooth and shiny rather than rough.
What you need: a 60-grit dressing stone, water and the blade still mounted on the saw. Set the stone on the saw table, turn on the water and make a series of shallow cuts into the stone. Light, even pressure, one direction. Don’t bear down; the stone does the work by wearing away the bond and exposing fresh diamonds.
After a few passes, stop and check the segment texture. Run a fingernail across the segments. Rough and gritty again? You’ve dressed the blade. Still smooth make a few more passes.
Expert Tip: Use water as a lubricant when dressing to reduce heat and extend the life of the dressing stone.
Product Recommendation: A 60-grit dressing stone (Pearl Abrasive, Lackmond) or an aluminum-oxide dressing stick (Distar, Hi-Tech Diamond) for moderate to heavy glazing.
Method 2: Rubbing Stone (80-Grit for Tile Blades)
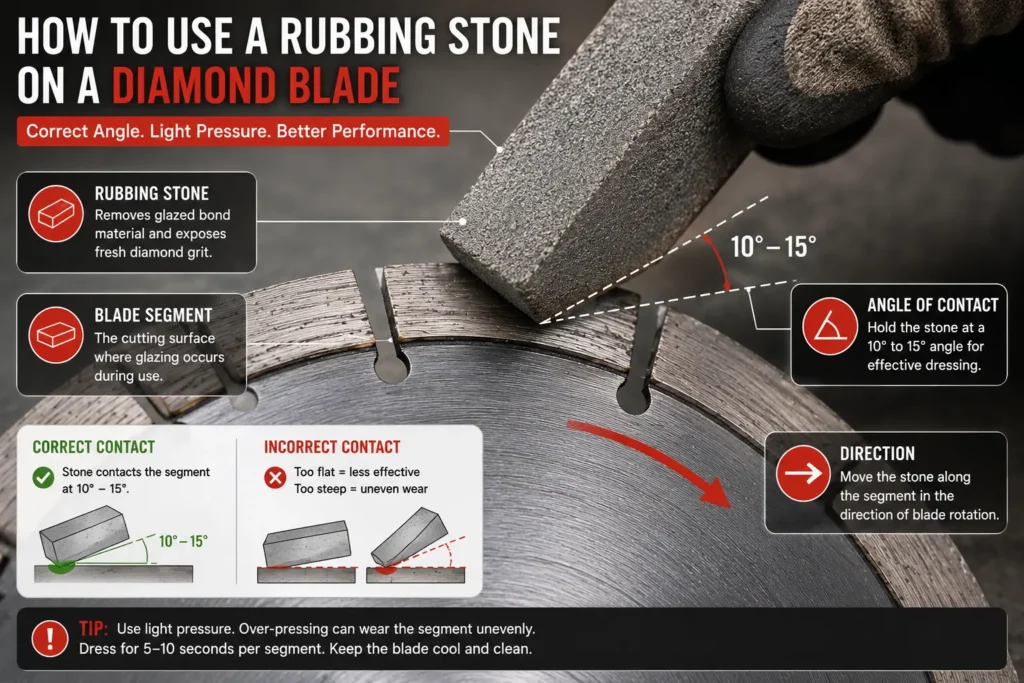
Tile blades with light to moderate glazing respond well to an 80-grit rubbing stone. This is the gentler option when the blade still cuts but has lost its edge.
The first tile job where I watched a blade skate across porcelain instead of cutting, I nearly binned it. A rubbing stone cost less than a sandwich and two minutes of light passes brought the segments back to rough. The blade bit again on the next cut and I finished the job with the same blade I’d been ready to throw out. That’s the gap between what a glazed blade looks like and what it actually needs.
Hold the rubbing stone against the side of the spinning blade or make shallow cuts into it, depending on your setup. Use water as lubricant. Light, even pressure in one direction. Check the segment texture after a few passes.
Expert Tip: Before a new blade’s first real job, make a few shallow cuts in a soft abrasive block to expose fresh diamonds.

Product Recommendation: An 80-grit rubbing stone (QEP, Rubi) for tile blades with light to moderate glazing.
Method 3: Abrasive Material (Soft Brick or Concrete Block)
Mid-job and the blade starts glazing? Cut into a soft abrasive material like a concrete block or common brick. No need to remove the blade and it’s the fastest fix on site.
Set the block on the saw table or the ground, and make several shallow cuts. The soft abrasive wears the bond and exposes fresh diamonds. Keep the cuts shallow you’re dressing, not cutting a full-depth kerf.

Expert Tip: Never force a blade through the material; let the diamonds do the work to prevent glazing.

Product Recommendation: Keep a soft common brick or a dedicated dressing block in your tool bag for on-site touch-ups.
Method 4: Bastard File (for Light Glazing on Metal-Bond Blades)
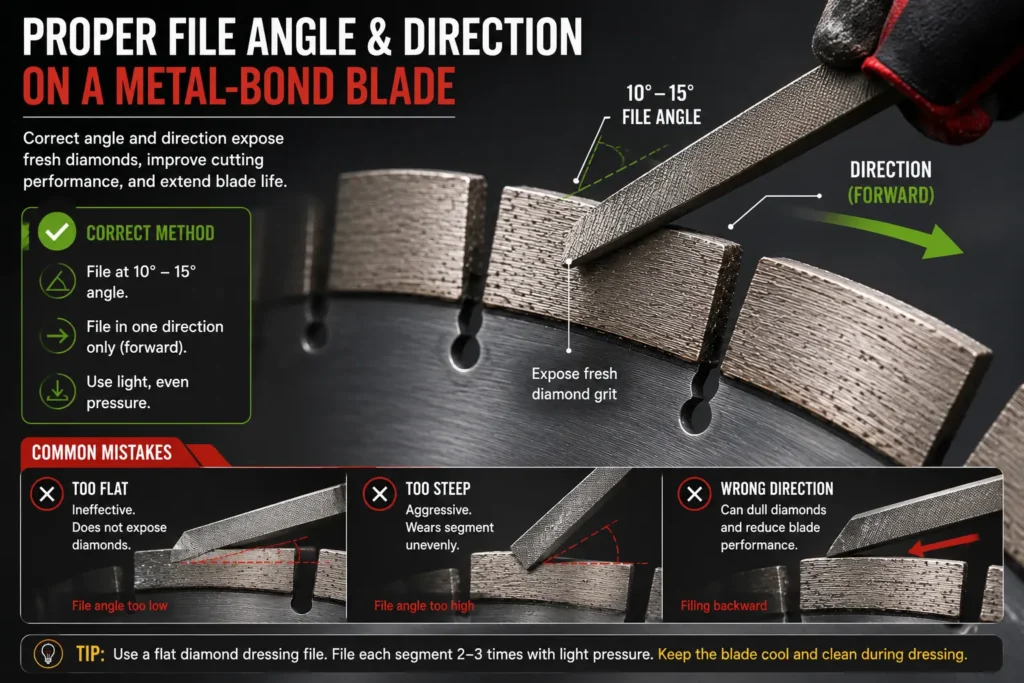
A bastard file can dress light glazing on metal-bond blades but it’s aggressive and easy to overdo. Save it for light glazing when you don’t have a dressing stone on hand.
Hold the file against the side of the segment at a shallow angle and draw it across in one direction. A few light strokes are enough. Check the segment texture after each stroke. Over-dressing removes too much bond and shortens blade life.
Expert Tip: For severely glazed blades, a dressing stone is safer and more effective than a file.

Product Recommendation: A 10-inch bastard file (Nicholson or similar) for occasional light glazing on metal-bond blades.
Method 5: Chemical Cleaning (Mild Soap and Water)
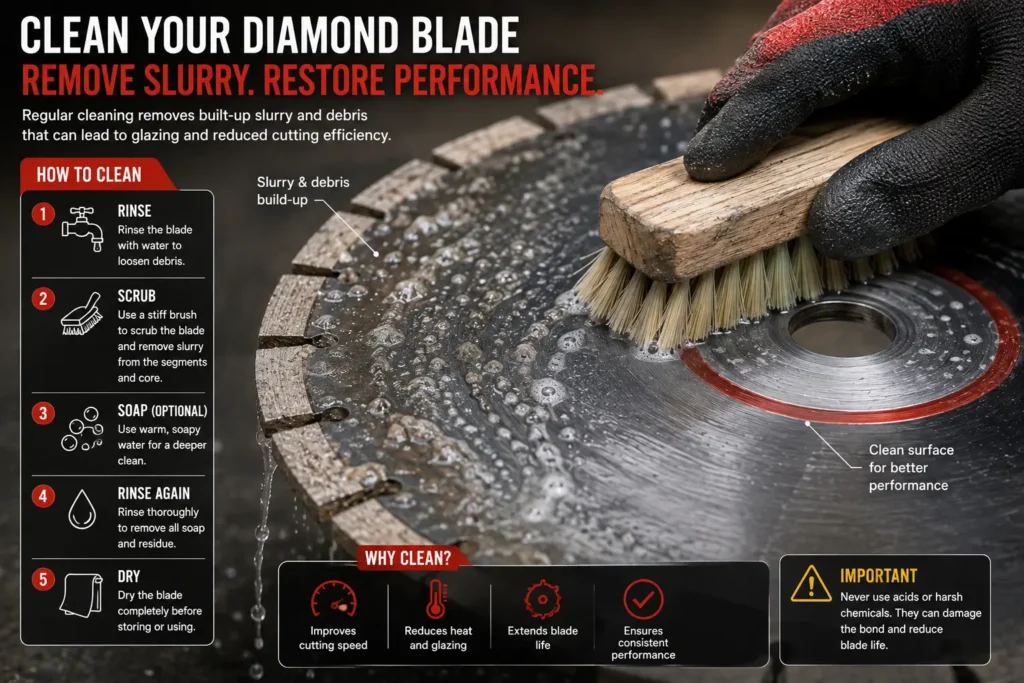
Soap and water is maintenance, not dressing. It removes slurry and debris that build up on the segments and contribute to glazing, but it does not expose fresh diamonds.
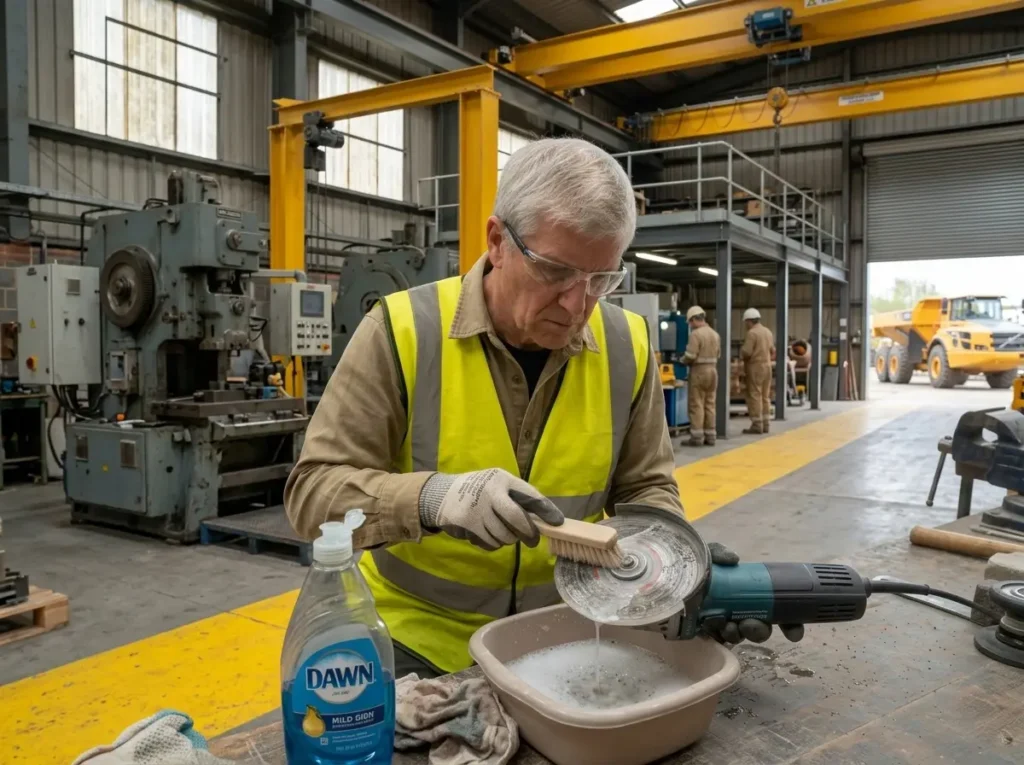
Scrub the blade with a soft-bristle brush and mild dish soap, then rinse and dry. Do this after each use, before the slurry hardens. A clean blade stays balanced and cuts truer.
Expert Tip: Clean blades after each use with mild soap and water to remove slurry and debris before it hardens and causes imbalance.
Product Recommendation: Any mild dish soap (Dawn, Palmolive) and a soft-bristle brush for routine cleaning.
Once you’ve dressed the blade, you need to verify it’s working properly.
Method Comparison Table
To help you choose, here’s a side-by-side comparison.
On a wet-saw job last spring, I watched a colleague swear by a 60-grit dressing stone for everything, while I’d been getting away with an 80-grit rubbing stone on lightly glazed tile blades. The difference wasn’t the tool. It was how severe the glazing was. Match the method to how far gone the blade is, not to what’s hanging on the pegboard; when it’s time for a replacement, a saw blade selection guide can help narrow your choices.
| Method | Effectiveness | Cost | Ease of Use | Best For | Time Required |
|---|---|---|---|---|---|
| Dressing Stone (60-grit) | High for moderate to heavy glazing | Low to moderate | Easy, light even pressure in one direction | Wet saw blades with significant glazing | 1-2 minutes |
| Rubbing Stone (80-grit) | Good for light to moderate glazing | Low | Easy, use water as lubricant | Tile blades with early glazing | 1-2 minutes |
| Abrasive Material (brick/block) | Moderate, on-site dressing | Very low | Very easy, no blade removal | Quick field dressing without removing the blade | Under a minute |
| Bastard File | Aggressive, risks over-dressing | Low | Requires care and a steady hand | Light glazing on metal-bond blades only | 1-3 minutes |
| Chemical Cleaning (soap/water) | Removes slurry and debris only, does not dress | Very low | Very easy | Preventing buildup that leads to glazing | 2-3 minutes |
| Dressing Stick | Re-opens glazed blades | Low to moderate | Easy | General re-opening of glazed diamond blades | 1-2 minutes |
Key Distinction: soap and water cleans. It does not dress. A dressing stick actually re-opens the blade by exposing fresh diamonds, so don’t confuse the two.
After dressing, you need to confirm the blade is actually fixed.
Post-Cleaning Inspection and Testing
Dressing is only half the job. You still need to verify it worked. “Looks shiny, cuts slow,” a tiler muttered at the counter and that one line taught us the whole diagnostic: a glazed segment gleams, a dressed one shows grit.
How to Check if the Blade is Properly Dressed
Look at the segment edge first. A properly dressed blade shows exposed diamond grit, not a smooth, shiny surface. Run a fingertip along the edge: it should feel slightly rough, not slick.
Then make a test cut on scrap material and compare the speed and edge quality against your pre-dressing baseline. Check the blade and the cut for excess heat afterward, because heat signals the blade may still be glazed.
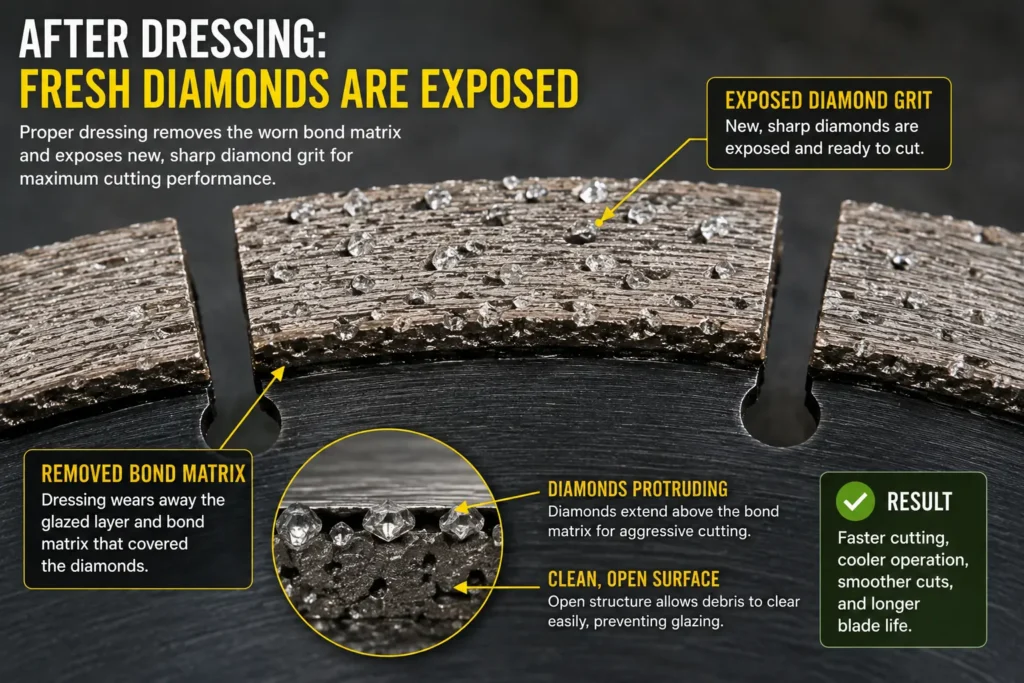
Expert Tip: For severely glazed blades, make multiple light passes with a dressing stone rather than one heavy pass; heavy passes can overheat the segment and damage the bond.
A properly dressed blade still needs ongoing care to stay that way.
Ongoing Maintenance Best Practices
Prevention costs less than dressing. Keep the blade clean and the bond stays open.
I ruined a good blade on a patio job by letting slurry bake onto the segments between cuts. The bond glazed over within a morning, and the blade stopped biting. Now I rinse the blade after every session and wipe the segments dry before hanging it up.
Daily Use, Cutting Techniques, and Storage
Inspect the segments before every use. Look for glazing, cracks or warping. Catching a problem here takes seconds catching it mid-cut costs you a blade.
Cut with step-cutting and light feed pressure. This keeps heat down and stops the bond from smearing over the diamonds. After each session, clean the slurry off the blade so it can’t harden into glaze. Mild soap and water does the job; it removes buildup but doesn’t dress the blade, so don’t count a rinse as a dressing.
Storage matters just as much. Store blades flat or hung by the arbor hole in a dry, temperature-controlled space and never stack anything on top of them. A maintenance log tracking hours and dressing intervals tells you when a blade needs attention before it glazes.

Expert Tip: Hang blades by the arbor hole or store them flat in a dry, temperature-controlled space, and never stack anything on top of them.

Product Recommendation: Lackmond’s Diamond Blade Storage Rack or a simple pegboard system keeps blades separated, dry, and easy to label by type.
Even with good maintenance, problems can still arise. Here’s how to troubleshoot.
Troubleshooting Common Blade Problems
Sometimes a blade has issues beyond glazing. Here’s how to diagnose and fix them.
The smell hit me before I saw the problem, hot metal and scorched bond cutting through the wet-saw spray. I’d been feeding a porcelain tile too hard and the blade was cooking. That acrid note is the signature of overheating, the bond smearing over the diamonds instead of exposing them. Back off the feed pressure, let the water do its job, and the smell clears. If it doesn’t, check the segments.
Segment Loss, Warping, Overheating, and Uneven Wear
Each of these failures has a distinct cause, and each calls for a different response.
Segment loss usually means the bond overheated or the blade ran dry. A missing segment throws the blade out of balance, so stop cutting immediately. Warping shows up as a wobble you can see and hear; a warped core is not repairable. Overheating comes from insufficient water or too much feed pressure, so fix the technique before blaming the blade. Uneven wear often points to arbor or flange problems, so verify mounting before replacing anything.
Check segment height before you do anything else. If segments are worn below 1/16 inch, or if any are missing or cracked, replace the blade. Inspect the core for warping or cracks; a damaged core means replacement, not repair.

Expert Tip: If segments are worn but still above 1/16 inch and the core is intact, a professional re-tipping service can restore an expensive blade at lower cost than replacement.
Still have questions? The FAQs cover the most common ones.
Interactive Blade Health Quiz
Not sure what’s wrong with your blade? Answer three questions and you’ll know whether to dress it or bin it.
On a February patio job in Leeds, I held a blade up to the light and couldn’t tell if the segments were glazed or just worn. The client was waiting, the saw was slow, and I had no quick way to sort it out. That job is why this quiz exists: three questions, thirty seconds, and you know whether to dress or replace.
Three quick checks:
- Does the blade cut slower than it did last week? Yes points to glazing.
- Do the segments look shiny or smooth instead of gritty? Yes means the bond has smoothed over the diamonds.
- Are the edges chipped or missing? Yes signals damage, not wear.
Answer yes to 1 or 2 and you need to dress the blade. Answer yes to 3 and it’s time for a replacement. Chipped or missing segments aren’t fixable with a dressing stone; a blade in that state belongs in the scrap pile.
Once you know the fix, track your maintenance with the downloadable log.
Downloadable Maintenance Log Template
A maintenance log is how you stay ahead of glazing. Grab the template here.
We used to think logging blade hours was busywork until a £40 tile blade glazed mid-job and cost us a full afternoon of rework. The log would have flagged it two cuts earlier. That mistake is why the log is now part of our saw setup, not an afterthought.
The template tracks six fields: blade ID, material cut, hours of use, last dressing date, dressing method, and performance notes. A sample row might read: “B-07, porcelain, 14 hrs, 12 Aug, dressing stick, slight glazing on right side.”
Logging hours and dressing intervals like this lets you anticipate when a blade will need attention, so it never surprises you mid-job.
Download the PDF version or the spreadsheet version and keep it near the saw.
Let’s wrap up with a summary and a printable checklist.
Conclusion and Maintenance Checklist
A glazed blade is almost never a dead blade. Dressing removes only a tiny amount of bond material, so the diamonds underneath are usually still there, waiting to be re-exposed.
Why do so many blades end up in the bin? Because nobody showed the owner that a quick dress brings a glazed blade straight back to full bite.
Replacement is the right call in only a few cases. Swap the blade when segments wear below 1/16 inch, when segments are missing or cracked, or when the core is warped or cracked. Everything else is fixable.
Here’s the five-step maintenance checklist:
- Inspect segments before each job
- Dress when glazed
- Clean slurry after cutting
- Store dry
- Replace when worn
Before you bin a blade, dress it. Most of the time, that’s all it needs.