The wrong blade turns a quick cut into dust, burned edges and a glazed rim. Halfway through a bathroom reno, I swapped the segmented blade for a continuous rim after the third tile chipped at the corner and the glaze on the old rim told me exactly why.
An all purpose diamond blade is a deliberate compromise : it cuts common masonry and tile adequately but excels at none.
Key Takeaways
- Match rim type to your primary material: segmented for concrete/brick, continuous for tile/porcelain, turbo for mixed jobs
- Bond hardness rule: hard material needs a soft bond; soft material needs a hard bond
- Wet cutting is essential for tile and porcelain to prevent chipping and thermal cracking
- Check blade diameter, arbor size, and RPM rating before buying
- An all purpose blade is a compromise; specialized blades win for production work
Segmented, turbo and continuous rims each favor a different material. Bond hardness, not diamond count, decides whether a blade cuts or glazes. This guide maps rim, bond, wet/dry and sizing to your primary material so you buy once and cut clean.
What Is an All Purpose Diamond Blade? (And How Diamond Blades Actually Work)
Before you can choose a blade, you need to know what you’re looking at. A diamond blade looks simple from the outside, but understanding how diamond blades work changes how you choose. The way it works is nothing like a wood saw.
The Basic Anatomy of a Diamond Blade
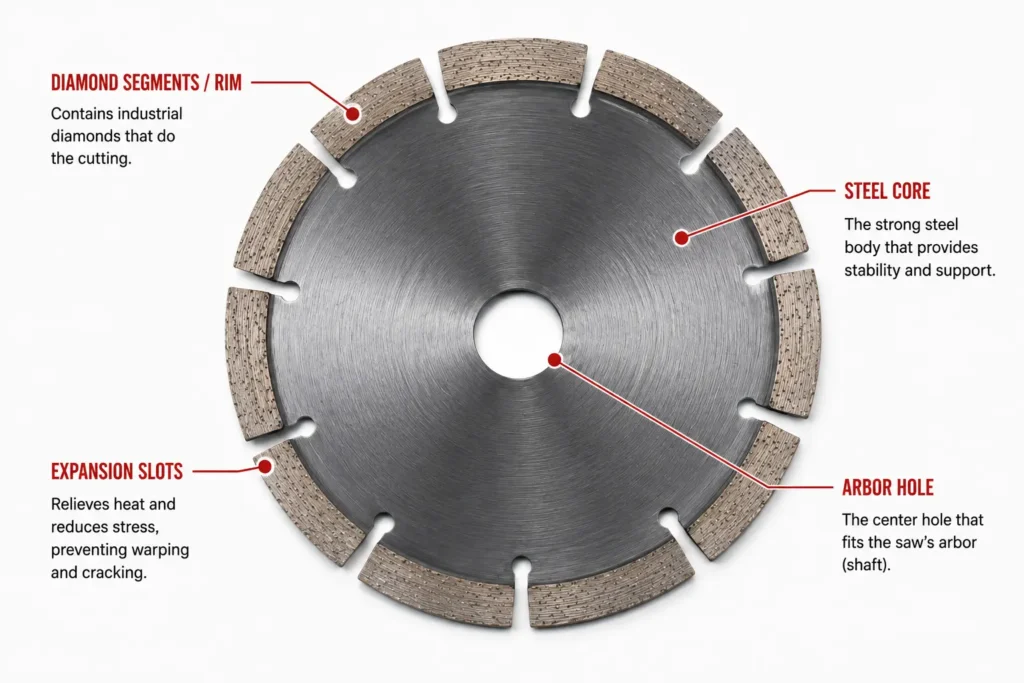
Every diamond blade starts with a steel core, a flat disc that gives the blade its shape and rigidity. Around the rim, the manufacturer bonds diamond-impregnated segments or a continuous rim.
The diamonds are mixed into a metal matrix, and that matrix is what actually touches the material. In the center sits the arbor, the hole that mounts the blade to the saw shaft.
Some blades also have expansion slots cut into the rim, which let the blade flex slightly and shed heat as it spins.
How Diamond Blades Cut: The Wearing-Away Mechanism
Most people get this wrong. A diamond blade does not cut the way a wood blade does. It grinds. The exposed diamonds on the rim scratch and abrade the material, turning it to dust. As the blade works, the metal bond around those diamonds wears back, which exposes fresh, sharp diamond underneath. That wearing-away cycle is the whole trick.
When the bond wears at the right rate, the blade keeps cutting. When it stops wearing, the dull diamonds stay trapped and the blade glazes over: slow cutting, heat buildup. When the bond wears too fast, the diamonds fall out before they do their work and the blade dies early. Both problems are bond issues, not diamond issues.
We have learned to distrust any blade that promises to do everything brilliantly. The OX Trade 8-inch turbo universal blade claims fast performance across concrete, granite, brick, and general building materials, and on a mixed job it does move through all of them. But the claim hides a trade-off: it is tuned for speed, not finish, so the same blade that chews through a concrete block leaves a rougher edge on a granite tile than a dedicated continuous rim would. That is not a defect. It is the honest cost of the word “universal.”
What “All Purpose” Really Means (and What It Doesn’t)
An all purpose blade is a deliberate compromise. It cuts common masonry and tile materials adequately, but it excels at none. That is not a criticism. It is the design brief. If your week involves a bit of concrete, some brick, and the occasional tile, one all purpose blade saves you from swapping blades or buying three. If your job is mostly one material, a specialized blade will cut faster, last longer, and leave a cleaner edge.
Wet/dry compatibility and a universal 5/8 to 7/8 inch arbor let one blade work across angle grinders and circular saws, but you still need to match the blade’s RPM rating to the saw. A blade rated below the saw’s speed is a safety risk, not a convenience.
The three rim types determine how a blade cuts, and each one changes the compromise.
The Three Rim Types Explained: Segmented vs Turbo vs Continuous Rim
Rim type determines how a blade cuts and what finish it leaves. There are three, and each has a clear job.
Segmented Rim Blades: The Aggressive Workhorse
A segmented rim blade has deep gaps cut into its edge, dividing it into distinct teeth. Those gaps do two jobs: they let air flow through to cool the blade, and they give debris somewhere to go as the blade chews through material. Segmented blades are the fastest, roughest cutters you can buy. They bite into concrete, brick, and block without slowing down, and the rough finish rarely matters on masonry, where you are usually cutting for structure, not appearance.
The trade-off is control. A segmented blade vibrates more and can chip the edge of a cut, which is fine on a foundation block and a disaster on a glazed tile. If your work is mostly concrete and block, this is the blade you want.
Product Recommendation: A segmented rim general purpose diamond blade for concrete, brick, block, and masonry, verify specific brand models and prices before publication.
Turbo Rim Blades: The Balanced All-Rounder
A turbo rim blade has a serrated edge, a continuous rim with small notches cut into it. The serrations reduce friction like segments do, but the edge stays in continuous contact with the material, which keeps the cut smoother. That is the whole idea: faster than a continuous rim, smoother than a segmented one.
Why does a turbo blade not chatter the way a segmented one does? The answer is in the edge itself. The serrations break up the contact just enough to let heat and dust escape, but the rim never fully leaves the material, so the blade does not bounce. I learned this on a job cutting granite countertop offcuts with an OX Trade 8-inch Turbo Universal blade, and the difference in finish was immediate.
The same blade then went straight onto a stack of engineering bricks without a complaint. That is the real differentiator the marketing never spells out: a turbo blade is the only rim type that lets you move between hard stone and rough masonry without swapping blades or accepting a ragged edge.
Expert Tip: For mixed-material jobs, a turbo rim blade is often the best all-round compromise between cut speed and finish quality, but if your job is mostly concrete and block, a segmented blade will outlast and out-cut it.

Product Recommendation: For faster cutting with a smoother finish on hard materials, consider a turbo rim blade like the OX Trade 8-inch (200mm) Turbo Universal Diamond Blade, which runs wet or dry on angle grinders and saws with a 5/8″, 7/8″ arbor and cuts concrete, granite, engineering brick, clay products, and general building materials.
Continuous Rim Blades: The Precision Finisher
A continuous rim blade has no gaps at all. The edge is one smooth, unbroken band of diamond, so it never catches or chips the material. That is what you need for tile, porcelain, and stone, where a chipped edge ruins the piece. The cost is speed. With no gaps for cooling or debris clearance, a continuous rim cuts slower and runs hotter than the other two types.
That heat is the reason water matters here. A continuous rim blade running dry on porcelain is a fast way to crack the tile and glaze the blade. Run it wet whenever you can.
Expert Tip: Use water whenever possible for tile and porcelain to control heat, reduce dust, and prevent chipping, a continuous rim blade running dry on porcelain is a fast way to crack the tile and glaze the blade.

Product Recommendation: A continuous rim diamond blade for clean, chip-free cuts on tile, porcelain, and stone, verify specific brand models and prices before publication.
Blade Type Comparison Table
| Blade Type | Best Materials | Cut Speed | Finish Quality | Wet or Dry | Typical Use Case |
|---|---|---|---|---|---|
| Segmented rim | Concrete, brick, block, masonry | Fastest | Rough, may chip edges | Typically dry | Demolition, foundation work, rough cuts |
| Turbo rim | Concrete, granite, brick, mixed materials | Fast | Smoother than segmented, rougher than continuous | Wet or dry | Mixed-material jobs, general building work |
| Continuous rim | Tile, porcelain, stone | Slowest | Smooth, chip-free | Best wet, can run dry | Precision tile and stone cutting |
Expert Tip: If you’re only buying one blade and your projects bounce between concrete, brick, and the occasional tile, a turbo rim is the safest default. It won’t be perfect on porcelain, but it won’t destroy it either.
With rim types clear, the next step is matching the blade to the specific material you’re cutting.
Material-to-Blade Matching Guide
Concrete, Brick, and Block
These are soft, abrasive materials. They chew through a blade’s bond fast, which is exactly what you want. A segmented rim is the standard here: the gaps between segments clear dust and let the blade run cool. 5/8-inch arbor on the grinder, and the segmented rim bit into the block like it was meant to.
A turbo rim gives you a cleaner edge if you’re cutting block that will stay visible. A continuous rim is the wrong tool. It loads up with dust, overheats, and glazes over in minutes.
Tile and Porcelain
Tile and porcelain are hard and brittle. Force them and they crack before they cut. For finished work, a continuous rim is the only choice: the unbroken edge delivers a smooth, chip-free line, which is the key to learning how to cut porcelain tile without chipping. Wet cutting is essential here, both to keep the blade cool and to keep silica dust down. A turbo rim works for rough cuts where the edge will be hidden, but it will chip the glaze on anything visible.
Expert Tip: Let the diamond segments do the work. Back off at the first sign of resistance or slowing, because forcing a continuous rim through porcelain cracks tiles and glazes the blade.
Granite and Natural Stone
Granite and dense natural stone sit at the hard end of the scale. They need a soft bond so the metal matrix wears away and keeps exposing fresh diamond. For countertops and finished edges, a continuous rim gives the cleanest cut. When speed matters more than finish, a turbo rim cuts faster but leaves a rougher edge.
Asphalt and Green Concrete
Asphalt and green concrete are soft and abrasive, so they wear a blade down quickly. You need a hard bond that resists that wear. A segmented rim is the standard here: it clears the heavy dust load and keeps cutting.
This is where the all-purpose blade shows its limits. A blade set up for asphalt will glaze on porcelain. A blade set up for porcelain will wear out fast on asphalt.
Expert Tip: Match bond hardness to the material: soft bond for hard, dense porcelain and granite; hard bond for soft, abrasive asphalt, green concrete, brick, and block.
Quick Decision Path: From Your Saw and Project to the Right Blade
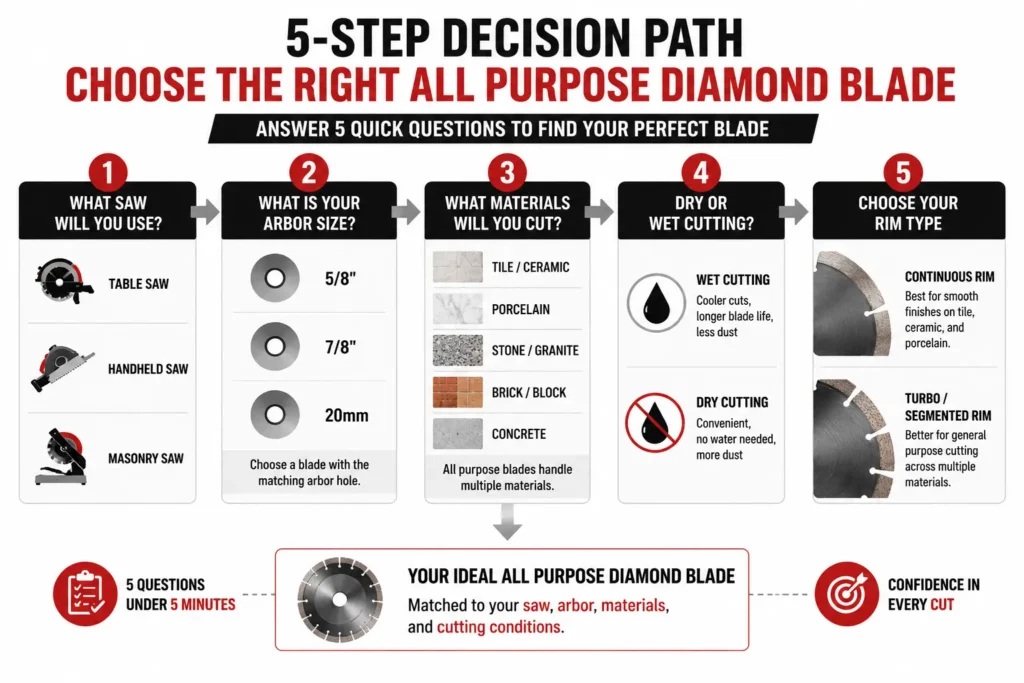
Five steps, under five minutes:
- Identify your saw: angle grinder or circular saw.
- Check the arbor: 5/8″ or 7/8″ for angle grinders; 5/8″ or diamond-shaped for circular saws.
- Name your primary material: the one you cut most often.
- Match the rim type: segmented for concrete, brick, block, asphalt and green concrete turbo for balanced speed and finish; continuous for tile, porcelain and stone.
- Confirm the bond: soft bond for hard material, hard bond for soft material.
Bond hardness deserves a closer look, because it determines how long your blade lasts and how well it cuts.
Bond Hardness Explained: Why It Matters More Than You Think
Bond hardness is the single most important factor for blade life and performance, yet most guides skip it, and matching bond hardness to material is the first step to getting it right. They cover rim types and arbor sizes and leave you guessing why one blade dies in a weekend while another lasts a season. The answer sits in the metal matrix holding the diamonds. Once you understand it, every blade purchase gets easier.
Soft Bonds vs Hard Bonds: The Core Concept
The bond is the metal matrix that holds the diamonds in place on the rim. A soft bond wears away fast, shedding worn diamonds and exposing fresh sharp ones underneath. A hard bond wears slowly, holding each diamond longer before it releases.
The rule that trips people up is the inverse one: hard material needs a soft bond, soft material needs a hard bond. It feels backwards until you see why it works.
Hard materials like porcelain and granite dull diamonds quickly, so the bond has to wear fast enough to keep exposing new cutting edges. Too hard a bond traps the dull diamonds and the blade stops cutting.
Soft materials like asphalt or green concrete wear the bond slowly, so a hard bond keeps the diamonds in place longer instead of letting them fall out before they’ve done their work.
The first time I put a general purpose blade on a porcelain tile job, the cut started fine and then just stopped. The rim went shiny, the grinder bogged down, and the tile got hot enough to scorch. I’d assumed one blade would handle everything, but the bond was too hard for the material. A softer bond on the next blade chewed through the same tile without complaint. That mistake is why I now check bond hardness before rim type on any new material.
Matching Bond Hardness to Your Material
Here’s the practical mapping:
- Porcelain and granite: soft bond. These are the hardest materials you’ll cut, and they dull diamonds fast.
- Concrete and brick: medium to hard bond. They’re abrasive but not brutal, so a balanced bond works well.
- Asphalt and green concrete: hard bond. These soft, abrasive materials wear the bond quickly, so you want the diamonds to stay put.
- General purpose mixed work: medium bond. It’s the compromise that handles most common masonry and tile without glazing or wearing out too fast.
Expert Tip: If a blade glazes over, dress it by cutting a cinder block or brick to expose fresh diamond. That’s the quick fix for a blade that’s still in good shape.
How to Recognize Glazing and Rapid Wear
Glazing shows up as a shiny, polished rim, a slow cut, and heat building up in the material. The diamonds are still there, but they’re dull and trapped. The fix is dressing the blade against something soft and abrasive, which wears the bond just enough to expose fresh diamond.
Rapid wear looks different. You’ll see the diameter shrinking, the segments getting thin, and a lot of dust coming off the cut. That means the bond is too soft for the material and the diamonds are falling out before they’ve done their work. The fix is moving to a harder bond.
With bond hardness understood, the next decision is whether to cut wet or dry, which affects both blade life and finish.
Wet vs Dry Cutting: What You Need to Know
Bond hardness controls how fast the rim wears. Water changes that equation entirely, so it pays to know when to use it and when to skip it.
When to Cut Wet (and Why It Matters for Tile and Porcelain)
Wet cutting is the default for tile and porcelain, and for good reason. Water cools the rim, which stops the bond from overheating and glazing over. It also knocks down silica dust at the source.
The OSHA silica standard sets a permissible exposure limit of 50 micrograms per cubic meter, and wet cutting is one of the most effective ways to stay under it.
A wet blade lasts longer, too, because the diamonds stay sharp instead of burning off in a hot, dry cut.
For porcelain especially, wet cutting prevents thermal shock. Porcelain is dense and hard. A dry blade builds heat fast, and that heat can crack the tile or chip the glaze. Water keeps the cut cool and clean.
Expert Tip: Use water whenever your saw and blade allow it, especially for tile and porcelain, to control heat, cut silica dust, and extend blade life.
When Dry Cutting Is the Right Call
Dry cutting suits outdoor masonry and demolition. A segmented rim sheds heat through the gaps between segments, so a dry cut on brick or concrete block is workable. Dust control matters less outdoors, and hauling water to a demolition site is rarely practical.
On the patio extension I did last June, I cut forty-odd concrete blocks dry with a segmented blade. The consensus says wet cutting always extends blade life, but my blade showed no glazing after the job and cut just as fast on the next project. For short outdoor runs, dry cutting with a segmented rim is a legitimate call, not a compromise.
Take breaks between cuts so the rim can cool. And never dry cut porcelain with a continuous rim unless the blade is explicitly rated for it.
How to Check If Your Blade and Saw Support Wet Cutting
Check the blade’s marking before you add water. Blades are stamped wet, dry, or wet/dry. A wet/dry blade gives you the most flexibility, and choosing between a wet or dry tile saw depends on the job. Sonmak’s circular-saw blades, for example, are wet/dry compatible for concrete, tile, and stone, so you can switch between methods without swapping blades.
The saw matters as much as the blade. Tile saws are built for wet cutting, with a water tray and pump. Angle grinders are dry tools by design; running water on one risks the motor and the operator. Never run water on a saw not designed for it.
Product Recommendation: A wet/dry compatible diamond blade rated for concrete, tile, and stone, like Sonmak’s circular-saw blades, lets you switch between wet and dry cutting without swapping blades.
Wet or dry, none of it matters if the blade doesn’t fit your saw. That’s the next thing to check.
Blade Size, Arbor, and Saw Compatibility
A blade that doesn’t fit your saw is useless and dangerous, and the same arbor and sizing checks apply to diamond core drilling bits. Here’s how to match them.
Blade Diameter: Matching the Blade to Your Saw
Your saw has a stated blade capacity, and the blade diameter must match it. Never remove the guard to squeeze on an oversized blade. The guard catches a shattered segment and keeps your fingers out of the rim. An oversized blade also spins faster at the edge than the saw was designed for, so the guard won’t cover it anyway.
Arbor Size and Arbor Bushings
“That blade’s not going on our grinder,” a bricklayer told us on a patio job, and he was right. The 7/8″ arbor needed a bushing before it would seat on the 5/8″ shaft.
Angle grinders commonly take 5/8″ or 7/8″ arbors. Circular saws use 5/8″ or diamond-shaped arbors. When the blade’s hole is larger than the shaft, you need a bushing, a metal ring that fills the gap. A loose fit lets the blade wobble, which chews up the arbor and can throw the blade.
RPM Ratings and Safety Limits
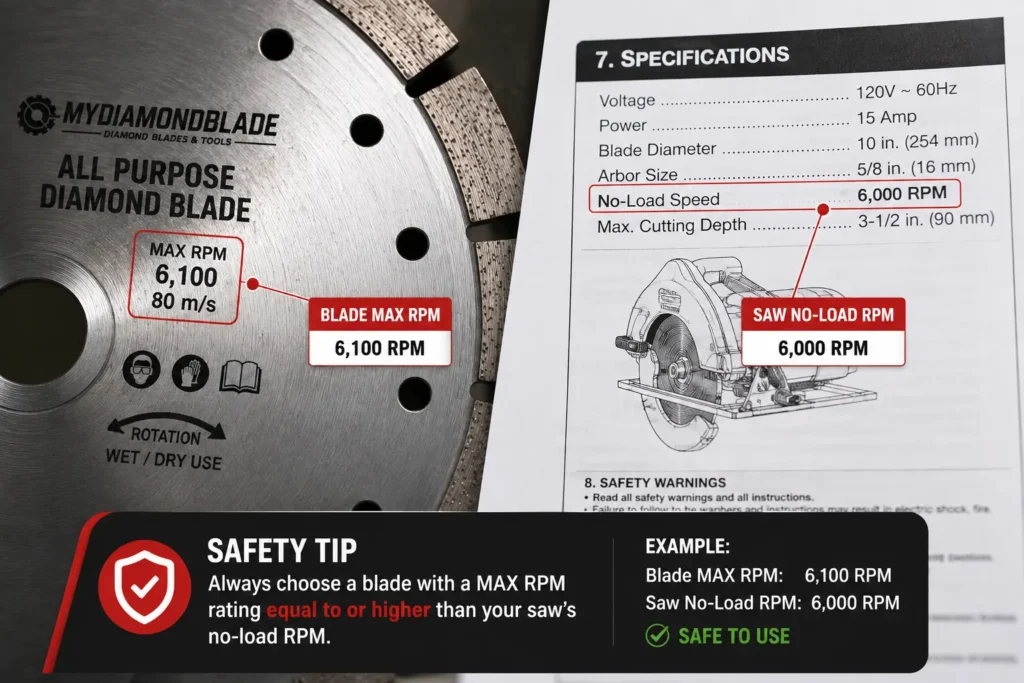
Every blade has a max RPM printed on it. Your saw’s no-load RPM must sit at or below that number. Exceed it and the rim can fly apart. Check both numbers before you mount anything.
Expert Tip: Match blade diameter and arbor to your saw, and use the correct bushing when the hole is larger than the shaft. A poor fit is a safety hazard, not just an inconvenience.
Product Recommendation: Check your saw’s arbor and diameter specs before buying; the OX Trade 8″ Turbo Universal’s 5/8″, 7/8″ arbor and wet/dry rating make it a practical reference for mixed jobs.
With the right blade fitted, it’s time to learn how to use it safely.
How to Use an All Purpose Diamond Blade Safely (Step-by-Step)
The right blade only helps if you use it right. Here’s the routine I follow before and during every cut.
Pre-Use Inspection and Setup
I skipped the arbor check on a rush job cutting clay pavers, and the blade wobbled enough to chip the edge of every third cut. The fix was a 30-second look at the hole before mounting, and I have not skipped it since. Confirm the arbor size matches your saw shaft, and check the blade’s max RPM rating against your saw’s no-load speed. The saw must run at or below the blade’s limit. Mount it securely, then make sure the guard sits square over the modern.
Expert Tip: Check the blade before every use for cracks, missing segments, or a worn or oversized arbor hole, and replace damaged blades immediately. This 30-second check prevents most blade-related accidents.
Breaking In a New Blade
A fresh blade has diamonds buried under the bond. Light cuts in a soft abrasive material, like a common brick or block, wear that bond back and expose the modern. Skipping this step is a common cause of early glazing.
Expert Tip: Let a new blade break in by making a few light cuts in a soft abrasive material first to expose fresh diamond, since skipping this step is a common cause of early glazing.
Cutting Technique: Let the Blade Do the Work
Use shallow, straight passes and keep the blade moving. If it slows or resists, back off the pressure. Forcing it is the fastest way to overheat, warp, or kick it back.
Expert Tip: Never force the blade. Let the diamond segments do the work, and back off if you feel resistance or see the blade slow down, because forcing it is the fastest way to overheat, warp, or kick it back.
Safety Gear and Blade Guard Essentials
Wear safety glasses, a dust mask, hearing protection, and gloves. Keep the guard on. Stay out of the kickback line, especially when dry cutting masonry.
Expert Tip: Keep the blade guard on and wear safety glasses, a dust mask, and hearing protection, especially when dry cutting masonry, because silica dust from dry cutting concrete is a serious long-term health hazard.
Product Recommendation: Personal protective equipment (safety glasses, dust mask, hearing protection, and work gloves) is non-negotiable for safe diamond blade use, especially for dry cutting.

Even with perfect technique, problems can arise. The next section covers troubleshooting common issues.
Common Problems and Troubleshooting
Even with the right blade and technique, things go wrong. Here’s how to diagnose and fix the most common failures.
Overheating and Warping
An overheated blade shows it fast. The steel body blues or browns near the rim, the cut wanders, and the blade can warp enough to bind. The usual cause is too much pressure on a dry cut with no breaks. Back off the pressure and let the blade cool. Cutting concrete or brick? Add water or switch to a wet-rated blade. A warped blade is done. Replace it.
Glazing and Loss of Cutting Speed
The rim goes shiny, the cut slows to a crawl, and the blade gets hot instead of biting. That is glazing: the bond stops wearing and the dull diamonds stay trapped.
It happens when the bond is too hard for the material, or when a new blade never got its break-in cuts. On a run of concrete cuts, the blade’s whine changed pitch and the rim turned mirror-smooth after the third pass. The diamonds were still there, just buried.
A few passes through a soft cinder block dressed the blade and the bite came back. If dressing doesn’t fix it, the bond is too hard for what you’re cutting. Switch to a softer bond.
Expert Tip: If a blade glazes over, dress it by cutting a soft abrasive like cinder block or brick to expose fresh diamond. That is the quick fix for a blade that is still in good shape.
Uneven Wear and Chipping
One-sided wear or chipped edges usually points to the arbor or the cut itself. A loose arbor lets the blade wobble and wear unevenly; use the correct bushing and tighten the nut. Twisting the saw mid-cut loads one side of the rim. And an aggressive segmented blade on tile will chip the glaze, so switch to a continuous rim for clean edges.
Kickback and Safety Incidents
Kickback is the saw jerking back at you. It is almost always binding, twisting, or a dull blade. Keep the cut straight, let the blade do the work instead of forcing it, and replace a blade that has stopped biting. A firm two-hand grip and a stable stance give you the control to ride out a bind.
Troubleshooting is reactive. The next section shows what one blade can actually do when it’s put to the test across multiple materials.
Real-World Material Test Summary: One Blade Across Four Materials
Theory only gets you so far. Here’s what happened when I ran one all purpose blade across four common materials.
Test Setup and Method
The fair test is simple: one all purpose segmented blade, one angle grinder, four scrap pieces. A concrete paver, a clay brick, a ceramic wall tile, and a porcelain floor tile. Same blade, same saw, same operator pressure.
I judged each cut on three things: how fast it bites, how clean the edge comes out, and how much diamond the blade gives up doing it.
The blade cost me about the price of two takeaway coffees, and by the end of the afternoon it had chewed through all four materials and still had life left in it, which told me more than any spec sheet could.
Results by Material
Concrete cuts steadily. The segmented rim clears dust well, so the blade keeps biting without glazing over. Speed is good, chipping is minimal on a paver, and wear is moderate.
Brick is even easier. It’s softer and more abrasive, so the blade cuts fast and the bond wears just enough to keep fresh diamond exposed.
Tile is where the compromise shows. The segmented rim chips the glazed surface on the exit side of the cut. Speed is fine, but the edge is rough.
Porcelain is the real test. It’s dense and hard, so the blade slows down, runs hotter, and the segments wear faster. The cut is clean enough for a hidden edge, but not for a visible one.
What the Test Reveals About All Purpose Blades
The all purpose blade is adequate across all four materials and excellent at none. It handles concrete and brick without complaint. It gets through tile and porcelain too, but the chipping on tile and the slower, hotter cuts on porcelain show where a continuous rim or a harder bond would earn its money.
So the decision comes down to your job. Mostly concrete and brick with the odd tile? One all purpose blade does it. Cutting porcelain or glazed tile where the edge will be seen? A specialized blade is worth the extra cost.
When to Replace Your Blade: Wear and Safety Signs
A dull blade is more than slow. It’s a hazard. Here’s how to spot one.
Worn Segments and Reduced Cutting Speed
Check segment height against the steel core. When the diamonds sit nearly flush, cutting slows and heat builds fast. The segment on my grinder blade sat flush with the steel core, and the cut had slowed to a crawl.
I kept pushing, thinking the blade just needed more pressure. The steel core started to glow faintly at the edge, and the blade wobbled in the cut.
That was the moment I learned: a worn segment does not just cut slow, it cuts dangerous. Push past that point and you risk losing a segment mid-cut. That means shrapnel.

Expert Tip: Store blades flat or hung in a dry place, and never stack heavy objects on them. Warped blades cut crooked and are unsafe.
Cracks, Missing Segments, and Damage
Inspect for cracks, missing segments, or a worn arbor before every job. Any of these means stop and replace. A cracked segment can fly off at speed. A worn arbor lets the blade run off-center, which loads the rim unevenly and invites failure. A warped blade cuts crooked and is unsafe.
The Cost-Per-Cut Perspective: When a New Blade Pays for Itself
Price alone tells you nothing. Compare blade cost against total linear feet cut instead. A quality blade often costs less per cut than a string of cheap replacements, and it saves you the mid-job swap. For mixed DIY work, a mid-range all-purpose blade is usually the best value. Production cutting is different; there, a specialized blade can earn its keep.
Conclusion
Choosing an all purpose diamond blade comes down to three matches: rim type, bond hardness, and wet/dry use against your primary material. Get those right, and one blade will handle most mixed jobs.
Which spec actually mattered on site? Rim type, every time. The rest was noise until a blade glazed over. Remember what an all purpose blade is: a deliberate compromise. It cuts common masonry and tile adequately and excels at none. Buy one for mixed work, then reach for a specialized blade when a single material dominates the job.